
CO-STORE USER GUIDE
This guide will walk you through setting up and managing your co-store company stores through the
company store manager.
Upon entering your Administrative Level user name and password, you will land at the Distributor
Landing Page. The Bright Stores system works in a hierarchal flow. The additions and changes that you
make at this level of your Distributor Landing page will “trickle down” and be available for all stores in
your system.
The blue bar across the top of the control panel is called the Navigation bar. This contains bread crumb
trail navigation showing where you are currently and how you got there in the system. Use the bread
crumbs to get back to the distributor level (maybe to set up size groups or shipping categories), the
general store level (will show in the navigation bar as the store name, and shows all main tabs for that
store), or any other tab you would like to access.
CREATING/EDITING STORES
STORES TAB – DISTRIBUTOR LEVEL
Click on the Stores tab to view all stores that you have set up in the system. To the right of each store
it will say either Active, indicating that the store is turned on and may be viewed from the store front,
or Inactive, indicating that the store is not turned on.
To add a new store contact Bright Stores. Once you have additional stores available in the Bright
Stores system, you may set the store up. To do so, click on the Stores tab and then click on the New
Currency Store button. This will land you at the Stores Edit Tab (see instruction below to begin setting
up your store).
To edit an existing store, click on the store name to open that store. This will land you at the stores
Details Tab (see instruction below for Details tab).
ACTIVATE/DEACTIVATE YOUR COMPANY STORE
Active refers to all stores listed under “Active Stores” in your Company Store Manager Stores tab. If the
store is accessible in the company store manager but you have not made it live to your customer you
are still using the system and are therefore a fee is incurred for the store.
If you are not using your store and do not want to be charged for it, simply make your store inactive by
following these steps:
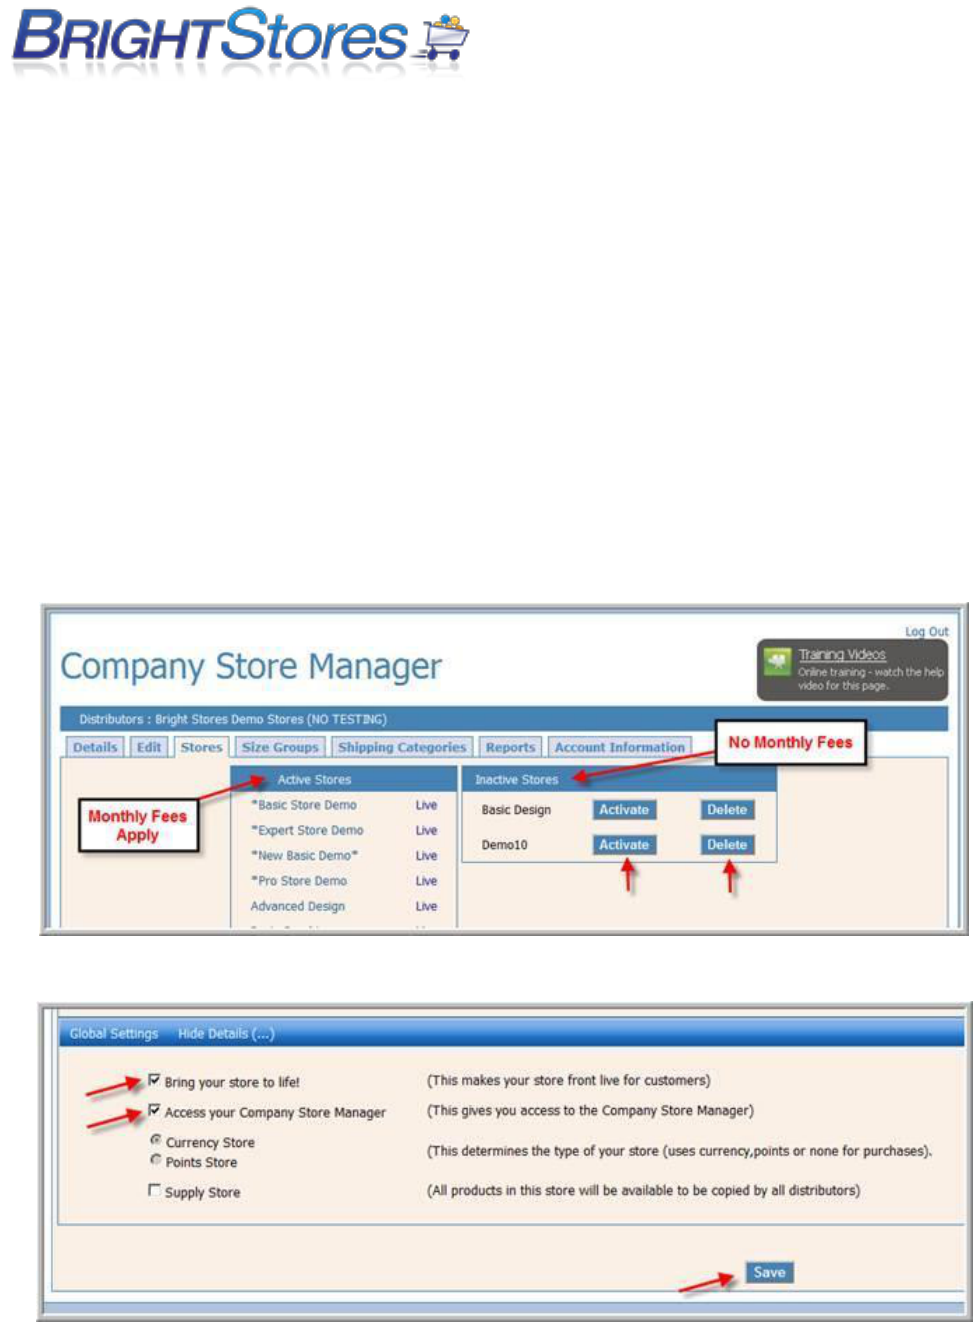
Step 1: Log in to the Company Store Manager,
Step 2: Click on the Stores tab,
Step 3: Select the store you wish to manage
Step 4: Select the Edit Tab and scroll to the bottom of the page,
Step 5: Click on Global Settings. Uncheck both the “Access the Company Store Manager” and the “Bring
your store to life” boxes. Click on Save. You should now see that store move to the Inactive category.
You may reactivate your store at any time. Simply click on Activate next to the store name, under the
Inactive Stores section of the Stores tab.
If you want to allow your store to be viewed by customers, you will need to click on the “Bring you
store to life” box under Global Settings.

STORE DETAILS TAB
When you click on a store name in the Stores tab at the Distributor level, you will land at the Details
Tab. This tab has three different sections.
General Information Notes may be left here by entering them into the Store Details Page Text box in
the Edit page of the store. This information does not show up in the store front.
Featured Products - If the Featured Products feature was selected at the Edit page of the store, you can
select the products which to feature here.
Procedure:
Under Select Featured Products you will see a drop down menu. This contains all of the products that
you have loaded into the store. From the drop down menu, click on the product you wish to
feature. Click on the Add button. Follow the same steps to add additional products to the featured
products list.
This will add a new box called the Featured Products Selected box. This will list all products that you
have chosen to feature. To remove a product from the featured products list, check the box to the left
of the product name and click on the Remove button. This will remove that product from the Featured
Products list.
Custom Images Here you can upload images that are to be used in HTML content. Once uploaded, you
may right click on the image to view and copy its properties. The HTML code may be entered in the
Content tab (see Content tab for instructions).
Custom Images are for html content ONLY. DO NOT upload product images here.
To upload images, click on the Browse button, find your image file and click the upload button.
STORE EDIT TAB
When you click on New Currency Store in the Stores tab at the Distributor level, you will land at the
Edit Tab.
Now you are ready to begin setting up your store.
THE ABSOLUTE, MOST IMPORTANT THING TO REMEMBER IS TO SAVE YOUR WORK EACH TIME YOU
EDIT, ADD OR DELETE.
THE SAVE BUTTON IS LOCATED AT THE BOTTOM OF THE EDIT PAGE TAB.

In order to begin setting up your store, you will see five categories of information which need to be
supplied. The categories are:
Profile
The Profile category is the nuts and bolts of your system. In this section, you name your store
and provide the necessary email and URL addresses.
Design
The Design category is where you set up how your store will look (its colors and graphics).
Features
The Features category allows you to assign the available features of Bright Stores to your
store.
Page Text
Store Details Page Text: This area is for keeping notes in the Control Panel. The notes show up
under the Details tab in the control panel. Notes written in this area do not show up in the
storefront.
Delivery Date Suggestive Text: Notes that show up in the store near the shipping section of the
checkout page. Can use this field to suggest customers click on calendar to request a shipping
date.
Manage Store Global Settings
Determination of how the store is to be used is defined.
Below will walk you through the steps necessary to complete the required fields to properly configure
your company store.
PROFILE SECTION
Lets begin with the first category, Profile. Within the Profile category, all fields may be left blank
except for the following mandatory fields:
Store Name, Company Name and Landing Page
By leaving a field blank, you are simply choosing not to use the feature.
Store Name (Mandatory Field)
Type in exactly how you want your store named at the Bright Stores Control Panel. This will not show
up at the storefront. However, it will display on e-mails sent to store shoppers.

Company Name (Mandatory Field)
Enter your Company Name. This does not display on the storefront or on e-mails that come from the
store.
Landing Page (Mandatory Field)
In the Landing Page field, you enter your stores URL address, or website address. Begin your address
with the / (forward slash).
For example, our hypothetical store address might be:
http://www.co-store.com/wonderstore
Under the Landing Page field, you would enter:
/wonderstore
Handling Fee
You may wish to add a handling fee to each order. If so, enter the dollar amount here. Be sure to
include two decimal places.
For example: 10.00 If you do not wish to charge a handling fee, leave the field blank.
Less than Minimum Order Total:
If you wish to impose a determined minimum order dollar amount, you may enter that dollar amount
here. If a placed order is less than the minimum you set, a fee will be charged (see less than Minimum
Order Total Fee below). Be sure to include two decimal places.
For example: 100.00
Less than Minimum Order Total Fee:
If you wish to charge a fee on orders which are less than the determined minimum order total, you
may enter the fee here. Be sure to include two decimal places.
For example: 25.00
From Email:
When shoppers receive e-mails from the store, they will be from the e-mail address that you enter
here. When customers reply to your emails this field is the address they will see. Enter your address
exactly.
Account Request Email
This field pertains to Private Stores only. When customers wish access to the private store, this
address is where they will send their request for access permission. Enter the address exactly.
Order Email
This is where you enter the address of the person(s) you wish to receive a copy of the order for
fulfillment or otherwise. Enter the address(s) exactly and separate multiple addresses with semicolons.

Inventory Email
If you plan to utilize Inventory Triggers to alert you of low inventories, enter the email address where
you would like notification sent. Enter the address exactly.
Note: Inventory Emails are pro level store feature.
DESIGN SECTION
The Design category sets up how you want your site to appear to your customers. The Design category
allows you to choose color schemes and upload graphics.
Choose a Navigation Template
Choose a Navigation Template allows you to decide where you want the Navigation bars to
appear. You have several options to choose from in the drop down menu:
Top and Left
The Navigation bars will be displayed along the top of the page and along the left of the page.
Left
The Navigation bars will be displayed only along the left of the page.
Top and Left + Commerce
The Navigation bars will be displayed along the top of the page and along the left of the
page. Commerce adds in additional navigation within the header; this must have the right kind
of style sheet and header graphics to work correctly. The Header will include the following
navigation:
Prior to login: Home, Log In, Shopping Cart.
After the shopper logs in: Home, Log Out, Shopping Cart, My Account, My Orders, Artwork, and
any Gift Certificate or Budget amounts that may be set for this shopper.
For Example: If you have a lot of Content Pages you may use Top and Left + Commerce to avoid
having the navigation stack up.
Top and Right
The Navigation bars will be displayed along the top of the page and along the right of the page.
Top Only
The Navigation bars will only be displayed along the top of the page. They will stack one on top
of the other.
Choose a Color Scheme
Color Scheme is an area that includes a choice of standard, stock style sheets. Each style sheet consists
of various colors, fonts, shading, etc. Click on the drop down menu to view and select Color Scheme
choices.
Custom style sheets may be created for the customer at an additional cost. Please call Bright Stores
Customer Service for details.
Choose a Store Graphic Area
The first thing to do in the graphics area is to create a graphic for each area you would like a graphic to
be seen. Refer to the Graphics Specifications for the correct file type and sizing for each graphic
area. Once your graphics are created, you may upload them. Choose a location to upload the graphics
from the drop down menu.
If you choose to incorporate HTML into your Home Page, Header, Footer, etc. you can do so under the
Content tab in the control panel. See “COMPANY STORE DESIGN AND LAYOUT” below for more
information.
FEATURES (BASIC, PRO, & EXPERT)
Within Features, checking boxes allows you, the administrator, to turn a particular feature on or off. At
this step you are simply determining exactly what features you will want in your store; later you will
enter the specifics.
Please note: not all features are available for all stores. You may not see all options listed below in
your store. For example:
Budget
You should click the Budget button under Expert Features if you know that an individual or a user
group has specific budgets which should not be exceeded. In another step later in the Company Store
setup process, you will define the individuals and the groups, and assign specific dollar amount
budgets. Do not be concerned about the specifics right now, just make the decision if you need this
feature, or not.
Featured Products
By checking the Featured Products feature, you will turn on a box that will display on your home page
and in the category pages. You can select any of the items listed in your store to exhibit in the
Featured Products box.
Search
By checking the Search feature, a shopper can search for a specific item. This feature searches for
words or numbers in the Product Name, Description and Item Number of all of the products in the
store.
For example: hat

By entering hat all the items including the word hat will be displayed.
Customized Search can also be selected to search by keyword, by price range or minimum
quantity. This feature is located under the Expert store features on the edit tab.
Public (verses Private)
By not checking the Public button, the store is Private; meaning that a User must login before they can
enter the store. A Public store is just that: open to the public.
In a Private store, a User will enter through the website address. Only a login page will display
requesting the Username and password. Users will have been set up in advance by an administrator to
enter the store. If desired, an Account Request form can be initiated to allow Users request store
access.
The User may check a box titled Remember me which will automatically load their information next
time they log in through that computer terminal.
The Forgot Password? box allows the User to reset their password.
By checking the Public button, a User who enters the web site will be able to view the store and self
register. After self-registration, the User can then follow through with a purchase.
If you, the Administer, check the Public box and then check the Hide Self Registration box, it will permit
a User to browse but not purchase. That User cannot buy from the store until they have pre-registered
by an administrator. They cannot self register.
Employee ID Validation
By checking the Employee ID Validation box, a box where the User may input their Employee ID at
checkout is provided. At the Group Level, the Store Administrator may select Make Employee ID
Required and then the shopper must enter their Employee ID before checking out. User profiles can be
set up to include the Employee ID.
Group ID Validation
By checking the Group ID Validation box, a box where the user can enter a pre-setup Group ID appears
on the Login Page for when they are requesting or setting up a new account. You can setup the group
ID under the Groups tab for each user group in the store.
View All Products Page
By checking the View All Products Page box, the User will be able to view all products available through
the store. The products will be sorted alphabetically at 12 per page. Users may be able to scroll from
page to page with one click.
Budget

Clicking the Budget box allows you, the administrator, the option to later set budgets for determined
Users and Groups in the Group section of the Control Panel.
Quick Books Integration
The Quick Books Integration tool integrates your Company Store with your accounting software. This
feature eliminates repetitive data entry in multiple programs by automatically creating new clients or
recognizing existing ones. The system utilizes item numbers to create sales receipts for credit cards or
invoices for Purchase Orders or General Ledger Codes.
There is an additional charge for this feature.
Order Grid
By checking the Order Grid box, the available products in a category will be displayed three across each
page. Shown below each product will be the title of the item, minimum order required and the cost
per each. The User may perform an additional click to view a product in more detail. The detail
displays the information in grid format with sizes across the top of the grid and colors down the left
side. With Order Grid, shoppers can mix and match colors to meet a product minimum. In addition,
the product information is displayed differently than with the standard look. Standard look is achieved
by not checking the Order Grid box.
If you choose the Order Grid box, the Category Grid box will then be displayed. The Category Grid will
display each product within a selected category, in Order Grid format, one stacked on top of the
next. All of the product detail is displayed with the first click of a category. The user scrolls down to
view additional available products. At this screen, users may also enter their order into the shopping
cart.
Clicking this feature eliminates further clicks for the User, easing the ordering process.
Allow Direct Linking
By checking this box, you turn on the visibility of the direct link of any selected category. To directly link
to a category, go to its edit page and copy the address shown there under the "Direct Link"
heading. You can then paste this direct link into any outside website. When the link is clicked on, it
will bypass the home page taking the user directly to the category.
Constant Contact
With a Constant Contact account, your store can automatically retrieve and organize visitors to your
Company Store. This data mining application is ideally suited for public stores where visitors must self-
register to shop. Go to www.constantcontact.com for more information.
After checking the Constant Contact box, an Account # box will display prompting you to enter your
account number.
COGS Cost of Goods Sold
By checking this box, a field in the Sizing/Pricing page of the Product Profile will turn on. This field
allows you to set a dollar amount for that product for the cost of the good sold, in addition to
price. This information is also reflected in the product report.
Order Management
By checking this box, the Order Management report will be turned on in the Reports section.
Product Personalization
By clicking the Product Personalization button you are allowing a box to display for the User at the
Order Product Page. The system will display a field for entering 640 characters including spaces,
multiple lines and light formatting such as carriage returns. This feature is very effective when
ordering personalized items like plaques, trophies, magnets or business cards.
Donations
Clicking the Donations box allows for donations to be solicited at the Users conclusion of
checkout. The amount will be added to the Users total.
Once the Donations box is checked, three additional boxes will display for your selection. One, or all,
boxes may be chosen to offer Users choices.
Round total up $5
Round total up $10
Users enter donation amount (can be any amount)
Another box will be displayed when the Donations box has been checked. It is the Donation Message
box which allows you to enter a personal message or information about the donation campaign.
Custom Information Field
The Custom Information Field allows another field on the checkout page to be used to gather
additional information to aid in accounting and tracking purposes. The fields are customizable and
may be used in conjunction with a date option. Both may be selected to be required.
Procedure:
1. Click the Custom Information Field
The screen will refresh to display additional fields.
2. In the Field Name field you may enter what you choose to name the field.
3. In the Suggestive Text field, enter a prompt or instruction for the User.
4. If you click the Enable Date Selection, a calendar will display on the checkout page for the User to
pick their event date.

5. By clicking the Make Fields Required box, the User will not be allowed to checkout until they
complete the required event name and date.
For example:
In your store you may wish for Users to identify the event name and date.
Therefore, you would enter the following:
Field Name: Name of Event
Suggestive Text: Enter the name of the event here.
You would next click the Enable Date Selection box and the Make Fields Required box.
Customize Queries
The Customize Queries allows another section on the checkout page to be used to gather additional
information by using dropdown menus that you can create. There are two queries that can be set up.
Procedure:
1. Click the Customize Queries box. (The screen will refresh to display additional fields.)
2. In the Field Name field you may enter what you choose to name the field.
3. In the Primary Query text field, enter a prompt or questions for the User.
4. To the right of the Primary Query Text, there is a box with an Add button next to it. This is where
you can add the choices you would like in your drop down menu. Add them one at a time.
5. By clicking the Make Fields Required box, the User will not be allowed to checkout until they select
a choice from the drop down menu.
6. By clicking the Enable Secondary Query box, you enable a second Query Text field, Add box and
Make Fields Required button. If you have a second query that you want to ask the shopper, you can
set the second up using the same instructions as the first.
Gift Certificate
By selecting the Gift Certificate box, the administrator is enabling the option to allow gift certificates to
specific individual Users. Users may opt to use the gift certificate, or not, for purchases.
When the Gift Certificate box is checked, the page will refresh and a Display As prompt will appear. If
you would like to change the title Gift Certificate to something else, you may do so here. The Gift
Certificate functionality will still work the same.
Each certificate will be individually loaded later at the Groups section of the store Control Panel.
Coupons
By clicking the Coupons button you provide your store with the option of setting up coupons to
nonspecific Users.
You can also click the box next to "Multiple Coupons" if you would like to allow a shopper the ability to
use up to 5 coupons on any order they place in the store.
Later, at the Reports tab under Coupons, you will be able to assign coupons to coupon codes. Users
can enter a coupon code upon check out to use a coupon for their purchase. Expiration dates are
required and specified accounting codes may be identified. At this tab in the Control Panel, a Coupon
Import Template can be uploaded.
3 Types of Coupons will be honored:
The Order Discount is a coupon designed to deduct from an order amount (can be set up to require a
minimum) with a dollar amount or a percentage. The coupon takes off from the sub total amount of
the order.
The Order & Shipping Discount is a coupon designed to deduct from an order amount (can be set up to
require a minimum) with a dollar amount or a percentage. In addition, shipping costs can come out of
coupon amounts.
Product Discount is a coupon designed to offer one Free Product or shipping for that product.
Permissions
The Permissions feature is available only in the 2nd Floor Stores. By clicking this feature, you later
allow yourself the option of assigning specific Groups to access different product categories, different
logos, different pricing discounts and different payment options.
Categories
Limits what products can be viewed by each Group level.
Pricing Discounts
Pricing Discounts can be applied at the Group or User level and will affect total
purchases excepting tax and shipping.
Logo Permissions
Various logos can be assigned to certain product categories and/or User groups.
Payment Options
Assign payment options to certain groups or users.
Inventory
By clicking the Inventory button you allow for tracking of each product including its variations of colors
and sizes. When the quantity of a product in inventory dips below a specified amount, an email will be
generated and sent to the designated email recipient (if this address was previously entered in the
Profile section of the Edit tab on the Control Panel.

In the Reports section, an Inventory Report will display the inventory on hand and its value for each
product including variations in colors and sizes.
When you check the inventory box, the page will refresh and a Hide Inventory on store Front box will
appear. If you check this box, actual inventory amounts will not show up in the store front. Either the
words In Stock or Out of Stock will show up for each item. If a shopper does try to order a quantity
greater than that in inventory, it will show that there are only X number in inventory. X=actual number
in inventory.
Store Skin
The Store Skin is a landing page loaded ahead of the home page and is often used as a preface to
introduce your Stores image or as a User log in page. The page is completely customizable using HTML
in the Content tab of the Control Panel.
TIP: This feature must be turned on at the Distributor level and then again on the Edit page. If this is
checked under the Edit tab without the content page being uploaded, the User will see only a blank
page
Sales Tax
If you would like your Company Store to compute Sales Tax, check the Sales Tax button. Here you have
the choice of two sales tax computation methods.
The first method, implemented later under the Tax Page tab of the Control Panel, is based on overall
tax charged by a particular state. The tax must be entered using a decimal point.
For example: Tax of 4.9% should be shown as 0.0490
The second method must be chosen by clicking the Sales Tax Integration button. This method utilizes
an integration with StrikeIron/Tax Data Systems based on zip codes and will compute a full sales tax
based on tax rates from all municipalities including city, county and state. There is an additional cost
for the integration, in addition to a subscription service withStrikeIron.
Artwork
Clicking the Artwork button allows the user, after logging into the store, to upload artwork into the
system. The artwork can be retrieved by an administrator in the Control Panel.
Shipping
By clicking the Shipping button, you turn on the shipping feature. This allows you to estimate and add
freight to orders coming through the store. You can also offer choices on shipping methods and
charges. Once checked and saved, the Edit page will refresh and provide you with the following four
additional choices, of which all, or none, may be selected.

Allow International (includes billing)
By checking the Allow International button, unique information is populated in the shipping fields to
allow International Countries to be selected.
UPS Integration
The UPS Integration is a complete integration that pulls from the UPS rate charts. Products will need
to be set up with weight and size information to accurately charge freight. There is an additional cost
for this feature.
User Shipping Account
By clicking the User Shipping Account, you allow Users the option to enter their shipping account
number into the shipping method section of the Checkout page. Consequently, if they chose to use
their own account number, no shipping charges from your store will apply. If your customer does not
enter a shipping account number, your determined shipping charges will be billed.
Residential Address Check
When the Residential Address Check box is checked, a surcharge will be added to cover the extra cost
charged by the shipping company when shipping the product to a residence.
If you select this option, enter the surcharge amount in the box provided.
For example: 5.00
MOAS – Manager Order Approval System
MOAS is a feature that requires Manager Approval for all or specified orders that come through the
store. A manager must approve a Pre-Order before it becomes an order in your store. The user’s
managers address is either pre-loaded, or can be added at the checkout page by the user. The order is
then sent to the manager for review and approval of the order. If approved, the order is sent to the
appropriate email address for processing. If denied, notification of such is emailed to the shopper.
MOAS is on by default for all Groups but you may choose to unselect individual Groups at the Groups
Tab.
When the MOAS button is checked the Edit page will refresh and display an Email Domain field and a
disable for credit cards box.
E-Mail Domain “ you can enter a domain name here. When the shopper is prompted to enter their
managers address, they will only need to add the first part of the address, up to the domain name. For
example: @ourcompany.com will already show up.
Disable for Credit Cards - By selecting the Disable for Credit Cards, you allow a user purchase power
without the requirement of manager approval when paying by credit card.
Pending Inventory Tracking
If the Pending Inventory Tracking box is checked, the product will be taken out of inventory (if the
Inventory feature is being used) while awaiting manager approval. The product will be placed in
pending status. If the order is declined by the manager, the product will be returned to inventory. If it
is accepted, the inventory will be depleted and processed.
Custom Email Configuration
If the Custom Email configuration box is check, it will allow two system generated e-mails to be
customized.
The first is the Order Email Configuration. This is located below Order Email in the profile section of
the stores Edit tab. There is a field for Salutation (custom greeting) and a Message box. You may enter
the custom text that you would like the Order Email to contain in this box. You may also use HTML to
customize your emails further. When an order is placed in the store, this will be part of the order
confirmation email that goes out.
The second is the Welcome Email. This is located in the Groups tab. Here you can customize email
that go out to new users that are uploaded into the system by an administrator. There is a field for
Salutation (custom greeting) and a Message box. You may enter the custom text that you would like
the Welcome Email to contain in this box. You may also use HTML to customize your emails further.
Page Text
Store Details Page Text
This area is for keeping notes in the Control Panel. The notes show up under the Details tab in the
control panel. Notes written in this area do not show up in the storefront.
Delivery Date Suggestive Text
This area is for notes that show up in the store near the shipping section of the checkout page. Can use
this field to suggest that customers click on a calendar (offered in this section) to request a shipping
date. This field may also be used for general notes or disclaimers regarding shipping.
MANAGE GLOBAL SETTTINGS
Bring Your Store to Life - This button allows your store to be active for users to enter the url,
view the store and shop.
Access Your Company Store Manager - This give you access to the Company Store Manager
Supply Store - If the Supply Store box is checked, all your products in your store will be available
to be copied by all distributors. This button is generally not selected by company stores.
COMPANY STORE DESIGN AND LAYOUT
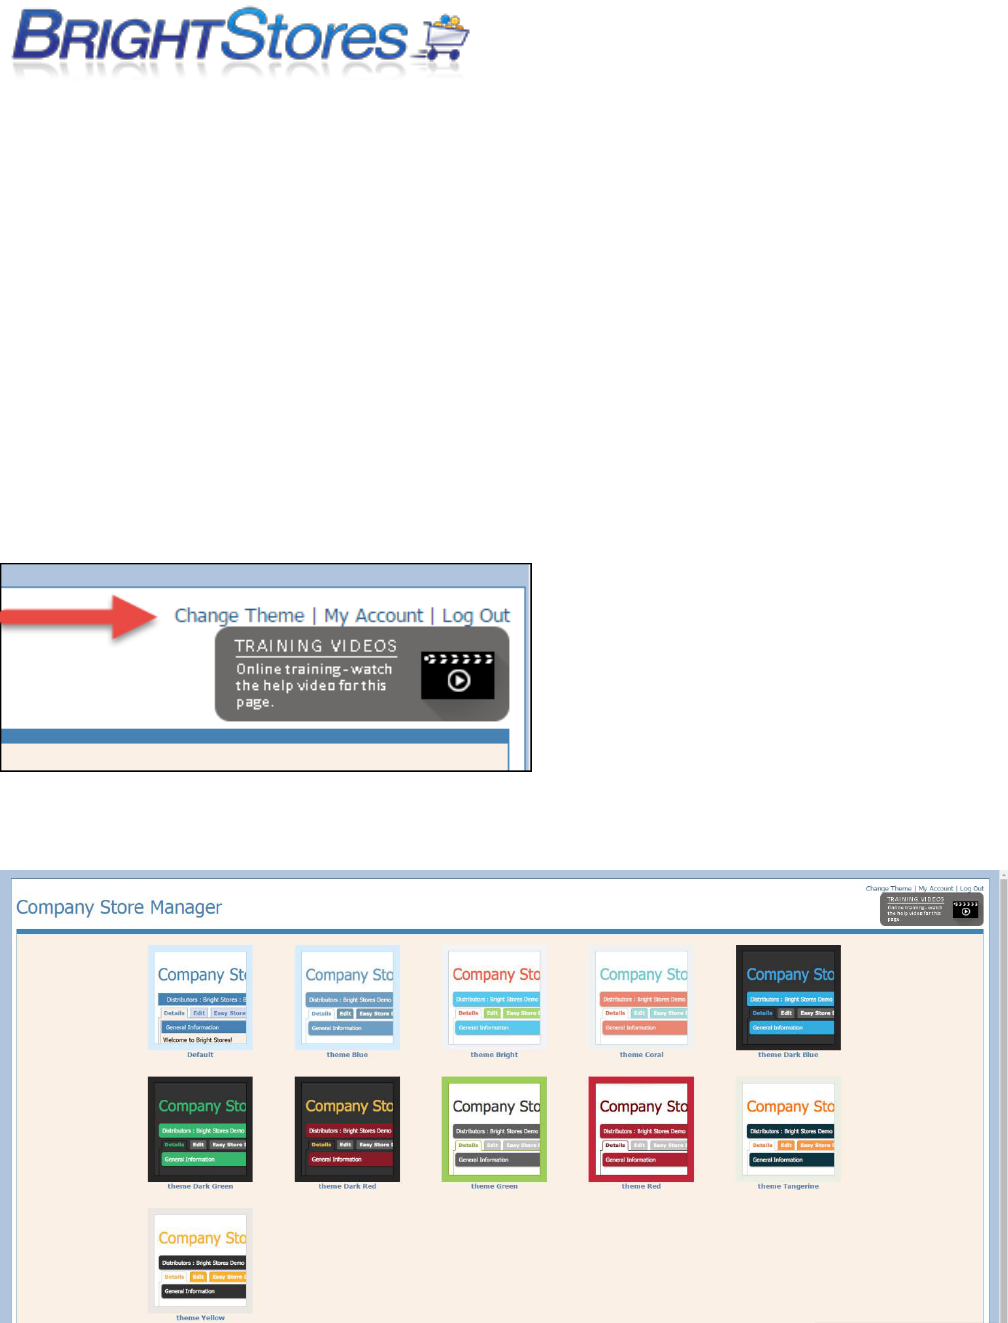
COMPANY STORE MANAGER THEME
This section will show you how to change the appearance of the Company Store Manager with the
“Change Theme” option. Change Theme is directly tied to the username you are logging in with, so
each individual admin user that logs into the admin side can choose their own theme.
Change theme is only tied to the appearance of the admin and does not alter the storefront display.
1. First you will need to login to the Company Store Manager ( www.co-store.com/admin ) with your
username and password.
2. In the top right corner of every page in the admin you will see a Change Theme link that you can click
on to access the various Themes to choose from. Go ahead and click this link.
3. You should now see the available themes to choose from which show a thumbnail preview of the
colors for that theme.
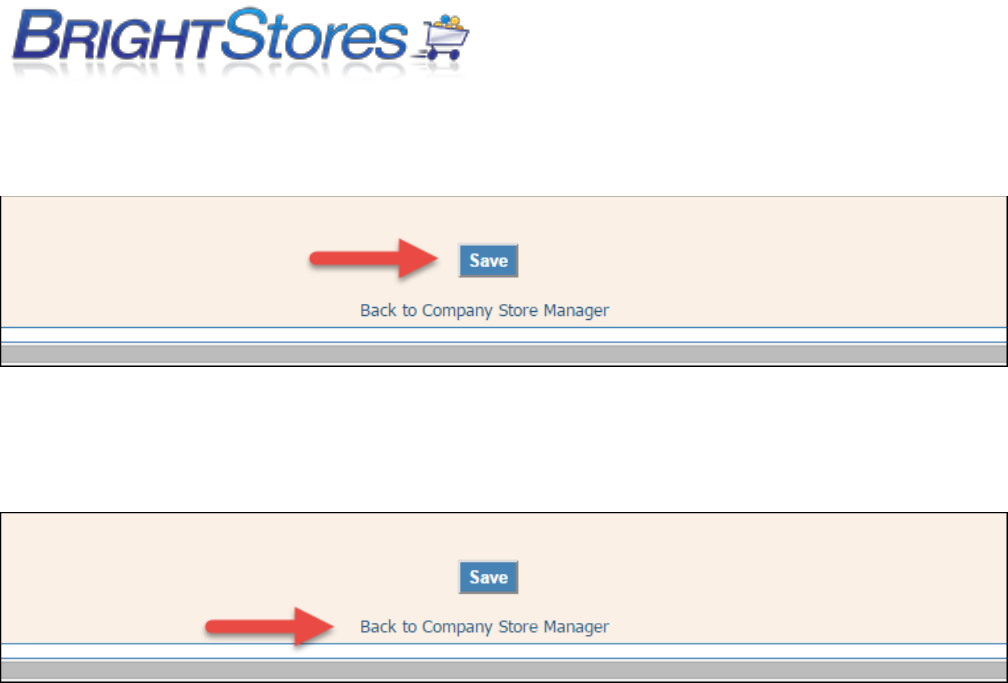
4. Click on the thumbnail image for the theme you would like to use and then click the Save button at
the bottom of this page to save the chosen theme.
5. Once you have saved your chosen theme, you will want to click on the text below the save button
that reads “Back to Company Store Manager” as shown in the screenshot below.
STOREFRONT DESIGN OPTIONS
There are several ways that you can design your company store. Under the edit tab of your company
store manager for each store, there is a Design bar that allows you to choose from preset design
templates, build your own template with html/css, and upload graphics. You also have the Easy Store
Designer tab where you can select a theme and edit the colors, add graphics and publish your design.
Below you will learn how to use both the Edit tab to design you store, easy store designer, and utilizing
the content tab to create pages and use the WYSIWYG editor.
CHOOSING A NAVIGATION TEMPLATE
This section will show you how to choose a Navigation Template for your store. This allows you to
decide where you want the Navigation bars to appear in your store.
1. Navigate to the Edit tab at the Store level.
2. Under the Design section, you will see "Choose a Navigation Template" with a drop-down menu. You
will have several options to choose from in the drop-down menu:
Top and Left: The Navigation bars will be displayed along the top of the page and along the left
of the page.

Left: The Navigation bars will be displayed only along the left of the page.
Top and Left + Commerce: The Navigation bars will be displayed along the top of the page
stacked and along the left of the page. Commerce adds in additional navigation within the
header; this must have the right kind of style sheet and header graphics to work correctly.
Note: The Header will include the following navigation: Prior to login: Home, Log In, Shopping
Cart. After the shopper logs in, they will see: Home, Log Out, Shopping Cart, My Account, My
Orders, Artwork, and any Gift Certificate or Budget amounts that may be set for this shopper.
For Example:
If you have a lot of Content Pages you may use Top and Left + Commerce to avoid having the
navigation stack up.
Top and Right: The Navigation bars will be displayed along the top of the page and along the
right of the page.
Top Only: The Navigation bars will only be displayed along the top of the page. They will stack
one on top of the other.
3. Select the Navigation Template from the drop-down menu that you wish to use.
4. Be sure to click Save at the bottom of the page when you are finished.
5. You can check on your store front to see how the Navigation Template you choose looks.
CHOOSING A COLOR SCHEME
This section shows you how to choose a Color Scheme for you store. Color Scheme is an area that
includes a choice of standard, stock style sheets. Each style sheet consists of various colors, fonts,
shading, etc.
1. Make sure you are logged into the Control Panel.
2. Navigate to the Edit tab at the Store level.
3. Under the Design section, you will see "Choose a Color Scheme" with a drop-down menu. You will
have several options to choose from in the drop-down menu.
4. Click on the drop-down menu to view and select Color Scheme choices.
5. You can view the Color Scheme choice in your store front.
6. Be sure to click Save at the bottom of the page when you are finished.
NOTE: Custom style sheets may be created at an additional cost. Please contact Bright Stores for
details.

UPLOADING GRAPHICS TO YOUR STORE
This section will show you how to choose a Store Graphic Area and upload a graphic into that area. You
will first need to create a graphic for each area you would like a graphic to be seen. Refer to the
Graphics Specifications knowledgebase for the correct file type and sizing for each graphic area. Once
your graphics are created, you may upload them into your store.
1. Make sure you are logged into the Company Store Manager.
2. Navigate to the Edit tab at the Store level.
3. Under the Design section, you will see "Choose a Store Graphic Area" with a drop-down menu. You
will have several options to choose from in the drop-down menu:
Banner (Top and Right Navigation only)
Choosing Banner will insert your graphics below the top Navigation bar.
Footer
Choosing Footer will place your graphics at the bottom of every page going left to right.
Header
Choosing Header will insert your graphics above the top Navigation bar going left to right. To
accommodate the changing requirements of your site, your graphics must be 760-1200 pixels
wide and 80 pixels high.
Home Page
Choosing Home Page will place your graphics between the left or right Navigation (if applicable)
and the featured products (if applicable).
Home Page 2
Choosing Home Page 2 will add a graphic space that will stack below the graphic for Home
Page.
Logo
Choosing Logo places your graphics above and left of the header. It can be used to increase the
height of the header and automatically creates a link back to the home page of the site (the
Landing Page of the URL).
Right Bar
Choosing Right Bar will add a bar or line down the right side of the page and to the right of all
other graphics or features used in the store.
Left Bar
Choosing Left Bar will add a bar or line down the left side of the page and to the left of all other
graphics or features used in the store.

4. Select which Graphic area you wish to add a graphic to from the drop-down menu.
5. Click Browse and search for your graphic file and then click upload.
6. Once you have uploaded at image, to view it, you can select the Graphic area again from the drop-
down menu, and then click "view current image"
7. You can check your store front to see how the new graphic looks in your store.
8. If you do not like how the first graphic looks, simply upload a new one. This will replace the previous
file.
NOTE: If you choose to incorporate HTML or use our WYSIWYG editor to create your Home Page,
Header, Footer, etc. you can do so under the Content tab in the Company Store Manager.
GRAPHIC SPECIFICATIONS
File Specification for each Graphic Area
File type: jpeg or gif
Resolution: 72dpi
Header
Size: 760-1200 pixels wide x 80 pixels high
Notes: The store minimum width is 760 pixels, so make your header at least that wide. Our system is
dynamic so it can push the page to the right past 760 pixels exposing the header or lack of one. When
you design your header graphic keep in mind that all content wider than 760 pixels will only be seen
when the page pushes.
Logo
Size: Up to 200 pixels wide by up to 80 pixels high. The logo will be be placed in the top left part of the
header and it will lie on top of the header. We advise to design the header with the logo in it and as
part of it. Then simply cut the logo out of the header file and upload it as the logo. Note: The logo will
automatically link back to the stores home page.
Home Page and Home Page 2
Color Mode: RGB
Image Size: Featured Products On: 460 pixels wide, Featured Products Off: 625 pixels wide
You can make the file as high as necessary.
Note: The total default width of the site is 760 pixels. The site is dynamic so it can be pushed to the
right. All uploaded files will be top and left justified so you may want to consider the use of the canvas
when creating the file.

EASY STORE DESIGNER
This knowledge base will teach you how to use Easy Store Designer to design your store front.
First, navigate to the Easy Store Designer tab located in your store admin. You will see four steps to
design your store front.
STEP 1
Next, click on Step 1 “Pick a Template”. Here you will see two options: Easy Templates and My
Templates.
The Easy Templates are predesigned templates which are only customizable if you save it to My
Templates; otherwise, all colors, fonts and navigation bars are preset and cannot be changed unless
you save the template of your choice to My Templates. If you find a predesigned easy template in the
easy templates drop down menu that you like and no changes are needed, skip step 2 and move on to
step 3.
My Templates allows you to choose a template from the Easy Templates drop down menu and
customize it to your liking. Please note, you cannot edit a template unless you first save the template
to My Templates.
To save a template to My Templates, click on the Easy Templates radio button and choose from the
drop down menu the template you would like to customize. Once you have found the template you
like, click on the “save as” button located next to the drop down menu and rename the template
anything you like and click save.
STEP 2
Next, you are going to click on Step 2 “Modify Easy Colors & Settings.” Here you can modify the color
schemes, fonts, and general setting for your store. Clicking on a color in the “easy color editor” will
allow you to choose from any color you prefer for multiple areas on the template. Next to the easy
color editor box you will see the “easy settings editor”. Here you can enable your store footer, change
the text and link fonts/size, center store on screen, put border around products and hide select
delivery date.
STEP 3
Once you are done with step 2 you are going to jump to Step 3, “Upload Images.” Here you can upload
your own Logo, Header, and Home Page images. To upload an image, click on the choose file button to
browse for your image, then go ahead and click on the “Upload” button. Once your image is uploaded
it will appear below in the Preview pane. To delete an image, just click on the delete button located
next to image you want to remove.

STEP 4
Lastly, once you are happy with your store design, click on Step 4 to Preview, Save, & Publish. Place a
check mark in the box titled “Check to Publish Preview Images” and then hit the Publish Your Design
button to publish your design to your store. Now to view your store front, you can click your mouse on
the blue link next to the Publish your Design button reading, “Click here to see your store live!”
IMPORTANT: To enable the correct preview in Step 4, you may have to adjust your browser settings
depending on which browser you are currently using.
If you are having trouble viewing your store after you have designed or made changes to it using Easy
Store Designer, you may want to delete your cache and then retry viewing your store again.
CLEARING BROWSER CACHE/COOKIES
Internet Explorer:
Navigate to the Tools menu and click the Delete Browsing History option.
In the Delete Browsing History dialog box, click the Temporary Internet
Files and Cookies check box, and then click Delete.
Close your browser window once the deletion has completed and then reopen the browser
again and type in the store URL in your address bar.
After clearing your browser's cache and cookies, exit your browser completely before
attempting to access the site again.
Firefox
Navigate to the Tools menu and click on Options.
Click on the Privacy tab.
In the History dialog area, click the clear your recent history link.
In the Clear All History box, click the Cache and Cookies check box, and then click Delete.
After clearing your browser's cache and cookies, exit your browser completely before
attempting to access the site again.
Google Chrome
Click the wrench icon on the browser toolbar.
Select Tools.

Select Clear browsing data.
In the dialog that appears, select the check boxes for the Empty the cache and Delete cookies
and other site and plug-in data.
Use the menu at the top to select the amount of data that you want to delete. Select beginning
of time to delete everything.
Click Clear browsing data.
After clearing your browser's cache and cookies, exit your browser completely before
attempting to access the site again.
Safari
Select Preferences from the Safari menu.
Under the "Security" tab, select "Show Cookies".
Select "Remove All". Alternatively, if you only wish to delete a select group of cookies, highlight
them and select "Remove".
Read the confirmation message and click "Remove" to delete cookies.
Click Done.
After clearing your browser's cache and cookies, exit your browser completely before
attempting to access the site again.
CONTENT TAB
ADDING A NEW CONTENT PAGE
This section will show you how to add a Content Page to your store. This is helpful if you wish to have
a Contact Us page, FAQ page, a page explaining store policy, etc. This is customizable to fit the needs of
your store.
1. Make sure you are logged into the Control Panel.
2. Navigate to the Content tab at the store level.
3. Click on "Add New Content Page" button.
4. Enter the name you would like for this page. For example, "Contact Us" or "FAQ"

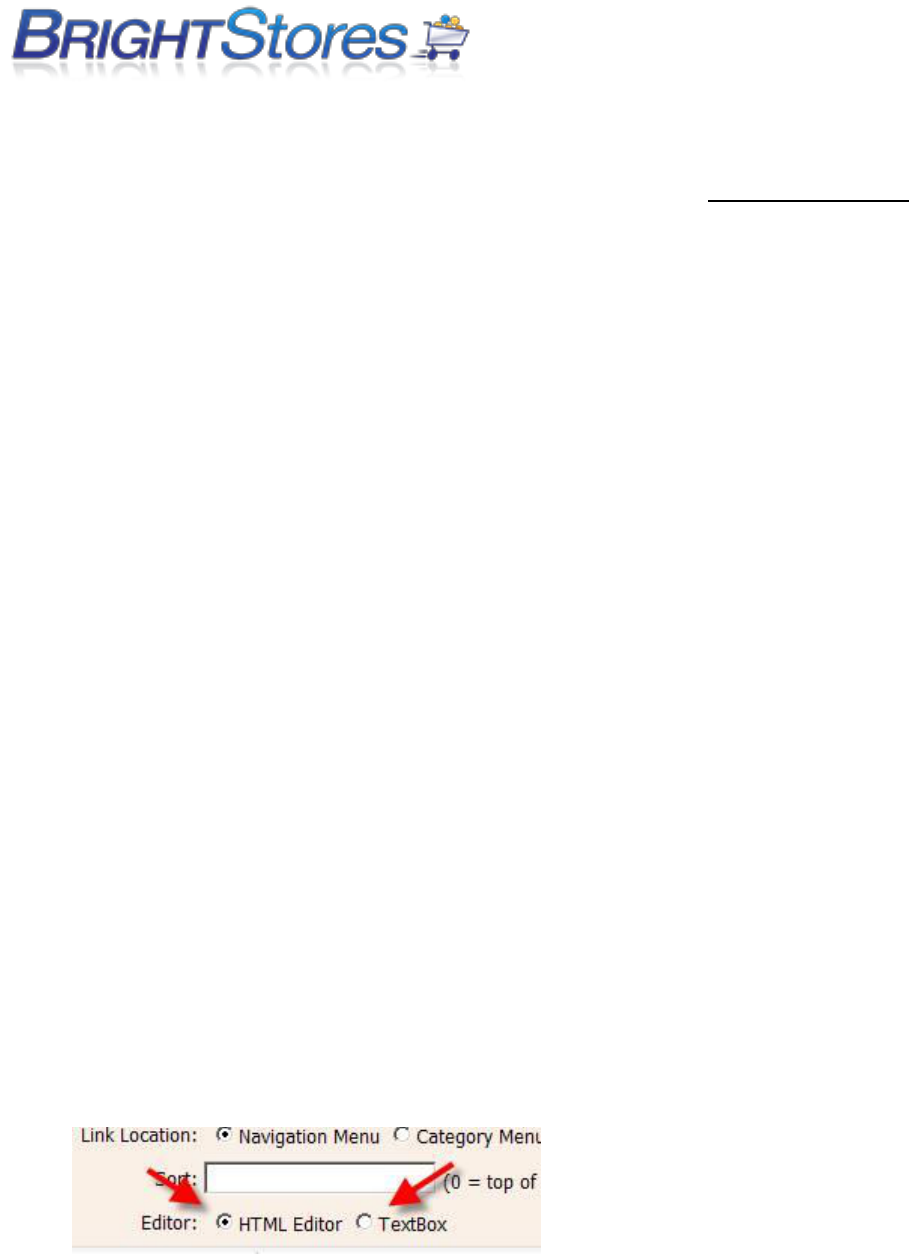
5. Assign the link location by clicking in the circle next to either Navigation Menu (will be placed with
other content pages such as Home and Shopping Cart) or Category Menu (will be placed with the
Product Categories).
6. Assign the Content Page a sort number. The smaller the number, the higher the content page will go
in a list. (0 goes to the top of the list)
7. You can enter in HTML content in the content area or you can enter plain text.
8. If you would like to import images into Content Pages, you will upload the images on the Details tab
at the store level by clicking browse and searching for your image and uploading.
9. Back on the Content tab, in the content area, you can program the images you uploaded on the
Details Tab with CSS/HTML into your content page.
9. Be sure to click "Save" at the bottom of the page when you are finished.
CREATING A CONTACT US PAGE
To add a contact us page you'll first need to navigate to the "Content" tab of the store you wish to add
a contact us page to.
From there, click on the "Add New Content Page" button.
Name the content page accordingly, and then look for the "Code Snippet" drop down in the content
editor. Simply select "Contact Us" from the drop down and the content for a contact us page will be
added to the editor window. You can then update the information with your contact info.
CENTERING YOUR STORE LAYOUT
If you would like have your store centered in your browser window (opposed to left-justified) simply
enter the following code in the Header content page of your store. You do not need to delete any
content already in the header area, simply add this to the existing content by clicking the HTML option
on the bottom left corner of the WYSIWYG editor and paste this code below:
<style>
body {
text-align: center;
}
table {
margin: 0px auto;
}
</style>
ADDRESS REGISTRATION PAGE
Please use the following code - copy and paste it - into the content page Address Registration. This
information will appear after a user has registered themselves for your store. Adjust the information to
fit your companies' needs.
<div class="UserDetailsSectionHeader">
Personal Address Book
</div>
<div class="UserDetailsSection">
Please create a new address by clicking on the drop down next to "Billing" or "Shipping", selecting
"New", and filling out the relevant information (don't forget to save your addresses!). Once you have
finished you may start shopping by selecting a product category on the left or searching for a
product.</div>
USING THE WYSIWYG EDITOR (CONTENT EDITOR)
Here is a quick rundown on the What You See Is What You Get (WYSIWYG) editor.
Summary:
The WYSIWYG editor is basically an advanced HTML editor that allows you to edit, review and update
content pages without having to know HTML. This editor can be accessed by visiting the "Content" tab
of your store.
1. There are two Editing options available when using the WYSIWYG editor. You can use the
HTML Editor which allows you to use the WYSIWYG editor box below to create or edit your
content pages OR you can use the TextBox editor for those who are design savvy and would like
to enter your design code for more custom store designs (i.e.,html, javascript, css). If you make
a change in one editor and switch to the other one without first saving the changes will NOT
carry over!!!
2. If you need to know what a button does, there’s a help icon on the top right of the editor. This
explains what every button does.

3. You can save, print, preview, spellcheck and more using the buttons on the top left.
4. There’s your standard copy/paste buttons, but also the ability to copy from a word file or copy
plain text (this removes any formatting in a document, such as bold, color, etc when pasting).
5. In case you don’t know the shortcut for undo or redo you can use the buttons provided:
6. There’s also date/time buttons, special characters (such as copyright), smilies
7. If you want to be able to put content anywhere in a page use layers; this allows you to drag a
box with content anywhere you want on a page. Its super easy to use and very powerful.
8. One notable option is groupbox, which is a super easy way to group relevant content:
9. Most boxes (group boxes, layers, etc) require a slow double click to edit. Click once to select
what you want to edit, and click again to edit the text within the box.
10. You can also right click on almost anything and bring up options for each object:
11. One of the bigger capabilities that you can do with the editor is directly load any images from
the details tab of a store, or upload your OWN images.
Click on the image gallery button to bring up images in the store.
12. This Produces a list of all images in your store on the details tab:
You can upload images directly to this page as well, you don’t have to do it on the details
tab. Note that any images uploaded here will NOT show up on the details tab!!
13. You can also add any image by just hitting insert image which brings up the dialog to add an image
to the content page. This is very similar but doesn’t display a gallery style listing. It is, however,
more powerful
14. Building a table is simple and like Word or Dreamweaver. Just click on the table button to build
a table.
You can then add rows, columns, modify cell properties, and more.

15. The following four buttons allow you to add a line break (same as hitting enter), add a
paragraph (useful for breaking up content, its also a common in books and documents), and
change the direction in which text flows in a paragraph (from the right or left):
16. You can make text bold, italic, underline, change the justification of text (left, center, right,
none), remove formatting, change the background color of text or the color of the text itself
with the following buttons:
17. To add list items (1,2,3 or bullets), indent text, subscript (put below the current line) or
superscript (put above the current line), make text uppercase or lowercase use the following
buttons:
18. The drop down menus for the most part are pretty easy to understand. CSS class currently
doesn’t do much of anything, inline style has some default styles that we can change, default
font changes the font, size changes the size of text, links allow users to insert links to various
areas of the store such as login page, shopping cart, or more. Code snippets are really cool and
you can insert an entire block of code, such as a contact us page, footer, or shopping cart info
without having to do any coding! Images is something we can populate with any images you
guys can think of, such as a shopping cart icon. And zoom changes lets you look closer at the
page you are editing.
19. You can link and unlink images or texts through the editor by selecting the Insert Hyperlink Icon
to add a link and enter the full URL that you want that text or image to link to when selected or
select the Remove Link icon to remove a hyperlink. You can also select the Anchor icon to link
different pages or different parts of the same page using hyperlinks and anchors.
Note: It is important that you include the 'www' in all links that you are creating in order for them to
function correctly in your store and avoid any store errors from occurring due to incorrect linking.
For Example: www.co-store.com/storename

WEBSITE AND EMAIL
EMAIL SERVERS
If you have a website or a domain re-direct with us you will need the following information to setup
your e-mail accounts:
POP Server: mail.yourwebsitename.com
SMTP Server: mail.yourwebsitename.com
Your e-mail password is the same as the e-mail password you setup in Plesk, and your username is
your e-mail address ([email protected]).
WHAT ARE YOUR DNS SERVERS?
The domain name servers are:
1. ns1.distributorsite.com
2. ns2.distributorsite.com
You will need this information if you are hosting a website with us or doing a domain re-direct to a
company store.
CONSTANT CONTACT
This feature is located under the Expert features on your stores edit tab and requires an account with
constant contact (www.constantcontact.com) .
Once you enable it, enter in your account information on the edit tab in your store.
This will turn on a box in your store front that allows users to enter in their email addresses.
Constant Contact uses email address for email marketing campaigns.
COMMON EMAIL TROUBLESHOOTING TECHNIQUES
This tutorial will provide tips and common email troubleshooting techniques if you or your client are
not receiving Order Confirmation emails for orders placed in your company store. This also applies to
sending shipping email confirmations and welcome emails through the company store manager.
Common Areas to check when you or any of your users are not receiving emails are as follows:
1.) Check spam folder.
2.) Verify the email address the order is going to is accurate (i.e: user email, order billing/shipping
email fields).
3.) Have your e-mail server administrator whitelist mail.co-store.com/50.97.78.219 as well
as mybrightsites.com/209.235.220.152 (if your store is on Bright Sites) or co-
store.com/209.235.217.68 (if your store is on co-store.com).
4.) Change the From Email on your store to [email protected] (if your store is on Bright
Sites) or [email protected] (if your store is on co-store.com).
Many e-mail servers will block an e-mail if the From Address on an email is not the same as the server
the e-mail is sent from (for example, if your From Address is orders@mystore.com, this may be an
issue as the e-mail is actually sent from our server, which is mybrightsites.com or co-store.com). If you
are required to have a specific From address, you’ll need to see step 5.
5.) Talk to the owner of the domain in the From email address (which may be you or your client) and
have their website administrator add an SPF record to allow mail.co-store.com (applies to Bright Sites
and co-store) to send on behalf of their domain.
6.) If using the MOAS feature, verify that the MOAS email address that the orders are being sent to is
correct. For this step, there are multiple locations that the MOAS email may be setup under in the
store.
What is a Whitelist?
A whitelist is a list of domains, IP addresses, or email addresses for example that are deemed as
acceptable to receive email from and should not be sent to the trash folder or marked as spam.
By whitelisting the above, you are authorizing that mail coming from either of these domains will
always be allowed and will prevent problems with emails not being received.
PRODUCT CATEGORIES
CREATING A CATEGORY
This section describes how to create a Category and a Sub Category. Before you can create a Sub
Category, you must create a Category.
1. Make sure you are logged into the Control Panel.
2. Click on the Categories tab at the store level and click the "new" button.

3. Enter in the name you want for your Category. Some examples are: Apparel, Promotional
Products, Gift Sets, etc.
4. Leave the parent category selected as "<root>" (only for Main Category, not Sub Category)
5. Enter in a number in the sort field. This allows you to arrange your categories in the way you
want them listed in your store. (0 goes at the top of the list)
6. Check the box next to Active (If it is unchecked, the category will not show up in your store.)
7. By checking the box next to Inventory, products in this category may be tracked for inventory.
(For more information, please see the article on inventory.)
8. Click the "Save" button. You have created a new Category.
CREATING A SUBCATEGORY
After creating a Category, you can create Sub Categories. (Think of parent categories and child
categories in a hierarchical relationship, where child categories exist under parent categories.)
1. Make sure you are logged into the Control Panel.
2. Click on the Categories tab at the store level and click the "new" button.
3. Enter in the name you want for you Sub Category. Some examples are: Ladies, Outerwear,
Pens, etc.
4. Use the drop down menu to select the parent category for this new Sub Category.
5. Enter in a number in the sort field. This allows you to arrange your categories in the way you
want them listed in your store. (0 goes at the top of the list)
6. Check the box next to Active (If it is unchecked, the category will not show up in your store.)
7. By checking the box next to Inventory, products in this Sub Category may be tracked for
inventory.
8. Click the "Save" button. You have created a Sub Category.
9. You can upload an image to represent the Sub Category by clicking on browse, searching for
you image, and clicking upload.

CATEGORY PURCHASE CONTROLS
This knowledgebase will explain how the Category Purchase Controls feature works and how to use it
in your store. This feature allows you to set purchase controls at the category level on a per order
basis; whereas the Category Levels feature controls what categories the User can or cannot purchase
from and the quantity of items.
Note: This is an expert level store feature. To turn this feature on, navigate to the Edit tab of your store
in the Company Store Manager, scroll down to the Expert Features and check the box next to Category
Purchase Controls. Be sure to hit Save at the bottom of the page.
With the Category Purchase Controls feature you can set a minimum or a maximum quantity for a
category or set both! You can also require the user to make a purchase from a specific category every
time they place an order in the store. This allows you to control ordering in a specific category, which
can be useful in uniform programs.
To set up the Category Purchase Controls, click on the Categories tab of your store in your Company
Store Manager. Select the category that you want to set the Min and/or Max quantity amounts for,
and you will be taken to the category’s edit tab. Please see the image below to see what the edit tab of
your category will look like with this feature turned on.
If you want to require the user to order items from this category, check the box next to 'Purchase
Required’ If not, then leave the box unchecked. Next, enter the Min. quantity that a user can order
from in this category and/or a Max quantity that a user can purchase from the category, then click the
Save button. The Min and Max is the total quantity of items; not the dollar amount.
CATEGORY LEVELS
This tutorial will show you how to use Category Levels, which allows you to assign Categories different
levels. This is useful when you have different Users who you wish to assign a specific quantity of
certain levels of Products. Users will only be able to purchase the quantity of products for each level
that you assign them.
NOTE: This is a second floor feature. (To make your store a second floor store, please contact the sales
department at 1-303-800-1546 ext. 1)
1. Make sure you are logged into the Control Panel.
2. Navigate to the Edit tab at the store level and check the box next to Category Levels under the
features section. Be sure to click "Save" at the bottom of the page.

3. To add levels, enter in the name of the level (for example, level 1, level 2 etc.) in the empty field and
then click the "Add" button. The level will now appear in the drop down menu.
4. Repeat step 3 until you have created all the levels you wish to have.
5. You can delete levels by selecting the level you wish to delete from the drop down menu and clicking
the "Delete" button.
6. Navigate to the Categories tab at the store level, click on a Category/Sub Category of which you
would like to assign a level to.
7. On the Edit tab at the Category level, you will now see a dropdown box next to "Level."
8. Select the level you wish to assign and click "Save."
9. Now you have to assign levels to each User that you wish. Navigate to the Groups tab at the store
level, then click on the User Group which contains the User you want to assign a level(s) to.
10. Click on the Users tab at the group level, click on the User and there will now be a new tab called
Levels Management.
11. Enter in the quantity and select the level from the drop down menu. Click "Credit" to add
quantities or "Debit" to subtract quantities.
12. Repeat steps 10. and 11. for all the users you wish to assign levels to.
DIRECTLY LINKING TO PRODUCT CATEGORIES
Directly linking to product categories allows you to insert a link to a specific category on your website,
e-mail, blog, etc.
1. Begin by logging into your control panel and selecting a store.
2. Click on the "Edit" tab.
3. Scroll down to the "Features" section and make sure "Allow Direct Linking of Categories" is
checked. If it is not, check it and hit "Save" at the bottom of the page.
4. Click on the "Categories" tab.
5. Click on the category name you'd like to link to (e.g. "Men's Polo Shirts").
6. Look for the "Direct Link" text. The URL to the right of that text is the link you can use to
directly navigate to that product category. Simply highlight/copy the link so you can paste it
into an e-mail, browser window, or website.

PRODUCTS AND PRODUCT MANAGEMENT
CREATING PRODUCTS
This section will show you how to add new products into your store.
Note: Not all fields listed below will show up for all stores. Some fields only apply to specific features.
1.Make sure you are logged into the Company Store Manager of your store.
2.Navigate to the Add New Product tab. The first page you will see is the add new product or the edit
tab. Enter the product item number or product number in the Item # field.
3.Product Profile field This is a free form text field allowing flexibility in entering custom messages, set
up information and pertinent product information.
4.Product Name This is a mandatory field. Enter the product name here.
5.Product Category Click on the down arrow, which shows a drop down menu. Here you can view a list
of the store categories you have created.
Select the appropriate category for this product by highlighting that category and clicking on it.
6. Shipping Category - This feature must first be turned on at the stores edit page. Click on the drop
down menu to list the shipping categories entered into your store. Select the appropriate shipping
category for this product by highlighting that shipping category and clicking on it.
SHIPPING CATEGORIES:
We have 5 standard shipping categories that most promotional type products fit into. We also have a
sixth for some heavier and/or larger products. Each of these categories is set up with a weight range.
If you estimate the weight of your product and set it up in the appropriate weight range it gives the
best estimated freight. This is an average, and does not take into account zones or location. It is only a
freight estimator.
Here are some guidelines for the categories:
Category 1: ITEMS APPROX. 2 OZ AND LESS. Some examples of this are pens, pencils, smaller
magnets, and small plastic key tags.
Category 2: ITEMS APPROX 2.01 OZ-4.99 OZ. Small promo products such as a small key tag,
small stress ball, a pen in small gift box, larger magnets, or a folding koozie.

Category 3: ITEMS APPROX 5 OZ-9.99 OZ. Standard ceramic mug, hats, basic, low end t-shirt,
pen and pencil set in gift box, plastic flashlight, tote bag, water bottle.
Category 4: ITEMS APPROX 10 OZ-1 LB. Most apparel items go in this category with the
exception of small t-shirts and large heavy items like coats, portfolio, more substantial travel
mug, latte mug.
Category 5: ITEMS APPROX. 1 LB - 5 LBS Coat, Briefcase, backpack
Category 6: ITEMS APPROX 5-8 LBS. Unusual items that are heavier or larger and require more
shipping.
If the store is set up with UPS integration you can select UPS from the Shipping Category drop
down menu. This will pull the shipping rates directly from UPS. If you find that your product
does not fit into any of the above categories, you can create custom shipping categories. See
the Shipping tab at the Distributor level for more information.
7. Product Description Type in the description of the product here. There will be a separate location for
sizing and color information.
8. Minimum Order Quantity Enter the minimum amount of this particular product that can be ordered
at a time. This field will only allow numeric characters. If left blank, Minimum Order Quantity will NOT
display in the store front. If you intend on using Quantity Discounts at a future time, you must enter a
quantity of at least 1 in the Minimum Order Quantity.
9. Production Time Enter the amount of time it will take from receipt of the order before the order will
be shipped. You may leave the space blank if you do not want to provide the production time and no
mention of production time will appear on your storefront.
10. Additional Logo Cost If an additional logo/logos will be offered for this particular product, and an
additional amount of money is to be charged for each logo, enter the dollar amount here. Use two
decimal places but dollar signs are not necessary. This is a running charge, and will apply to each
product ordered. It is not a set up charge.
11. Personalization Cost This feature must first be turned on at the stores edit page. If there is an
additional cost for personalization of this product, enter that dollar amount here. If you do not yet see
this box and should, go to Allow Personalization first (its next on the list, see below), and hit save at the
bottom of the page. This will activate the Personalization Cost box. This is a running charge, and will
apply to each product ordered. It is not a set up charge.

12. Fulfillment Data This field allows you to enter the products location within your warehouse to help
the fulfillment personnel fill the order. Please note this data will show on the confirmation email.
13. Manage Features for this Product only allows you to:
a. Select the Inventory button. This turns on the inventory feature for this particular item. Later you
can enter the inventory totals for each product.
b. Select the Allow Personalization button. This allows customers to add custom text to a product.
c. Select the Disable Sales Tax Button. This allows the administrator to disable calculation of sales tax
for this product only.
14. Manage Product Activation allows you to click the Active button. This will display this product on
the Storefront. If in the future, if the specific product becomes temporarily or permanently unavailable,
you may unclick the Active box. This will hide the product from the Storefront until you choose to
reactivate.
15. The Direct Link address is the address you may copy to a website so a User will be automatically
linked to the specific Store page displaying this product.
Now that you have added the basics of a product, you can now enter the specifics. Move through the
following tabs as you enter your product:
Colors Tab
Click on the Colors tab to set up this products color or color choices. Go through the following steps to
enter the color/colors.
1. Product Color Name Start by clicking on the word default in the lower box in the colors tab. That will
bring default up into the Product Color Name line. Edit the word default and change it to the first color
name that you would like to enter. Hit update. To add an additional color choice, enter the color of the
product here and hit save. If there are multiple colors, you will enter them one at a time. You must
enter at least one color choice, or the store will show the word default as the color.
2. Swatch Image (optional) If the item is available in a choice of colors, you may enter a swatch image
of the product for each color entered. To do this, click on the Browse button. This will open the file
upload screen from your computer. Find and select the image to be attached to the color name in the
Product Color Name line and click open.
3. Save Click on the Save button to save this color or this color with swatch image. You will see the color or
color/swatch in the box below. Once at least one color has been added, you can click on the Delete button to
remove any unwanted color, or the word default from your color selection (if not already edited).

Colors Sorting
When you add a new product to your store and add colors for that product, the colors are listed in
alphabetical order in the control panel, but are listed in the store front in the order you enter them.
If the product has images to show the color, then the images are displayed in alphabetical order in the
store front when you click "view color options."
When you edit an existing product by deleting that product's colors and then re-enter the colors, they
will not display in the order you enter them unless they are different colors from the original
colors. There is no consistency to the way the colors display in the store front after you delete the
colors and enter them in again.
Sizing / Pricing Tab
Click on the Sizing/Pricing tab to set up the sizes and prices for this product. Go through the following
steps to enter the sizes and prices.
1. Start by Selecting a Size Group Click on the down arrow to display the drop down menu. This will
show a list of size groups that you have entered in your store. Choose a size group or unit of measure
from this menu by clicking on it. If you dont see the size group that you need for this product, refer to
the Size Groups tab at the Distributor Landing Page. Next, click on the Click here to copy size group tab.
This will open up this size group into the box below.
2. Manage Sizes and Pricing - You will see the size group you selected. This will include a list of each
size in that size group with a delete box on the left of the size and a price box on the right of the size. If
there are sizes in the size group that you do not offer for this product, click on the delete box to check
the box for that size. Once all of the sizes to be deleted have a checked box, hit the Delete button
below to delete these sizes. Next, enter a price for each size listed in the group by typing the price in
the box to the right of each size. (Ex. apparel may have multiple sizes, and prices varying from XS-4XL, a
portfolio may have only one size, and use the each size group. This group is only one size and has only
one price.)
COGS - If the COGS feature is being used, you will also see a set of boxes for each product where you
may enter the cost of the product. This cost will not show up in the store front. It will show up in the
control panel as well as in the reports section for distributor level administrators only.
UPS Integration - If the UPS integration is being used, enter the Length, Width, Height and Weight of
this product, in its own packaging, in the boxes provided on this page.
3. Manage Quantity Discounts The Manage Quantity Discounts box allows you to offer discounts on
large orders. In order to offer Quantity Discounts, you must have entered at least one in the Minimum
Order Quantity field when you initially entered or edited the specific product. To add quantity
discounts for this product, follow these steps. Under the Quantity heading there is a box to enter the

first quantity break. Under the Price heading there is a box to enter the first price break. Enter both,
and then click on the Add button. To remove a quantity discount, check the delete box for that break
and then click on the delete button. Quantity price breaks must first be added, before they can be
deleted.
a. If you selected a size group that has only one size and one price, the new price should be
entered in the Price box as follows: $5 should be entered 5.00.
b. If you selected apparel sizing or offer multiple prices or sizes for this product, a percentage
discount must be entered in the Price box as follows: % should be entered.
c. The percentage will be calculated and an actual price will show here as well as in the store.
Images Tab
Click on the Images tab. Follow these steps to upload an image for this product. Product image
specifications: File Type: jpeg, 72 dpi, color: RGB Suggested Size: 350 pixels wide or larger. To upload an
image - First click the browse button, this will open up the file upload box from your computer. Select a
file and then click on the open button in the file upload box. Next, click on the upload image button in
the control panel. This will automatically upload your image of the detailed version, and resize it to a
thumbnail version. To replace an existing image, simply upload a new image. This will replace the old
image.
Logo Placement Tab
Click on the Logo Placement tab. Follow these steps to add a new placement.
Note: Leave this blank if the shopper has no choice or option of logo placement and do not remove the
[Default] placement that is here standard. If they do have a choice, proceed to the next step. Add New
Placement Click on the click here to add new placement button. You will see Logo Placement Name
next to a blank field. Enter the name of the placement in the blank field. (ex. Right chest, left sleeve,
back of shirt, etc.). If you would like the shopper to be required to select a placement, check on the
Required button. Click on the save your changes button. Follow these steps for each placement option
for this product.
Inventory Tab
Click on the Inventory tab if the inventory feature is being used for this product. Follow these steps to
add inventory. Adding inventory - Each size/color combination will have two boxes.
The top textbox is where you enter the amount of inventory that you have. The bottom textbox is
where you enter an inventory trigger for that size/color.
An inventory trigger is a number that you apply to this size/color, for which you want to be notified
when inventory reaches this number.

The inventory trigger is not a mandatory field. You may choose to use this feature or not. Once all
inventory numbers, and trigger numbers (if desired) are entered, click on the Save button.
For example:
Inventory - 48
Trigger 12
In this example, the total pieces available for sale are 48. When the available pieces reaches 12 pieces,
or below, an email will be sent as an alert that the stock should be replenished.
TIP: You must have checked the Inventory box when initially setting up your store at the Edit
tab/Features section of the Control Panel, at the category and sub category level and at the product
level on the product edit tab. The Inventory Email trigger will be sent to the email address entered
under the Edit tab/ Profile section, of the Control Panel.
CREATING SIZE GROUPS
This section shows you how to set up Size Groups which you will need to do before you can set up
pricing for your products. Every product in your store will need to be set up with a size group or a unit of
measure. This attaches to the price to indicate exactly what the shopper is ordering. Some common size groups
are Apparel, Ladies Apparel, Headwear, and Each.
You can set up as many size groups as you wish, giving whatever names to the sizes that you see fit for
your store. You will need to set up size groups before you can set up pricing for a product. Once size
groups have been created, you can see them in the drop down menu on the Sizing/Pricing tab at the
product level. There you can choose which size group to use for the product you are entering.
1. Make sure you are logged into the Control Panel
2. At the distributor level, (don't click into a store yet) you will see a Size Group tab.
3. Click "New" to create a new size group. Some common size groups are Apparel, Ladies Apparel,
Headwear, and Each. You can set up as many size groups as you wish, giving names to the sizes that
you see fit for your store. Now you will see a box with the words Sizes and Sort Order in it. This is
where you enter each size for this group.
4. Click "New." In the Name field, enter the name of your first size for this group. Next, enter a sort
order number. The system must have a sort order number for sizes. This will determine which order
sizes will go in. The smallest number will go to the top of the list. Sizes will display down the list
according to number.

5. Click "Save." Now it will take you back to the list of sizes for this size group. Click "New" to add an
additional size. Continue until all sizes for
this group have been entered.
6. If you are adding a size group like Each, where only one size is offered, name the size group, enter
the first and only size (include a sort order,
even though its the only one), and click "save."
7. To edit an existing size group, click on the size group from the Size Groups list on the Size Groups
tab. Click on the Edit tab and make your changes to the Size group name. To edit an existing size, click
on the Size group, click on the size itself to open the size set up page, and make your adjustments.
Note: You may take out a size from a size group when entering a product at the product level. Example:
If you have apparel sizes ranging from Small 3X-Large.
You select that size group in the sizing/pricing tab of the products tab. It pulls all sizes (Small 3X-Large)
into the page. However, you don’t offer this product in 2X-Large or 3X-Large. You may delete the 2X-
Large and the 3X-Large at the product level.
ADVANCED PRODUCT QUERIES/PRODUCT OPTION BUILDER
Please note: This is an Expert level store feature.
This section will walk you through setting up Advance Product Queries in your store. Advanced
Product Queries allows you to assign specific product options to each product in your store.
1.) First, make sure the Advanced Product Queries option is turned on for your store by checking the
advanced product queries box, located in the Edit tab under Expert Features and then click Save at the
bottom of the page.
2.) Next you are going to click on the “Products” tab and click on the “Product Option Builder”
tab. Click on the blue “Add” button to create a new product option.
On this next screen, you will see these options:
Product Option Name
Storefront Option Text
Required
Sort
Option Type: Free form text or Drop down

Product Option Name
The first field “Product Option Name” is where you will give your product option a name. For example,
you could create a Logo Placement option; so for the Product Option Name you could name it Logo
Placement.
Note: Be sure to check the “Active” box to activate this product option.
Storefront Option Text
The next field “Storefront Option Text” is text that will show in your storefront on the products that are
assigned this product option. For example, if you were creating a logo placement, you could put “Logo
Placement” for the text that will show up on the product in the storefront.
Required Box
You can either make this product option required for the product it is assigned to or you can give the
user the option to use/not use this product option when purchasing this product.
Sort
The next box is “Sort: (Storefront). If you are using multiple product options, the sort box gives you the
option to choose what order you want the product options to appear in the storefront next to the
product. Example: A sort number of 0 will cause the product option to appear first. A sort number of 1
will cause the product option to appear second, and so on.
Option Type
Finally, we have “Option Type,” which gives you the option to choose how your product option will be
displayed in the storefront. You have two options: Free form text, and Drop down.
Free Form Text
Allows you to have the product option displayed as a text field where the user can enter text,
such as their name or employee number, etc. When selecting the Free Form Text option, you
will see a blue tab appear below under Free Form Text Builder which gives you the option to
choose from either 1 Line or Multiline text fields.
Drop Down
This gives you the option to make your product option appear as a drop down menu for the
user to select from. When selecting this option, you will see a Blue tab appear below in the
product option tab that says Value Builder. Here you can create the different variables for your
drop down menu.
Once you are happy with the product option that you have created, click Save.

Assigning Product Options to Products
To assign the product options to your products, click on the Products tab and search for the product
you would like to assign these options to. Once you have clicked on the product, you will see a new
Product Options tab all the way over to the right; click on this tab. Here you will see the product
options you created in the previous steps. Check the box next to the product option/options that you
would like to assign to this product and you are done.
ENABLING AND TRACKING PRODUCT INVENTORY
Please note: This is a Pro level store feature. If you would like to track product inventory you will need
to do the following:
1. Make sure you are logged into the company store admin.
2. Navigate to the Edit tab at the store level.
3. Under the Pro features section, check the box next to Inventory and click save. Check the box next
to "Hide Inventory on Store Front" if you do not want inventory numbers to show up in the store
front. If this box is checked, for products you have inventory turned on for, it will say "in stock", or
"out of stock." If it is not checked, the inventory numbers will show up in the store front for each
product you turn inventory on for.
4. Click on the Categories tab at the store level and there will be a check box next to Inventory. You
must turn inventory on here, at the sub-category level and at the product level. Turn inventory on at
the product level by going into a product's edit tab in the company store manager through either the
products tab or the categories tab and then select the Inventory box at the bottom of the product's
edit tab and then hit save.
5. Once you have turned inventory on at the store level, category level, sub-category level and product
level, an Inventory tab will appear at the product level.
6. Click on the Inventory tab at the product level. Here you enter inventory for the product for each
size/color combination. Enter the inventory trigger number (see below) here for each size/color
combination. The inventory trigger is not a mandatory field. You may choose to use this feature or not.
Once all inventory numbers, and trigger numbers (if desired) are entered, click on the Save button.
To update inventory, add new inventory amounts to the existing inventory amounts
showing. Combine the old inventory with the new to show accurate inventory.

Inventory Trigger: This is a number that you apply to each size/color in each product, for which you
want to be notified when inventory reaches this number. You enter the Inventory e-mail (this is the
e-mail of the person that will be notified when inventory reaches the trigger number) on the Edit tab at
the store level under the profile section.
COPYING PRODUCTS
This section will show you how to eliminate the process of manually entering new products, by copying
product details from an existing product or a supplier store.
There are two ways to enter these products: Simple Product Copy and Advanced Product Copy
Simple Product Copy
Use this when you are copying a few products into your store.
Procedure:
1. Under the Products tab, choose the Simple Product Copy tab.
2. Select Copy Product and browse through the drop down menu. Find the product that you want to
copy and click on it.
3. Select the Into Category via a pull down. Choose the category and subcategory (if desired) for the
copied product to join.
4. Select from the drop down menu the appropriate shipping category and then click Copy New
Product. After copying the new product, you may then select the All Products tab to make any
adjustments to the copied product specifics, just as if it were a manually-loaded product.
TIP: Remember, under the Products, Edit tab, the product must have the Inventory button checked
and/or the Manage Product Activation button checked Active in order for the copied products
inventory levels to be determined and/or the copied product to be active within your store.
Advanced Product Copy
Use this when you want to copy an entire suppliers store or specific categories from a suppliers store
or from one of your own stores. You can also select specific products to be copied into your store as
well.
Procedure:
1. Under the Products tab, choose the Advanced Product Copy tab.
2. Select the supplier store that you would like to copy Categories/Products from in the drop down
menu.

3. Select a general shipping category for these products. This may need to be edited later once
products are copied. (AT THIS POINT, YOU MAY CLICK ON THE COPY ALL CATEGORIES AND PRODUCTS
BUTTON). Doing this will copy ALL categories and ALL products from this store into your store. If this is
not what you want to do, go to the next step.
4. Select the Category that you would like to copy from that Supplier Store in the dropdown menu.
Selecting a main category does not also copy its sub categories. (AT THIS POINT YOU MAY CLICK ON
THE COPY THIS CATEGORY AND PRODUCTS BUTTON). Doing this will copy this category and all
products in it from this store into your store. If this is not what you want to do, go to the next step.
5. Select Destination category that you would like specific items that you select to go into. If you would
like to see a thumbnail size image of the individual product, check the box.
Go through the list and check the small box next to each product that you would like to copy into the
selected category in your store. Once products have been checked, click on the Copy Selected Products
button. This will copy those products into your store into the selected category.
SORTING PRODUCTS
This section will show you how to use the Product Sort feature which allows you to display products in
the order you wish in each Category.
1. Make sure you are logged into the Control Panel.
2. At the store level, click on the Product tab. You will see a box that that reads "Product Filter" with a
field for Keyword and a drop down menu for Categories.
3. Click on the drop down menu and select the Category/Subcategory that contains the products in
which you would like to sort. Click "Search." This will bring up the products in the
Category/Subcategory that you have selected. There will be a "Sort Value" column.
4. In the Sort Value fields, enter in a number next to each product in the order you would like them
displayed. (0 goes to the top of the list)
5. Make sure to click "Update Sort Value" when you are finished.
Note: You cannot sort the view all products page and you cannot give Inactive Products a sort
value. When Inactive Products with a previous sort value are made active, they retain their
previous sort value.

DISPLAY PRODUCT COLOR IMAGE
This is a feature that allows a user to choose a color from the drop down menu on a product in the
store changing the main image to the color swatch image.
1. Log into your company store manager (https://www.co-store.com/admin)
2. Navigate to the Edit tab of your store.
3. Check the box next to the Display Product Color Image feature located under the basic feature
section.
4. Hit save at the bottom of the page.
5. To allow for swatch images that show as large as the main product image, you will need to upload
images that are 350 pixels wide or larger.
SEARCH FEATURE
The product Search feature (generally on the left hand side of your store, Quick Search and Advanced
search) work by searching your product database. Both Quick Search and Advanced Search take the
keyword entered and look for that keyword in each product's name and description. Advanced Search
goes a little further by allowing you to limit the result by price and the minimum amount that can
be ordered.
You must click the "Search or Go" buttons when performing a search. Hitting enter on the keyboard
does not work as it would in some other forms.
Search must also be enabled on the "Edit" tab of your store located under the Basic features section, in
order for it to show up on your Homepage.
CUSTOMIZED SEARCH FEATURE
Please note: This is an expert level feature
You can customize the function of Search in your store. If you have search turned on in your store, you
will see Customized Search with a box next to it under Search.
To enable the feature, check the box and click Save at the bottom of the page. You will then see a list
including:
Item Number
Product Name
Product Description
Product Profile
Color
Size
Price
The system will search in the fields that you select and will not search in the fields that you do not
select. However, if you have a word that is in an area you have not selected, but also in an area where
you have selected, it will still pull up that product.
For example, if you have selected Product description to be searchable and not Color, but a color is
listed in the product description of a certain product, that product will still be pulled if a User enters in
that color into the search field.
If you select Exact Match, the system will only find products that exactly match what a User enters in
the search field. Be sure to click "Save" at the bottom of the page when you are finished.
SEARCH AND PERMISSIONS
When using permissions and search together in a store, you need to save the category permissions for
each group after enabling the search and permission features on the edit tab.
In the Company Store Manager of your store:
1. Click on the Groups tab
2. Click on the User group name
3. Click on the Category Permissions tab and just hit save.
This will save the categories so that the search is able to search for products within those
categories. Do this for each User Group in your store.
ADDING FEATURED PRODUCTS
1. Begin by logging into your control panel and selecting a store.
2. Click on the "Edit" tab.
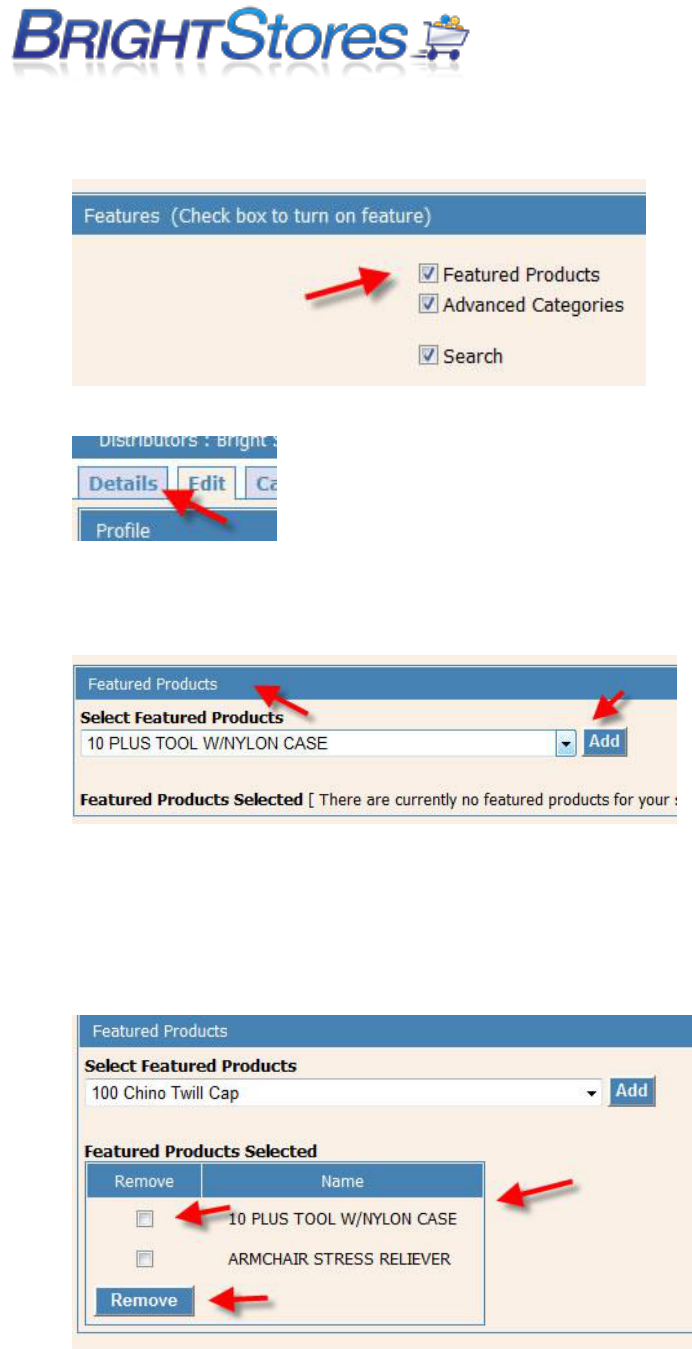
3. Scroll to the "Features" section and make sure that "Featured Products" is checked. If it's not,
check it and click "Save" at the bottom of the page.
4. Click on the "Detail" tab.
5. You will see a new section on the "Edit" tab titled "Featured Products" (if Featured Products
was not already turned on). Select the product from the drop down list you'd like to add to your
Featured Products area and click "Add".
6. You can add virtually an unlimited amount of Featured Products, but we recommend keeping
that amount between 2-5.
7. Each time you add a Featured Product it'll appear on a list (same area where you added the
product). You can also delete a product from the list in this same area by clicking the box next
to the product and hitting "Remove".
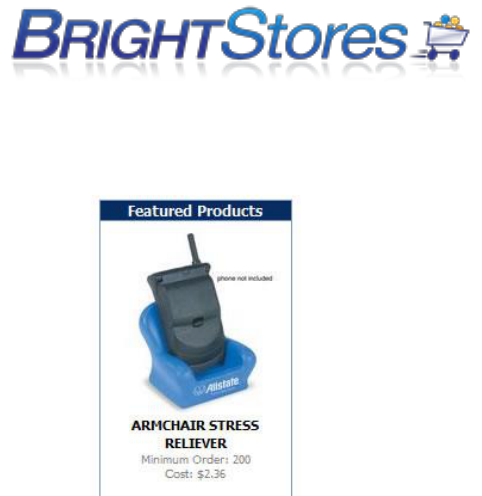
8. That's it! You have added Featured Products to your website!
LOGO MANAGEMENT
This section will show you how to use the logo management system. Please note, if you use the
logo management system, then the old logos tab and settings will no longer be in effect in your store.
First, navigate to the logo management tab in Company Store Manager. In the logo library section,
enter in the name of your logos, browse for your logo image and hit save.
The next step is to click on the 'User Group Category Logo Management' blue bar. This is where you
will select what user groups can see this logo and what categories and sub-categories can see this logo.
First, select which logo you want to assign to groups and categories. By default, all groups and
categories will be selected.
You can deselect all groups and all categories by deselecting the 'select all' or just deselect the
individual groups and categories that you do not what this logo to show for. If a category has sub-
categories, then select the one that contains the category and sub-category. For example,
Apparel\Ladies. Hit 'save settings' when you are finished.
The last step is to assign or not assign to specific products. Select which logo you want to manage,
select a user group, then select a category; the products within that category will populate to the
right. Next, uncheck the products that you do not want the logo to show on. Hit save settings. Please
note, if you have permissions set up for the store, then only the categories that the user group is
permissioned to see will show in the drop down.
*Repeat all steps for each new logo.

USERS AND USER MANAGEMENT
USER GROUPS
This section will show you how to add new user groups to your store.
1. Make sure you are logged into the Control Panel of your store. Click the Group button along the top
of the Control Panel.
2. Then click the blue "New" button.
3. Manage Group Features is the first section you see. Enter the name of the Group.
4. For Permissions based stores, at Discount, you may enter a percentage in decimal format for which
the Group is eligible. If no discounts apply, leave the field blank.
5. Check the Budget box if you would like to set up a group budget for this group. All users in this group
would deplete from the same budget set here if budget is checked in this location.
6. If the Groups purchases are regulated by the Manager Order Approval System, check the MOAS box.
If the Group does not require manager approval, leave the MOAS box unchecked.
TIP: If the MOAS button does not display, it is because it was not initially turned on at the Edit Page Tab
when you set up your store. If you wish to use the MOAS system, you may return to the Edit Page Tab
now and turn the system on.
7. Select the payment options that you would like users in this group to be able to use. (For second
floor, permissions stores only). Check the Require Credit Card Security Code box if you would like to
make the security code required upon checkout for credit card users in this group.
8. The second section is the Manage Group ID section. This field allows you to assign a group id or code
to this group. This can be used to direct new users, setting themselves up in a public store, into a
particular category. This is done by entering the Group ID here and having a new user enter that same
ID when they set up their user account. Press the Save button.
9. The third section is the Manage Employee ID Validation section. If you are using the employee ID
feature, you can set it up here so that users in
this group will be required to enter their user ID upon checkout, or enter it into their user profile.
Validation is only for companies requiring that Employee IDs be checked to see that they match the
company’s format. There is an additional cost for programming this.
After pressing Save, the Control Panel will update itself with four additional tabs across the top. You
will be at the Group level. To return to the store level, click on the words User Groups in the blue

navigation bar. Once back to the Groups tab, you will see the list of groups that you have added. To the
right of each name is a small circle. Click on the circle next to the Group Name that is to be the default
user group. This applies to public stores. When a user sets up a new account in the store, they will
automatically be placed in the group indicated here.
ADDING A NEW USER
This section will go over how to add new users one at a time:
1. Log in to the Control Panel
2. Click on the appropriate store
3. Click on the Groups tab
4. Click on the name of the group that you want to add the new user to (don't click the circle, this
is used to select the group that new users automatically go in to in a public store).
5. Click on the Users tab
6. Click on the NEW button. This will open a page to add new user information. This is called the
users Edit page.
Fill in the fields as follows on the Edit Page tab. Be sure to save all changes (at bottom)
All the personal information can be edited here including:
Email - required field
First Name - required field
Last Name - required field
Job Title
Employee ID - Feature must to turned on at the edit tab for this field to appear.
Phone
Discount - Permissions must to turned on at the edit tab for this field to appear.
Bcc Email
MOAS Email - Feature must to turned on at the edit tab and group tab for this field to appear.
Login Information
User Group
Username - required field
Password & Confirm - required fields
Check Active button to make this user active.

User Roles (5 Choices):
At least one role must be checked. A role determines a user’s access to the control panel. The Control
Panel is where Distributors and Store Administrators will set up and maintain the Company Store.
Different levels of secure access to the Stores Control Panel:
A. Distributor - The distributor has access to all areas of the control panel.
B. Store Administrator 1 - Details, Categories, Products, Groups (includes users), Reports (Edit and
view), Ship, Login
C. Store Administrator 2 - Details, Groups (includes users), Reports (VIEW ONLY).
D. Store Administrator 3 - Details, Reports (VIEW ONLY).
Please Note -Regarding the Store Administrative Roles, the listed tabs above can be viewed and
edited from the report unless otherwise stated.
E. User - Users can manage their profile but they have no access to the Company Stores settings and
do not access the Control Panel.
Payment Features - uncheck payment features at this level (in a 2nd floor store) if desired.
Budget - Check the Budget box to turn on a budget tab for this user.
UPLOADING MULTIPLE USERS
This section will show you how to upload a user list instead of manually adding one user at a time. This
is helpful if you have an extensive list of users you have to add into your store.
1. Make sure you are logged into the Company Store Manager.
2. Navigate to the Groups tab at the store level, you will notice the second box down, Upload and
Download User List.
3. In that box, click on "Download Example" and it will download the template that you can use to
upload users with. Save this file somewhere on your hard drive where you can remember, for example
your desktop.
The form should be filled out for the following reasons:
To upload new users or to edit users
To give gift certificates to users

To assign payment code to users
To upload or edit shipping and/or billing addresses for users as a default or nondefault address
The yellowed highlighted columns are required. Delete the default information before filling out the
form.
Column A: Do not delete! Must have this column for purpose of entry with NO spaces in between.
Row 1: Do not delete! Must have this row for purpose of entry.
Select one of the following reasons you are uploading a user list:
User Name
Gift Certificate
Payment Code
Shipping Address
Billing Address
If User Name is chosen,
Column B: User group name (must be set up prior to upload) Mandatory field
Column C: User Name Mandatory field
Column D: User e-mail address Mandatory field
Column E: Users first name Mandatory field
Column F: User last name Mandatory field
Column G: Employee job title
Column H: Employee phone number
Column I: User Budget amount (do not include dollar sign) NOTE: Do NOT leave budget empty if
uploading users in a store using budgets/points as this will disable the budget feature for each of the
users in that file.
Column J: User Discount amount (in decimal percentage amount ex. - .25=25%)
Column K: Blind Copy e-mail address
Column L: Manager Approval e-mail address (for MOAS)
Column M: Employee ID
Column N: Password (Even though highlighted in yellow, this field is not required if you want the users
to setup their own passwords)
NOTE - Mandatory fields must be filled out regardless of new upload or edit. Non mandatory fields
must be left blank if they are not being used or edited. Notes in template must be deleted prior to
upload or they will be included in upload.
If Gift Certificate is chosen,
Column O: Gift Certificate Amount for this user
Column P: Notes for this user

NOTE - Username and its mandatory fields (above) must be filled out when adding gift certificate
amounts to users.
If Payment Code is chosen,
Column Q: Payment code for this user
NOTE - Username and its mandatory fields (above) must be filled out when adding payment codes to
users.
If Shipping Address is chosen,
Column R: Ship to name
Column S: Ship to company name
Column T: Ship to street address
Column U: Ship to street address second line
Column V: Ship to city
Column W: Ship to state
Column X: Ship to area code
Column Y: Ship to phone number
Column Z: Ship to e-mail address
Column AA: If you want this ship to address to be the default address, the word default should show
here. If not, leave it blank
NOTE - Username and its mandatory fields (above) must be filled out when adding/changing users'
shipping addresses.
If Billing Address is chosen,
Column AB: Bill to name
Column AC: Bill to company name
Column AD: Bill to street address
Column AE: Bill to street address second line
Column AF: Bill to city
Column AG: Bill to state
Column AH: Bill to area code
Column AI: Bill to phone number
Column AJ: Bill to e-mail address
Column AK: If you want this Bill to address to be the default Bill to address, the word default should
show here. If not, leave it blank.
NOTE - Username and its mandatory fields (above) must be filled out when adding/changing users'
billing addresses.
Once your template is filled out, be sure to save it to your hard drive.
4. Navigate back to the Groups tab at the store level in the Control Panel.

5. In the Upload User List box, click browse and search for and select the file you just saved.
6. Check or uncheck the €Send Welcome Email€ box. If you uncheck this box, no welcome e-mail will
go out to new users.
7. If you check the welcome e-mail box, and have activated Custom E-mail on the Edit tab at the store
level, you can customize the welcome e-mail by entering a Salutation in the Salutation field and
entering a customized message in the Message field.
Example of a message:
An account has been created for you at XYZ Store. To access your account, you may need to set a new
password. Please visit the URL to set up. [email protected]
8. Click the Upload User File button.
TIP: Your list of Users must be in .CSV (Comma Separated Value) format. This format is available in
many popular programs like Microsoft Excel as a "Save As" function of the program.
9. After your Upload is complete, if you were uploading new users, each uploaded User will have the
billing and shipping address assigned to the Group as a whole if one has been set up for this group,
unless you assigned the user one at the user level.
10. After your Upload is complete, Users will have access to all the Product Categories unless you
choose to make alterations to the Group under the Category Permissions tab. (This is only for 2nd floor
stores that have Permissions turned on)
USER UPLOAD TROUBLESHOOTING TIPS & SUGGESTIONS
When uploading a user file there are several errors that could occur if the file has not been filled out
correctly or saved in the correct format. See below for examples of error messages that can occur and
helpful tups/suggestions for a successful file upload.
* Your store From Email address needs to be set on the store edit tab!
This means that there is an email address in the file that is incorrectly formatted such as missing the @
symbol or missing the .com or .net extension. Once you locate the email address causing this message
to appear and have corrected it you will then resave the file and proceed to upload the file again until
you no longer receive this error.
* UserName in record 2 does not belong to the current store.
This means there is a username in this file in row 2 that is already in use in another store in the
BrightStores system and you will want to change this username in order to upload this file.

FILES CONTAINING CELLS WITH LEADING ZEROS
After researching the issue with leading zeros being removed from .csv file formats when uploading a
user list, it has been determined that this is an issue with Microsoft Excel (according to Microsoft) and
not the BrightStores system itself. Microsoft support has advised of the below workaround to
successfully upload .csv files comma delimited files without the leading zeros being removed from the
file upload.
* If your file contains cells with leading zero's, to prevent the file from removing the zero's when
saving/uploading it under the Groups tab, you want to place an apostrophe in front of the cell
containing the leading zero.
For example: 01234 would be entered as '01234
CHANGING A USERS GROUP
This section will show you how to change the Group that a User is in.
1. Make sure you are logged into the Control Panel.
2. Navigate to the Groups Tab at the store level.
3. Click on the Group the user you wish to change is currently in.
4. Click on Edit tab at the group level and then click on the User.
5. Click on the Edit tab at the user level. Half-way down the page, you will see a "User Group" with a
drop-down menu under Login Information.
6. Click on the drop-down menu and select the Group that you want the User to be in.
7. Make sure to click "Save" at the bottom of the page when you are done.
ADDRESS BOOKS
This section will explain the steps involved with setting up billing and shipping addresses in the control
panel.
In the control panel, there are 3 different places where you can set up billing and shipping addresses.
1. You can set up default billing and shipping addresses that will apply to ALL orders going through the
store. These default addresses will automatically fill in the appropriate billing and shipping fields on

the checkout page in the store. The shopper CANNOT edit these fields. Again, all orders that go
through the store must use the same shipping or billing address for these options to apply.
To add a store wide default billing address, go into the control panel, groups tab, bottom of the page.
You will see Default Billing Address. Fill in and save.
To add a store wide default shipping address, go into the control panel, ship tab. You will see Default
Shipping Address. Fill in and save.
Group Level Addresses
2. You can set up an address book at the Group level. This can include billing and / or shipping
addresses. These addresses will be offered to all users in that specific group on the checkout page. You
can choose to set an address up as the default address by clicking the radial button next to that
address name. If it is a default address, it will automatically fill in the appropriate fields on the
checkout page. If you don't set it as default, the address will be offered on the checkout page in a drop
down menu.
To add a group level address book go into the control panel, groups tab, click on the group name you
would like to add an address for, click on the address book tab, click on new, select shipping or billing,
enter information, save. Once you go back to the address book tab you will see the address name. The
radial default buttons will show up to the right of the names.
User level Addresses
3. You can set up an address book at the user level. This can include billing and / or shipping
addresses. These addresses will be offered to one specific user only on the checkout page. You can
choose to set an address up as the default address by clicking the radial button next to that address
name. If it is a default address, it will automatically fill in the appropriate fields on the checkout page.
If you don't set it as default, the address will be offered on the checkout page in a drop down menu.
To add a user level address book, go into the control panel, groups tab, click on the group name for the
group that contains the user, click on the users tab, click on the username for that user, click on the
address book tab, click on new, select shipping or billing, enter information, save. Once you go back to
the address book tab you will see the address name. The radial default buttons will show up to the
right of the names.
RESETTING A USERS PASSWORD
Normally you should have your users click on the "Forgot Password?" link located at the log in page of
your store. From there they can enter their username - information on how to reset their password
will be sent to the e-mail account associated with said username. We recommend doing this and not
manually resetting their password for them due to security reasons.

If you must manually reset their password, please do the following:
1. Begin by logging into your control panel and selecting a store.
2. Navigate to the "Groups" tab.
3. Click on the group name that the user exists in.
4. Click on the "Users" tab.
5. Click on the username of the user that needs assistance.
6. Navigate to their "Password" tab.
7. Enter their new password, confirm their password in the second field and click "Save". You will
be responsible for letting the user know the new password.
GUEST CHECKOUT
This tutorial will show you how to set up your store to allow Guests to check out. This is helpful if you
do not want to require all Users to sign up for their own account. Your store needs to be a public store
to allow Guests to check out.
1. Make sure you are logged into the Control Panel.
2. Navigate to the Edit tab at the store level.
3. Under Basic features section, check the box next to Allow guests to checkout (Guest Store) which is
under the feature, Public. (Public needs to be enabled)
4. You will then need to set up a guest user in the store with the username and password that shows
on the edit tab when you turned on guest checkout. Follow the same directions to set up the guest
user as you would any other user in the store.
- Click on the groups tab, click on the name of the default user group, click the new button. Enter in
the first and last name (can be guest user), the username and password provided on the edit tab of the
store when you enabled the Guest Checkout option that appears in red; be sure to include the *
before and after the password.
For Example: Username: Guest2134 Password: *dfault2134*
- Hit save when you are done.

Once this feature is enabled, when a User goes to check out, they will see a new option to continue as
a Guest at the shopping cart level, as well as the options to sign into their existing account, (if they
have one) or to create an account.
NOTE: All the orders that are placed by Users checking out as a Guest will fall under one username
when running a report. For this reason, there are not a lot of options for running reports on guest
users.
USER MANAGEMENT
This section will show you how to use the User Management Tab (Pro store feature).
The User Management is an advanced user tool that allows for mass updating and searching of users
by Name, Username, E-mail address, Employee ID and User Group. Features like Gift Certificates,
Budgets, User points (Only in a Points Store), and User Groups can be updated for hundreds of users at
one time.
This can be done by following the following steps:
1. Make sure you are logged into the Control Panel
2. Navigate to the Edit tab at the store level and enable User Management under the features
section. Be sure to click Save.
3. Click on the User Management tab at the store level.
4. Use the Search Filter to search for a User or list of Users by Name, Username, Employee Id, or Group
and click "Search for User".
5. You can also add a user by clicking the Add New User at this stage.
6. Select which option you would like; View Users, Modify Gift Certificates, Modify Points, Modify
Budget, or Delete Users.
7. If you select Modify Budget or Gift certificates, then under Apply Changes, you will enter in the
amount you would like to add, add any notes and then click apply.
8. If you select to Modify Points, (in a points store) then under Apply Changes, you will credit or debit
the amount, select ledger (if applicable), or enter in notes (if applicable) then click apply.
9. If you select Modify User Groups, choose the group from the dropdown menu that you would like to
move the selected users (From step 1) to then click apply.

10. If you select Delete Users (which makes them inactive), select "delete all users" or "delete none"
to designate the action desired to the selected users (From step 1) and then click apply.
11. Look at the list of users in the Save Changes section of the page and make sure that the appropriate
users and the appropriate action has been set up. Once it looks right, click the Save Applied Changes
button to save the changes or click Clear Applied Changes to remove any of the changes you applied in
previous steps.
LOGGING INTO YOUR COMPANY STORE MANAGER
1. Navigate to the following website: https://www.co-store.com/admin.
2. Enter in your credentials (username / password) into the respective fields.
3. Check "Remember me?" if you wish to automatically login next time you visit the Control Panel
(please do not do this on a shared computer - anyone can access your computer can access your
store's admin area).
Finally, click "Log In".
4. You are now logged in. If your account has distributor level access you will see the Distributor
Landing Page. See the following step on how to access a store.
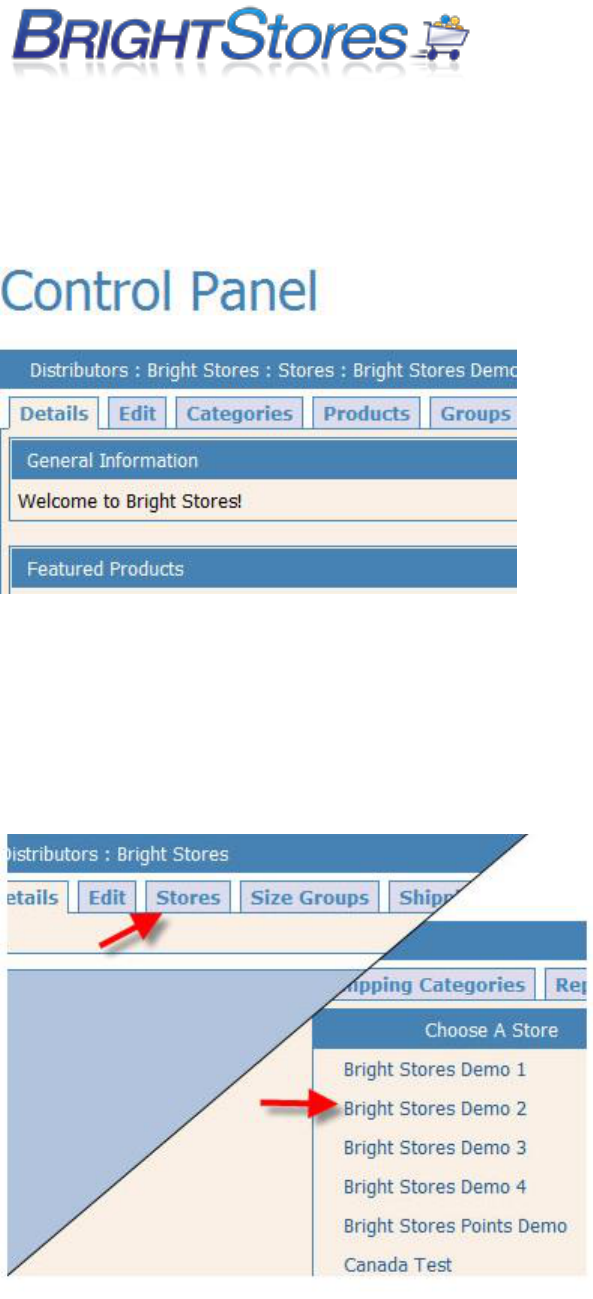
If your account only has Store Administrator access, you will automatically be taken to the Store Detail
Page (see example below) your account resides in.
5. If you are logging in as a distributor, you'll come to the following page after logging in. To edit a
store, click on the stores tab and then the store you wish to edit
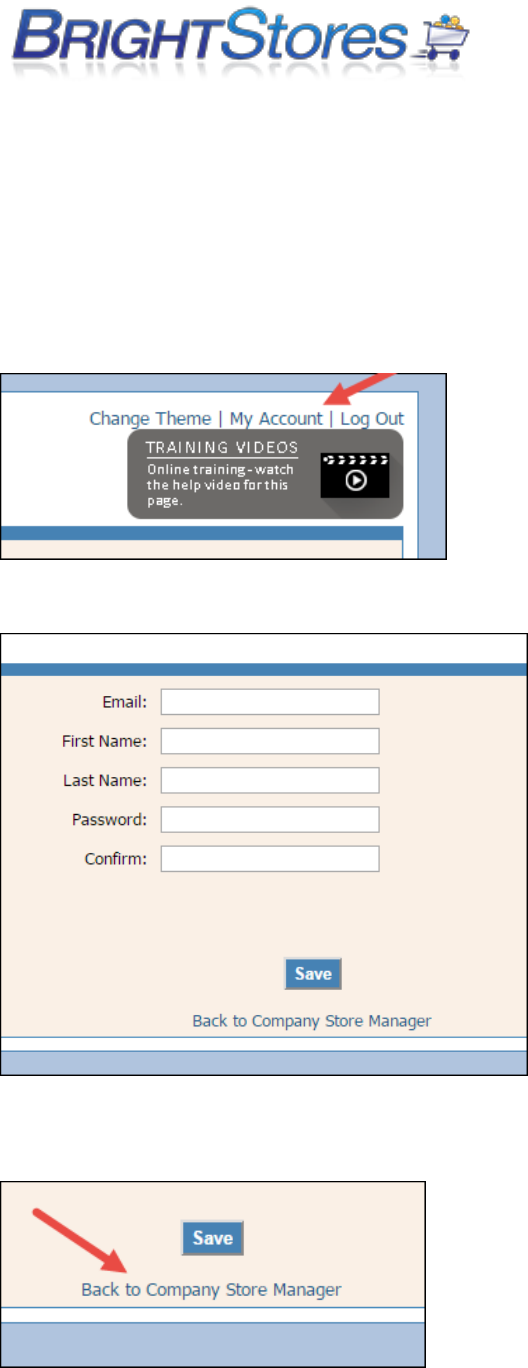
MY ACCOUNT (COMPANY STORE MANAGER)
The My Account link in the Company Store Manager allows you to quickly access and edit the basic
details associated with your username. These fields include your email address, first/last name, and
password.
You can find the My Account area in the top right corner of every tab in the Company Store Manager
just above the Training Videos link. Click on My Account to see your account details.
To edit these fields simply click into each field you want to change, edit your details and click Save.
Once you have saved your changes you can get back to the Company Store Manager area by clicking on
the link below the save button titled “Back to Company Store Manager”.

MAKING YOUR STORE PRIVATE
This tutorial is intended to show you how to force people to login to your store before they can view it,
and to make it so any new accounts are moderated by a manager.
1. Begin by logging into your company store manager and selecting a store.
2. Click on the "Edit" tab.
3. Scroll to the "Pro Features" section and check the "Private" checkbox (this will force people to
login to your store; if you'd like people not to have to login to your store, simply uncheck
"Private") or "Semi-private" checkbox (allows users to browse products in the store, but when
checking out they are required to enter in a pre set up username and password).
4. Click save at the bottom of the page.
5. If you would like it so they can request and get approval for their new account, simply click on
the "Edit" tab again (if you're not already there) and enter the e-mail address of the person
approving new accounts in the "Account Request Email" field under the "Profile" section. (this
only works with "private" stores).
6. Click save at the bottom of the page. Now any new accounts will be routed to that e-mail
address. Note that you still must manually create accounts sent to this e-mail address - the
"Account Request Email" simply informs you that the user would like an account, it does NOT
create it.
ORDERS AND ORDER MANAGEMENT
BASIC ORDER MANAGEMENT
This section shows you how to utilize the Basic Order Management feature in your store which is
available to all store levels by default. The Basic Order Management feature is extremely useful when
processing, fulfilling and shipping orders.
1. Make sure you are logged into the Company Store Manager.
2. Navigate to the Order Management tab at the store level and select Basic Order Management.
Note: The Advanced Order Management tab is available to Pro and Expert Level stores only and will
be grayed out until the feature is enabled.

3. Next you can run a report by first entering in a start and end date. The report can then be filtered by
User Group, User, and Order Status.
4. Select "Apply." The report will display the specified search information below. The following is what
you will see:
Order Number -By clicking the underlined Order #, your screen reverts to specific information about
this Order.
Order Date - Order Date
User Group - User Group that the User who placed the order belongs to.
User Name - User name of the user who placed the order.
Status- Current status of the order. You can change this by selecting the Order # which takes you to
the orders edit page.
Notes - Any notes entered by the user in the Notes field on the checkout page.
Ship Date - Shows the date the order was shipped (if it has).
Shipping Method - Shows the shipping method requested by the user on checkout.
Tracking Number - Shows the shippers tracking number if one has been entered. To add one, click on
the Order # to be taken to the orders edit page and select the Shipping tab for the order.
ADVANCED ORDER MANAGEMENT
This section shows you how to turn on Advanced Order Management in your store and use it. The
Advanced Order Management feature is extremely useful when processing, fulfilling and shipping
orders. The order filter offers many selections to narrow the information and create the Report you
want. Unlike Basic Order Management, here you can print pick tickets, packing slips, shipping labels
and send the confirmation email to the customer. You can also search by Order Number which
supersedes all filtering options.
1. Make sure you are logged into the Company Store Manager.
2. Navigate to the Edit tab at the store level.
3. Under the Pro features section, check the box next to Advanced Order Management to enable this
feature and click Save at the bottom of the page.
4. Navigate to the Order Management tab at the store level and select Advanced Order Management.

5. Here you can run a report by selecting a date range type or entering in a start and end date. The
report can be filtered by User, order status, lock status, or order number (which supersedes all filtering
options).
6. Select "Apply." The report will give you interactive capabilities to fulfill the Order. The following is
what you will see:
Lock Order- You can lock an order so that changes may not be made in the Order Details.
Order # - By clicking the underlined Order #, your screen reverts to specific information about this
Order, taking it to the orders edit page.
Date Order Date
User User name
Status Current status of order. You can change the status by clicking on the dropdown menu and
selecting an updated status.
In Hands Date Shows the date the shopper would like to have the order.
Shipping Date Shows the date the order shipped (if it has).
Shipping Method Shows the shipping method requested by the shipper. You can change this by
selecting an alternate method from the dropdown menu.
Tracking Number Shows the shippers tracing number if one has been entered. To add one, click on the
Edit button.
Pick Ticket
Next to Pick Ticket you will see the button Generate. By pressing Generate a Pick Ticket will display in
Adobe/Acrobat with complete fulfillment and order data including Shipping Address, Product
information and fulfillment data and instructions. You may print or view. Once generated, information
will be displayed to the right of the Generate button regarding when and who generated the last Pick
Ticket.
Packing Slip
Next to Packing Slip you will see the button Generate By pressing Generate a Pick Ticket will display in
Adobe/Acrobat with complete order data including Billing and Shipping Addresses and the Product
Description. You may print or view. Once generated, information will be displayed to the right of the
Generate button regarding when and who generated the last Packing Slip.
Ship Label
Next to Ship Label you will see the button Confirm. By pressing Confirm a shipping label will be printed
to previously set up printers.

Confirmation Email
The Confirmation Email will be e-mailed to whoever placed the Order.
Below is the list of heading that show up on an order confirmation:
Custom Information Field info
Order #
Order Date
Purchased by
Customer name
Employee ID (if feature is being used in store)
Billing Address
Shipping Address
Payment Method
Shipping Method (if feature is being used in store)
User Shipping Account (if feature is being used in store)
Product Description
Item name, item number, color, logo information, size, quantity, unit price, total, fulfillment data (if
applicable)
SubTotal
Discount
Coupon Savings (if feature is being used in store and coupon was used)
Sales Tax (if feature is being used in store)
Shipping (if feature is being used in store)
Handling (if feature is being used in store)
Donation (if feature is being used in store)
Order Total
Gift Certificate (if feature is being used in store)
Amount Used (refers to Gift Certificate)
Amount Left (refers to Gift Certificate)
New Total
CUSTOMIZING THE ORDER CONFIRMATION EMAIL
This section will show you how to customize the confirmation email that is sent to users after
they make a purchase from your store.
1. Make sure you are logged into the Company Store Manager of your store.

2. Click on the edit tab in the Company Store Manager at the store level and check 'Custom Email
Configuration' located under the Expert Features section and click save.
3. Under the profile section on the edit tab, 'Order Email Configuration' will pop up with a field that
allows you to customize the default text.
4. Once you have customized the text, you will want to hit save at the bottom of the page.
MANAGER ORDER APPROVAL SYSTEM – MOAS
This section shows you how to set up MOAS - Manager Order Approval System for your store
MOAS is a feature that requires Manager Approval for all or specified orders that come through the
store. A manager must approve a Pre-Order before it actually becomes an order in your store. The
users managers address is either pre-loaded, or can be added at the checkout page by the user. The
order is then sent to the manager for review and approval of the order. If approved, the order is sent
to the appropriate email address for processing. If denied, notification of such is emailed to the
shopper. MOAS is on by default for all Groups but you may choose to unselect individual Groups at the
Groups Tab.
1. Make sure you are logged into the Control Panel. Navigate to the Edit tab at the store level. Check
the MOAS button under the features section. The page will refresh and display an Email Domain field
and a disable for credit cards box.
2. Enter the E-mail Domain (see below) or enter the exact e-mail address(s) under "Enter multiple
email addresses separated by a semicolon:" The e-mail(s) you enter here applies to all the users in the
store in the groups where you turn MOAS on. If you prefer to set up managers e-mail addresses at the
group level or user level you may do that as well.
3. Check the Disable for Credit cards if you wish to allow a user purchase power without the
requirement of manager approval when paying by credit card.
4. You will then need to navigate to the Groups tab and click on each group that contains the users that
you wish to have a manager approve of their purchases. (You can enter a different manager e-mail for
each group or for each user.)
E-Mail Domain you can enter a domain name here. When the shopper is prompted to enter their
managers address, they will only need to add the first part of the address, up to the domain name. For
example: @ourcompany.com will already show up.
Pending Inventory Tracking
If the Pending Inventory Tracking box is checked, the product will be taken out of inventory (if the
Inventory feature is being used) while awaiting manager approval. The product will be placed in
pending status. If the order is declined by the manager, the product will be returned to inventory. If
the order is approved, the inventory will be depleted and processed.
REPORTS EXPLANIED
DETAILED REPORT BREAKDOWN AND EXPLANATIONS GUIDE
This knowledgebase article will give you a complete breakdown of the reports found under the Reports
tab in Company Store Manager.
INVENTORY REPORT
This report is used by those using the Inventory feature to track inventory for all or some of their
products in the store. It shows each product broken down by size and color and what has been sold,
adjustments that have been made and the quantity that remains in stock.
To display your Store’s Inventory information, enter the Start Date and the End Date and select the
“Run Report” blue button.
The Report generated will include the following information:
Item Number
Product Name
Size
Color
Starting (quantity in stock during date range)
Adjustments (increase or decrease of product during date range)
Sold (quantity sold within date range)
Inventory on Hand (how many items are available in stock during date range)
Unit Cost (per unit in stock during date range)
Inventory Value (what the total value of the inventory is during date range)
Note: If you are just now deciding that you wish to track Inventory, you must return to those levels and
turn the inventory feature on. To Save your report you will see a button labeled “Save to CSV” that you
can select which will allow you to save your report as a .CSV file.
MOAS
The MOAS System is an innovative tool that allows you to control spending within your Company
Store. This report is used by those who are using the MOAS (Manager Order Approval System) feature
in the store. The report shows orders (with order details) that are waiting for manager approval and
have not gone into the system as an order yet. You may filter this report by date range (beginning date
and end date), User Group or User. Orders may be approved or denied from this report as well. You
can also send an additional approval request e-mail to the manager from this report.
SALES
The Sales Report delivers a specific view of product sales within a determined length of time. This
report shows the sales breakdown for each order placed. This includes the user name and group,
payment information, and a breakdown of sub-total, discount, sales tax, shipping, handling and order
total.
This Report can be filtered by User Group, User, Order Status and Default Payment Code. You also have
the option to select “Show Ship To,” which will display the product’s shipping destination. You also
now have the option to select “Show Employee Id” which will display the Employee Id for the user that
placed the order if you are utilizing the Employee Id feature.
The following column headings are displayed for the date range selected (those that are underlined are
sortable within the Report):
Ship To (an optional column showing the product’s shipping destination)
Order (the internal Company Store Order number)
Order Date
User Group
User Name
Employee Id
Payment Method
Payment Code (this can be a PO # or Payroll Deduction for example)
Payment Sub-Total (the total price of the product without shipping, handling or sales tax)
Discount (listing of any discounts that applied to this order such as gift certificates or quantity
discounts)
Sales Tax (total cost of any sales tax applied to this order)
Shipping (total cost of any shipping charges applied to this order)
Handling (total cost of any handling fees applied to this order)
Order Total - At the bottom of the Report the Totals are computed for the columns Sub-Total,
Discount, Sales Tax, Shipping, Handling and Order Total.

You will see a button labeled “Save to CSV.” By clicking the button, you will have the option to Open or
Save the file to a CSV file format.
PRODUCTS
The Products Report is beneficial when analyzing the products offered in your Store within a specified
time range. This report shows sales information for each product in the store. This includes dollar value
sold, % of Product Sales and % of store sales.
The Report can be filtered by Product Category and by Product Category/Subcategory.
The column headers displayed are:
Item#
Product Name
Color
Size
Quantity Sold
Unit Price
Dollar Value Sold
% of Sales
% of Store Sales
Cost (what the product costs the company store)
Profit (profit made from sale)
The Products appear in order of Categories sold from greatest to least. None of the column headers
can be sorted.
You will see a blue button labeled “Save to CSV.” By clicking the button, you will have the option to
Open or Save the file to a CSV file format.
GIFT CERTIFICATES
The Gift Certificate Report’s purpose is to list gift certificates that have been distributed to Users within
a specified date range. For those gift certificates that have been used, it shows the order information.
You may filter this report by date range (start date and end date), User Group or User.
If you are utilizing the Employee Id feature then you can also check the box next to Show Employee Id
to show the employee id for the user that placed the order.
The column headers for the Gift Certificate report are displayed as:
User Group
User Name
Employee Id
Debits (displays the dollar amount, if any, of the gift certificate amount used)
Balance (displays the dollar amount remaining of the gift certificate)
The bottom row displays the total dollar amount of all the remaining gift certificates combined.
Note: You will see a blue button labeled “Save to CSV.” By clicking this button, you will have the option
to either Open or Save the file to a CSV file format.
COUPONS
This report shows all coupons that have been added to the system including their coupon code,
expiration date, partial coupon amount used (if applicable) and coupon amount remaining. This report
can be filtered by date range (starting date and end date), User Group or User.
You will see a button labeled “Save to CSV.” By clicking the button, you will have the option to Open or
Save the file to a CSV file format such as those found in popular spreadsheet programs such as Excel.
Note: You can also select the blue “Add New” button to create a new coupon code, as well as the
option to Upload a list of coupons if you have used our Coupon Import Template to create a .CSV file of
all the coupons you would like to upload. Please see our support article called “Uploading Multiple
Coupons” for more information on adding coupons.
BUDGET
The Budget report can only be used if the store is utilizing the Budget feature. This report shows
remaining budget amounts for users or groups. It also shows orders that have been placed and what
amount of the budget these orders used. You can filter this report by date range (start date and end
date), User Group or User.
The column headers displayed are: (underlined columns are sortable).
Order (the internal Company Store Order number)
Order Date
User Group
User Name
Payment Method
Payment Code
Amount (amount of budget used)
Balance (amount of remaining budget)
You will see a button labeled “Save to CSV.” By clicking the button, you will have the option to Open or
Save the file to a CSV file format such as those found in popular spreadsheet programs like Excel, Lotus
123 or QuatroPro.
BUDGET REMAINING
This report provides you with information on the current budgets remaining unused in the store. You
can search by User Group or User and then click the Run Report blue button. You also have the option
to “Save to .CSV” if you wish to save a copy of the report.
The report provides you with the following information:
Username
First Name
Last Name
Manager Email
Budget Balance (total budget remaining)
If you are searching ALL user groups and users, the report display is broken down by User Group which
allows each groups information to be separated and makes this report easily readable.
SPENDING
The Spending Report is useful for identifying what each User Group and each individual User has spent
within a specific date range. This report shows a breakdown of spending. It’s broken down by user
group or by user and includes the orders placed and what their total amount spent is.
The column headers for this Report are:
Order #
User Group
User Name
Full Name
PO Number
Order Total
You will see a button labeled “Save to CSV.” By clicking the button, you will have the option to Open or
Save the file to a CSV file format such as those found in popular spreadsheet programs like Excel, Lotus
123 or QuatroPro.
PRODUCT DETAIL
The Product Detail Report itemizes and displays particular product information for each product
ordered. This report shows each product by name and item number and how much of each item has
been sold. Order numbers are also displayed. The Item # and Product Name are displayed with
columns listing Order #, Size, Color, Quantity Ordered and Quantity Total.
This Report may be filtered by the following:
Start Date
End Date
User Group
User
Product Category
Product
You will see a button labeled “Save to CSV.” By clicking the button, you will have the option to Open or
Save the file to a CSV file format such as those found in popular spreadsheet programs like Excel, Lotus
123 or QuatroPro.
CATEGORY SALES
The Report will generate a total amount of sales for the particular Category selected and all of its
products. The Category Sales Report offers five filters to receive the data you are seeking:
Start Date
End Date
User Group
User
Product Category
Once generated, the Category Sales report will include the following information:
Categories Selected
User Group
User
Order Total for Category
At the bottom of the report there will be a Total adding sales of all categories selected. This report
gives you two different options for saving it. You can either “Save to PDF” which saves the report as a
PDF file, OR “Save to CSV” which will save the file as a .CSV file format such as those found in other
spreadsheet programs like Excel, Lotus 123 or QuatroPro.
QUERY RESPONSE
The Query Response report shows queries asked on the store checkout page and their responses. This
report tab will not show up if you are not currently using the Customize Queries feature which is an
expert level store feature.
You may only filter this report by date range (Start and End Date).
The report includes the Primary Query (and Second Query if applicable), Responses, Products ordered,
Quantity Ordered, and the Sales for this order.
This report gives you two different options for saving it. You can either “Save to PDF” which saves the
report as a PDF file, OR “Save to CSV” which will save the file as a .CSV file format such as those found
in other spreadsheet programs like Excel, Lotus 123 or QuatroPro.
ORDER DETAIL
The Order Detail Report offers complete information on orders. The following filters allow you to
define the exact information that you are seeking:
Start Date
End Date
User Group
User
After making the filter selections select the blue button labeled Run Report and your report will
generate, providing you with the Order #, the Order Date, User Group, Username, First & Last Name,
Payment Code, CC Authorization # (credit card authorization number) Item #, Product, Quantity, Unit
Price, Extended Price, Sales Tax, Estimated Shipping and Order Total.
You will see a blue button labeled “Save.” By clicking the button, you will have the option to Open or
Save the file to a CSV file.
ORDER DETAIL II
The Order Detail II Report offers complete information on orders. This report allows you to search by
Order Id or Products whereas the Order Detail report does not.
The following filters allow you to define the exact information you see:
Start Date
End Date
User Group
User
Product
Order Id (this option Supersedes ALL filtering options)
After making the filter selections, select Run Report and your report will generate showing the Order #,
the Order Date, User Group, Username, First & Last Name, Order Status, Item #, Product Name, Color,
Logo, Size, Qty (Quantity), Item Price and Item Cost.
You will also see a blue button labeled “Save To CSV.” By clicking the button, you will have the option
to Open or Save the file to a CSV file format.
ORDER DETAIL III
The Order Detail III Report offers information on orders basically combines the Order Details and Order
Details II reports.
The following filters allow you to define the exact information you seek:
Date Range
Start Date
End Date
User Group
User
Product
Order Id (this option Supersedes ALL filtering option)
Your report will generate showing the Order #, the Order Date, User Group, Username, First & Last
Name, Billing address, Shipping Address, Payment Method, Payment Code, Credit Card Info, Tracking
Number, Approval Email, Employee ID, Primary Question, Primary Response, Secondary Question,
Secondary Response, Custom Date, Custom Field Text, Item #, Product, Personalization, Color, Size,
Quantity, Unit Price, Extended Price, Sales Tax, Estimated Shipping, Order Total, and order Notes.
You will see a blue button labeled “Save To CSV.” By clicking the button, you will have the option to
Open or Save the file to a CSV file format.
SHIP TO:
The Ship to Detail Report offers complete information on orders and the ship to address. The following
filters allow you to define the exact information you seek:
Start Date
End Date
User Group
User
Order Status
Product
Order Id (Supersedes ALL filtering options)
After making the filter selections your report will generate showing the Order #, the Order Date,
Employee Id, Ship to Address, Payment Method, Payment Code, Username, First & Last name, Status,
Item #, Product name, Color, Size, Quantity, Item Price & Item Cost.
You will also see a blue button labeled “Save To CSV” that will give you the option to Open or Save the
file to a CSV file format.
SUBSIDY:
The Subsidy report gives you detailed information on the order #, order total, payment method used,
user details that placed the order, Employee Id, Internal ID fields (found in company store manager
under the users edit tab), and Freight costs. You must have the Subsidy feature enabled in order to get
the products subsidy amount.
Start Date
End Date
User Group
User
Product
Order Id (Supersedes ALL filtering options)
After making the filter selections your report will generate showing the Order #, the Order Date, User
Group, Username, Last name, First Name, Internal Id fields, Employee Id, Payment Method, Sub Total,
Sales Tax, Freight, Order Total & Subsidy.
You will see a blue button labeled “Save To CSV.” By clicking the button, you will have the option to
Open or Save the file to a CSV file format.
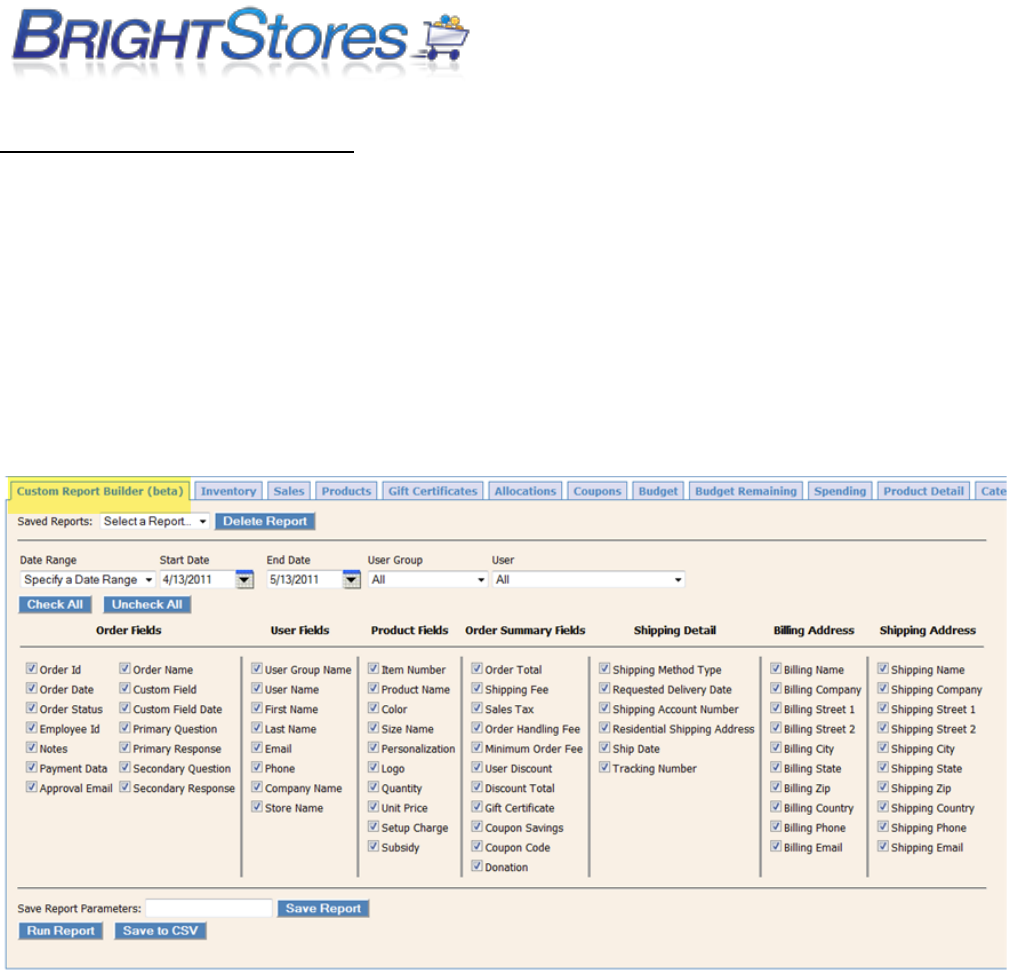
CUSTOM REPORT BUILDER
This knowledgebase article will explain to you how the Custom Report Builder works and how to use
this Report to run custom reports based off the information you have selected to be included in your
report.
Step 1.) First sign into Company Store Manager and choose the store you want to run the report for.
Next you are going to select the Reports tab. Here you will see the Custom Report Builder tab on left of
the various report tabs. Click on this tab.
Step 2.) You will notice that you have various options to choose from to build your custom report.
The first area of this tab allows you to select the Date Range to run your report for, the User Group to
be included in the report as well as the User to run the report for.
The User Group and User drop downs automatically default to ALL so be sure to change these if you
are looking to run a report by group or username.
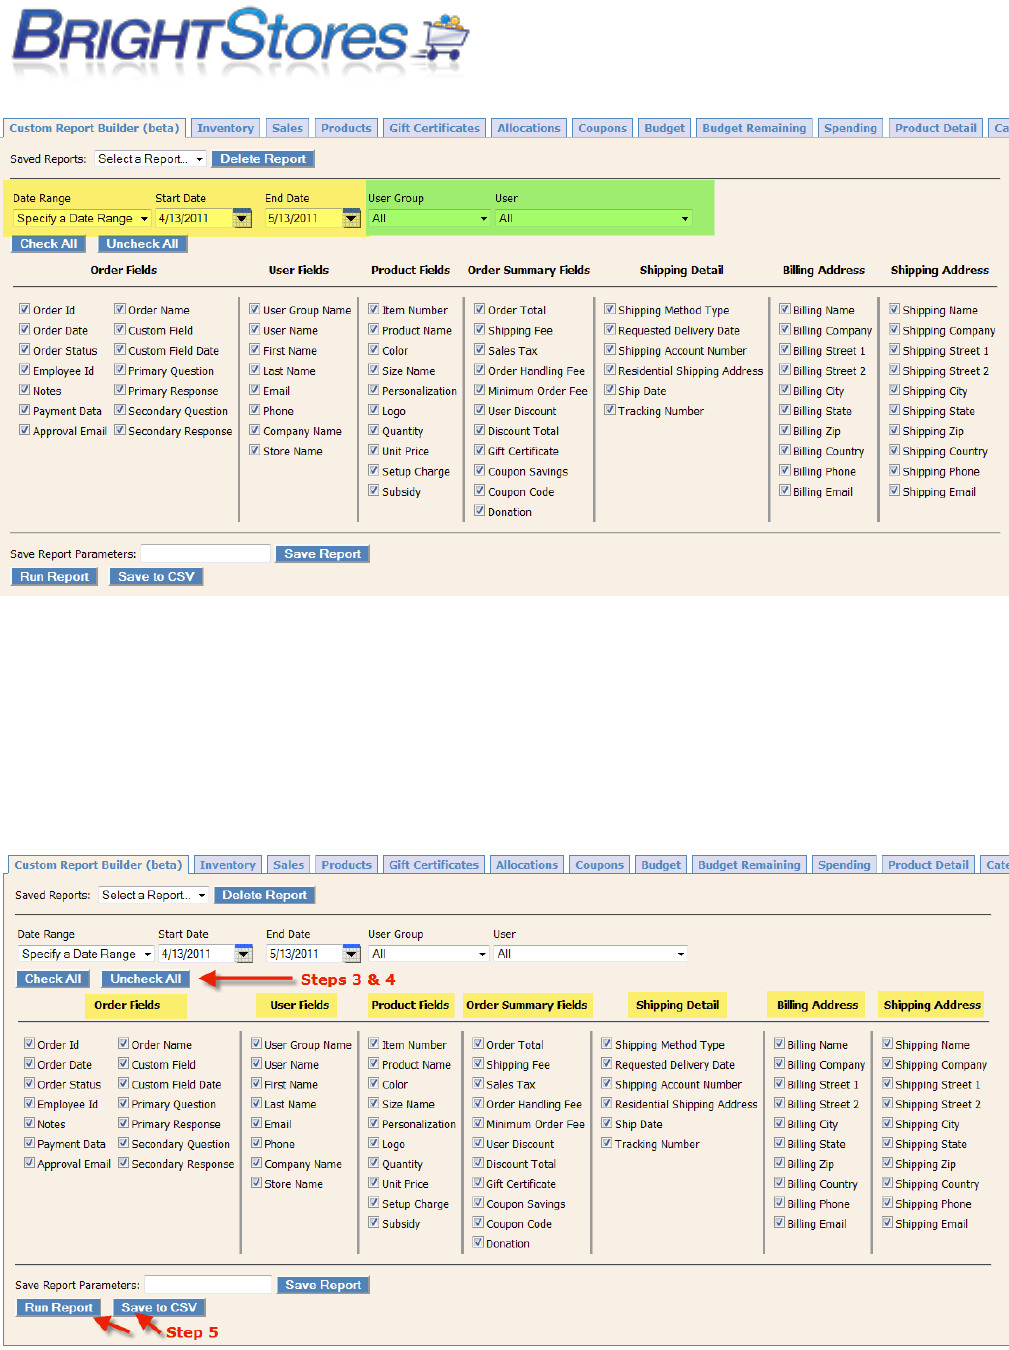
Step 3.) Next you will see that you have the options to Check All options to run the report on OR
Uncheck All fields and select only the ones that you want to be included in the report.
Step 4.) If you only want specific fields to be included in your custom report; go through and click on
the box next to the field you want to be included in the report. Notice that the various fields have been
broken down into categories to make searching for the desired field quick and easy.

ORDER FIELDS: This area is broken down into fields that provide primary order information such as the
Order Id, Order Status, Order Date, answers to customized queries and/or custom field text that the
user would have provided at checkout.
USER FIELDS: Narrow your search down to user information with the User Fields section of the custom
report builder. Search by User Name, User ID, or the user’s First and/or Last name information fields to
be included in the report for example.
PRODUCT FIELDS: Search for detailed product information with the Product Fields you prefer to be
included in your customized report. Information here can include anything from Item Numbers to Item
Colors or Unit Price for example.
ORDER SUMMARY FIELDS: These fields allow you to run your report based off of the orders total or
subtotal, discounts used, coupon codes, and sales tax to name a few. This is where you will find the
primary order summary information fields if you want to narrow your report down by order totals or
coupon codes for example.
SHIPPING DETAIL: Here you will find detailed information fields for shipping details to be included in
your custom report. Choose to search by specific information such as Tracking Number, Requested
Delivery Date, Shipping Method Type, Ship Date, Shipping Account Number, and Residential Shipping
Address.
BILLING ADDRESS: Here you can locate specific Billing Address information for orders by selecting from
the fields in this area of the report. For example, search by Billing Name, Billing Email, and Billing
Phone information fields for detailed information that was entered in these fields on the checkout
page.
SHIPPING ADDRESS: This area of the customized report includes all Shipping Address information fields
that are found on the checkout page of your store. You can include ALL of these fields or only the fields
you select to show up on your report.
Step 5.) Once you have selected all of the fields that you would like to be included in your Custom
Report, you can now run your report. Running your report will produce all selected fields to be
included in the report which will populate just below the Run Report button. You can also Save to CSV
if you want to view the report in CSV file format by selecting the Save to CSV button.
Please note:
If you have an expert store, you are also able to save your report for future reference. To do this, you
will enter a name for your report in the “Save Report Parameters” field and then select Save Report.
This will allow you to save multiple reports and pull them for future reporting so that you do not have
to create a new report each time you want to run a previous report.

To run a previously saved report, select your report from the Saved Reports drop down menu and click
on the Run Report button to generate a saved report.
To delete a saved report, simply select the report you want to delete from the Saved Reports drop
down menu and click Delete Report.
INVENTORY REPORT vs PRODUCT DETAIL REPORT
This section is designed to give a brief overview of the differences between inventory reports and
product detail reports.
1) When an order is placed the inventory report and product detail report are updated to reflect the
change in stock.
2) If an order is cancelled, set to MOAS pending or backordered it will no longer show on the product
detail report but will STILL reflect as being removed from inventory on the inventory report.
3) If the inventory is manually updated the change will show on the inventory report as an adjustment
but NOT the product detail report.
4) If you cancel an order you must manually update the inventory as items are not automatically put
back in stock. The inventory report will STILL show those items as sold, however, regardless of the
manual inventory update/cancelled order.
5) The inventory report and product detail report may or may not match due to the items listed above.
They are not designed to match and may seem inconsistent!
DISTRIBUTOR LEVEL REPORTING
There are two reports available at the distributor level. These reports offer information on all stores
that you have in the Bright Stores system.
STATISTICS - This report offers statistics for each store that you have in the system, including the
following information:
Store Name
Number of Groups
Number of Users
Number of Orders
Total Sales
Average Sale per Order

Average Sales per User
To run this report enter a date range (start date and end date) and click on the Run Report button.
STORE SALES - This report offers sales information for each store that you have in the system, all
within one report. It includes the following information:
Store Name
Order Number
Sub Total
Discount
Sales Tax
Shipping
Handling
Donation
Total
GC (Gift Certificate) Amount Used
Totals are run for each store and for all stores combined.
To run this report enter a date range (start date and end date) and click on the Run Report button.
MEGA STORES
This knowledgebase will explain Mega Store and what they are and how to know if your company store
falls into the Mega Store category.
WHAT IS A MEGA STORE?
Mega Stores are extreme high volume stores and make up less than 1% of the stores on our system. As
you know, our system is a shared system where our Customers and stores run on the same platform.
Instead of forcing the Mega Store off the shared system and into a very expensive dedicated system,
we have built our systems and support structure to handle these Mega Stores while not negatively
affecting our normal stores. The hardware, software and support systems required to support the
Mega Stores are substantially more expensive but only a small fraction of the costs of a dedicated
system.
HOW DO I FIND OUT IF ANY OF MY STORES ARE MEGA STORES?
To find out if any of your company stores fall into the Mega Store category you will need to login to the
Company Store Manager and click on the Reports tab at the Distributor level. Here you will notice
there is now a Mega Stores tab. Click on this tab to access the Mega Stores report. Most of you will see
Screenshot Example 1 below showing there are no stores which meet the Mega Store requirement. For
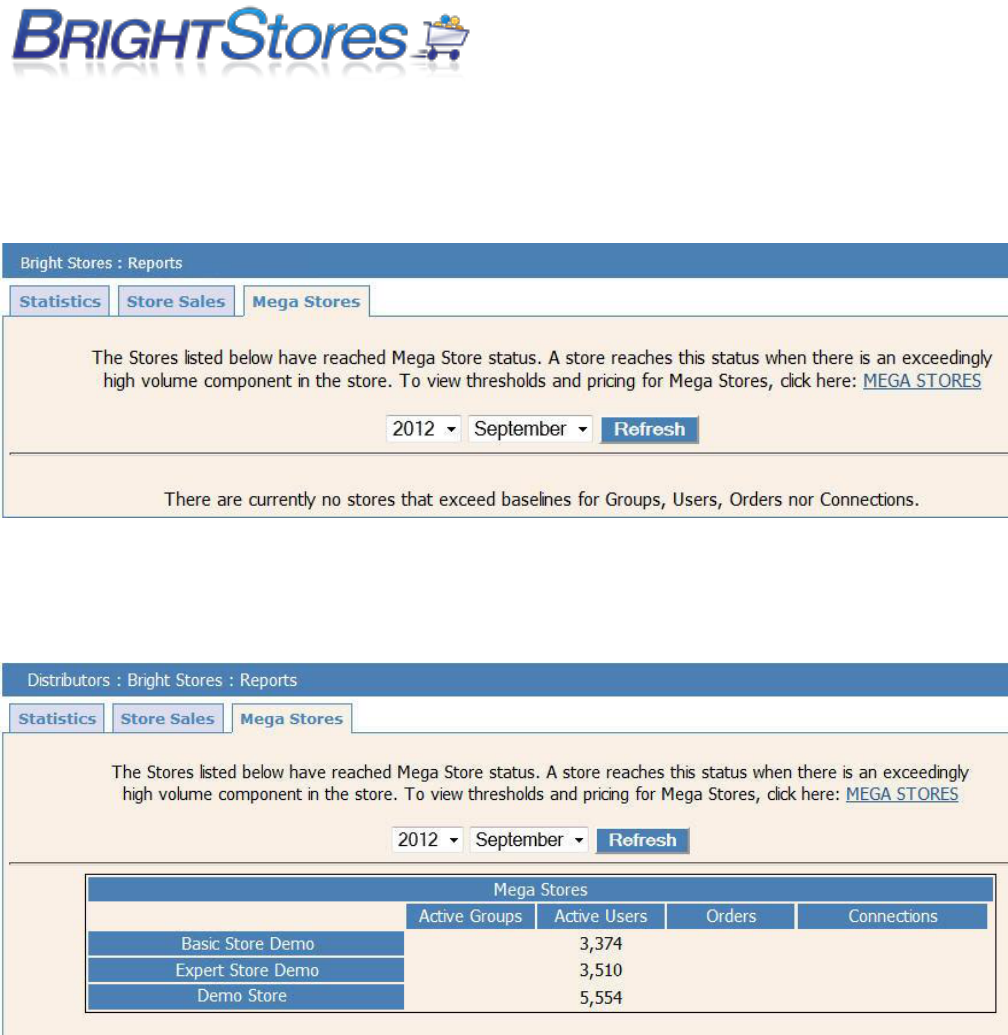
those of you who DO have Mega Stores, below is how your Mega Stores tab would display in
Screenshot Example 2.
Screenshot Example 1 “ No Mega Stores
Screenshot Example 2 “ Existing Mega Stores
WHAT THRESHOLD DETERMINES IF YOUR STORE QUALIFIES AS A MEGA STORE?
There are 4 different areas of your store that are taken into consideration when determining if your
store meets the Mega Store threshold. Those areas are Groups, Users, Orders, and Connections.
Groups
The average store has a total of 5.75 groups. Your chance of being charged for Group fees is less than
1%. If you have more than 100 user groups your store qualifies as a Mega Store.
Users
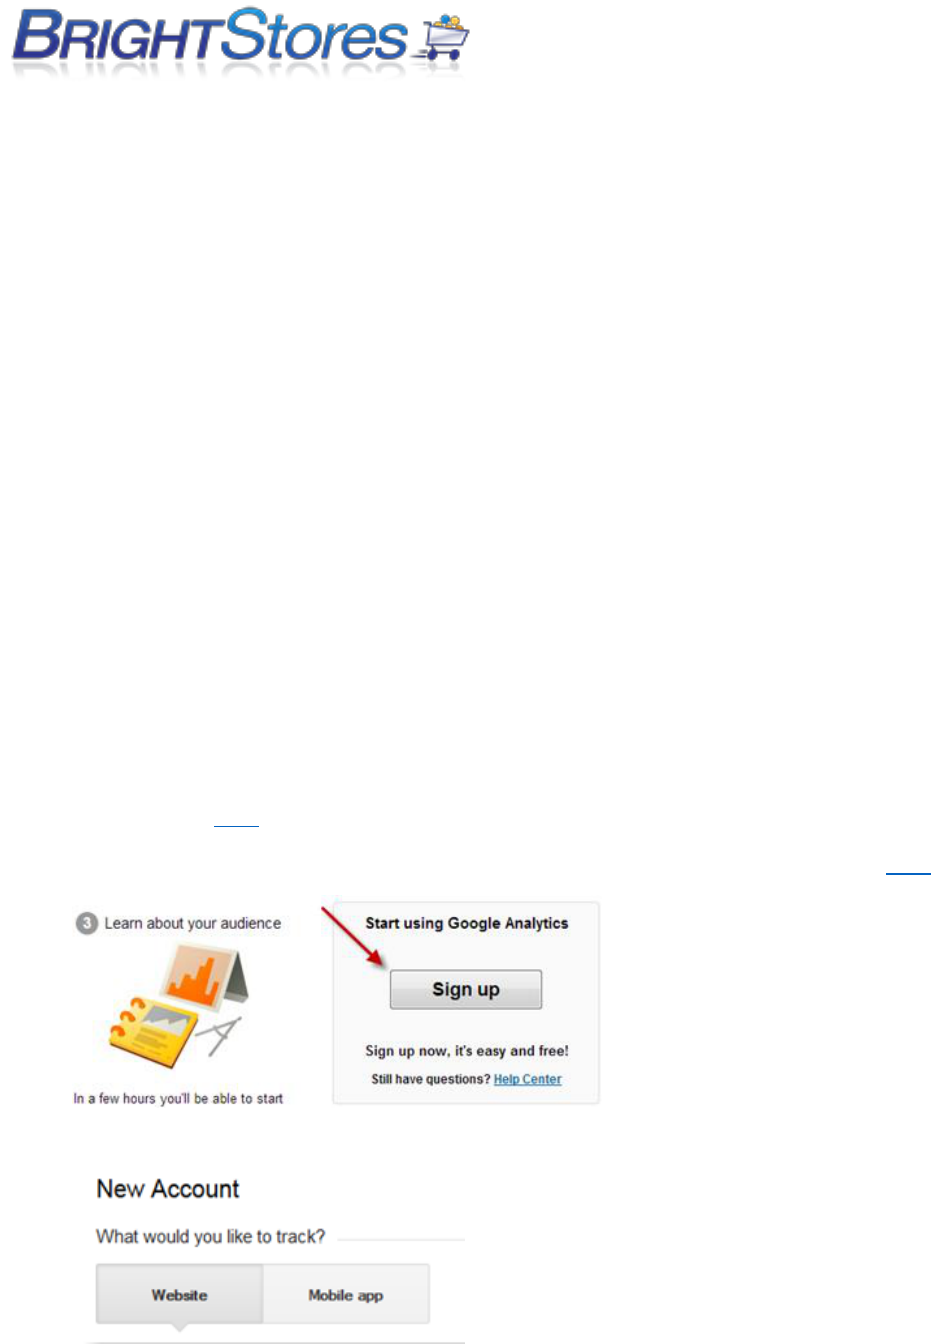
The average store has a total of 187 users. Your chance of being charged for User fees is less than
2%. If you have 3000 users or more your store qualifies as a Mega Store.
Orders
The average store takes 15.48 orders per month. Your chance of being charged for Order fees is less
than 1%. If you have 300 orders per month or more, your store qualifies as a Mega Store.
Connections (for integrations stores only)
The average integrated store receives 1,387 connection requests per month. Your chance of being
charged for Connection fees is less than 15% in an integrated store. If you receive 5000 connections
per month or more, your store qualifies as a Mega Store.
TRACKING YOUR STORE WITH GOOGLE ANALYTICS
If you'd like to track your website statistics (visits, hits, browsers, user's locations, etc) you'll need to
enable Google Analytics. It's fairly easy to do.
Just follow the steps below:
1. First, you'll need an account with Google. If you don't have a Google account, you can get one
free of charge here.
2. Then, you'll need to sign up with Google Analytics. You can access Google Analytics here.
3. Once you've started the sign-up process, choose Website (which should be checked by default)
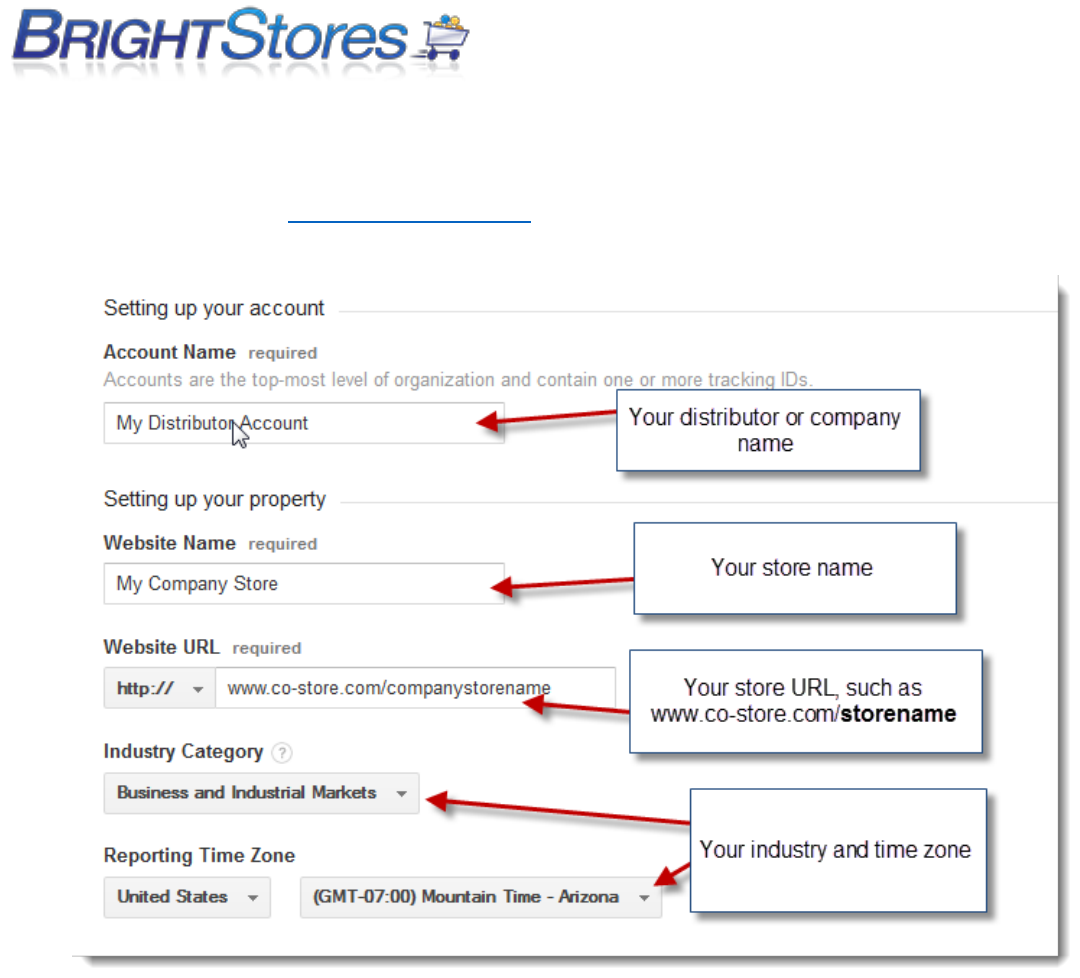
4. Input relevant store information. If you don't know your store's URL, you can find it on the
Store's Edit tab in the Company Store Manager.
5. Update your privacy information if you like. Otherwise, click Get Tracking ID and then
click Accept if you accept the terms.
Please see the example below for the tracking id and terms.
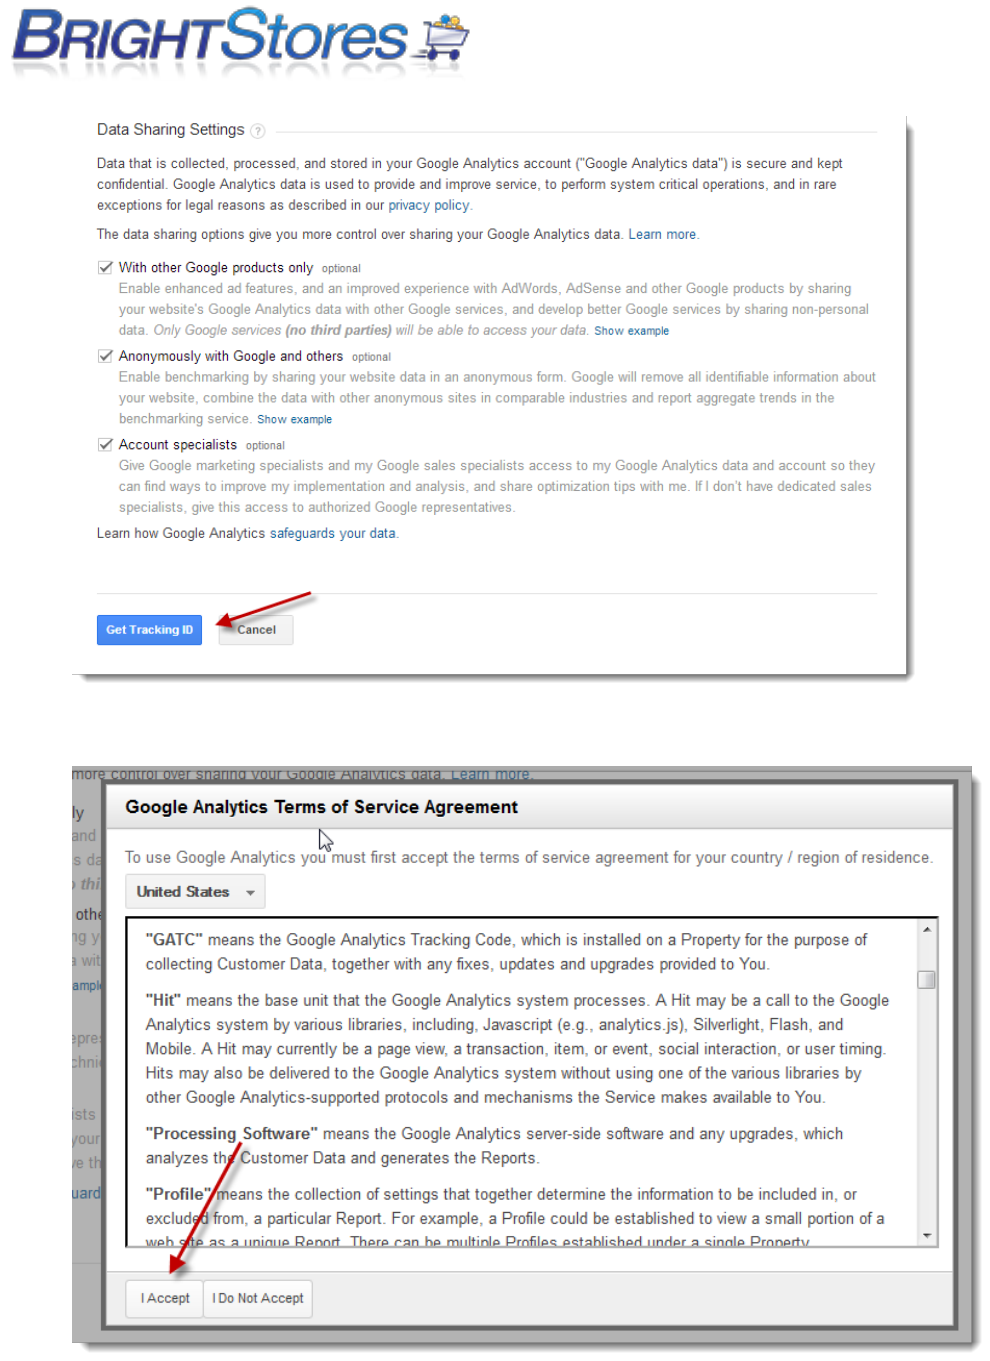
6. If you accept Google's terms of service, click Accept

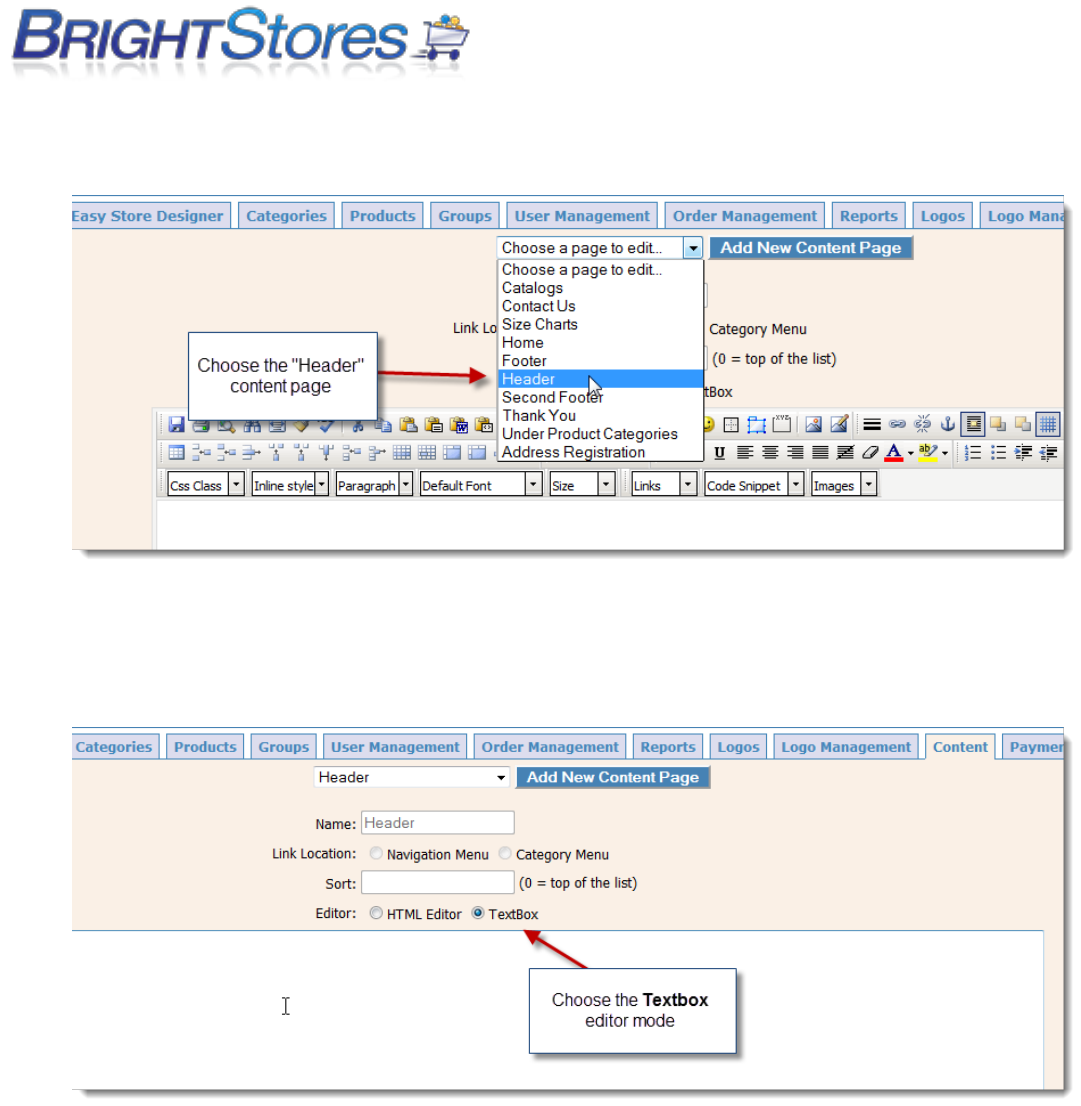
10. From the drop down menu, choose the Header content page.
11. When the Header content page has loaded, choose the TextBox editor mode.
12. The final step is to paste the code from Step 7. Be sure not to delete any code that is already in
the header content page, or you can damage your site's design/layout.
Instead, add the code from Google in addition to any code that is already there. When done,
click Save.
See below example:
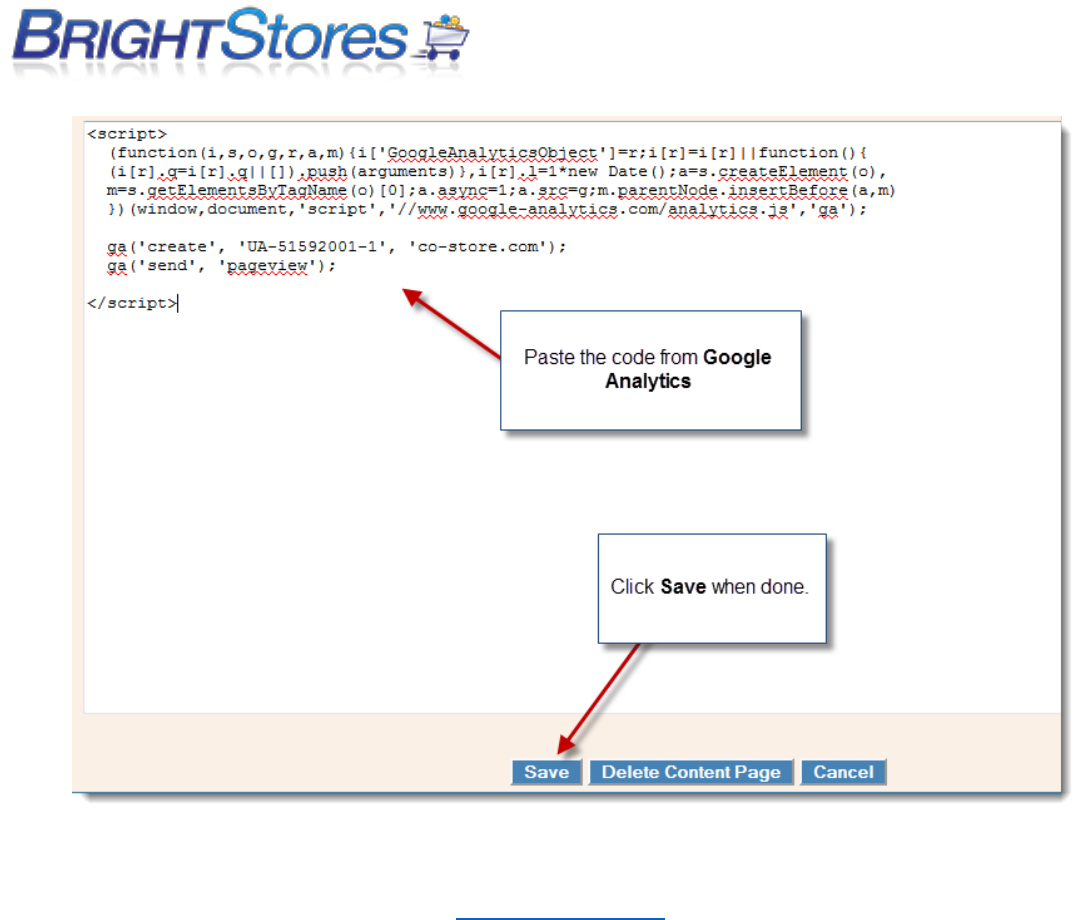
13. That is it! It may take several hours to a day for data to show up. If you have questions on how
to use Google Analytics, please see the Analytics Help Center. You can add additional stores by
adding new tracking properties from the administrative area of Google Analytics. Once you
have code for those additional stores, the process is virtually the same to add the code to your
website.
SHIPPING
The shipping feature allows you to estimate and add freight to orders coming through the store. You
can also offer choices on shipping methods and charges.
To enable shipping, you will need to first go to the Edit tab of your store admin and check the box next
to Shipping under the Basic Features area and then save at the bottom of the page.
SHIPPING CATEGORIES
When the shipping of an order is being calculated, it charges for the price per item for shipping, for
each item ordered from each shipping category. It will also charge the handling fee that is in the
shipping category. This fee will be calculated one time for each category ordered from on this order.
We have 5 standard shipping categories that most products fit into. We also have a sixth for some
heavier and/or larger products. Each of these categories is set up with a weight range. If you estimate
the weight of your product and set it up in the appropriate weight range it gives the best estimated
freight. This is an average, and does not take into account zones or location. It is only a freight
estimator.
Here are some guidelines for the shipping categories:
Category 1: ITEMS APPROX. 2 OZ AND LESS. Some examples of this are pens, pencils, smaller magnets,
and small plastic key tags.
Category 2: ITEMS APPROX 2.01 OZ-4.99 OZ. Small promo products such as a small key tag, small
stress ball, a pen in small gift box, larger magnets, or a folding koozie.
Category 3: ITEMS APPROX 5 OZ-9.99 OZ. Standard ceramic mug, hats, basic, low end t-shirt, pen and
pencil set in gift box, plastic flashlight, tote bag, water bottle.
Category 4: ITEMS APPROX 10 OZ-1 LB. Most apparel items go in this category with the exception of
small t-shirts and large heavy items like coats, portfolio, more substantial travel mug, latte mug.
Category 5: ITEMS APPROX. 1 LB - 5 LBS Coat, Briefcase, backpack
Category 6 ITEMS APPROX 5-8 LBS. Unusual items that are heavier or larger and require more shipping.
Categories can be edited or customized by you at any time. To make adjustments or to view the
shipping categories:
Click on the Shipping Categories tab. To add a new shipping category, click on the blue New button.
Enter a name and description for your shipping category and hit save.
Here you can enter each line of your table as follows: Select the shipping method, the minimum and
maximum number of products ordered for them to fit in the range you are creating, price per item and
base handling fee. Click save. Continue this process until all shipping options are entered.
To edit a shipping category, click on the shipping category name. Make necessary changes to the fields
listed. Edit the shipping method, the minimum and maximum number of products ordered for them to
fit in the range you are creating, price per item and base handling fee. Click Save. Continue this
process until all shipping options are edited. Hit save.
(Additional Shipping Features)
On the edit tab of your store admin you will also find these shipping tools below that can be enabled in
Pro and Expert level stores.
Allow International (includes billing)
By checking the Allow International button, unique information is populated in the shipping fields to
allow International Countries to be selected.
User Shipping Account
By clicking the User Shipping Account, you allow Users the option to enter their shipping account
number into the shipping method section of the Checkout page. Consequently, if they chose to use
their own account number, no shipping charges from your store will apply. If your customer does not
enter a shipping account number, your determined shipping charges will be billed.
Residential Address Check
When the Residential Address Check box is checked, a surcharge will be added to cover the extra cost
charged by the shipping company when shipping the product to a residence.
If you select this option, enter the surcharge amount in the box provided. For example: 5.00
Delivery Date Suggestive Text
This area is for notes that show up in the store near the shipping section of the checkout page. Can use
this field to suggest that customers click on a calendar (offered in this section) to request a shipping
date. This field may also be used for general notes or disclaimers regarding shipping.
UPS INTEGRATED SHIPPING
The UPS Integration is a very large and complex piece that allows store integration with UPS. With the
UPS Integration, shipping rates are calculated by UPS based on shipping origin, ship to zip code,
package dimensions and weight. Contact Bright Stores at 1-303-800-1546 to purchase this Integration.
1. First you will want to turn the UPS Integration feature on. Click on the Edit tab in your Company
Store Manager. Make sure shipping is turned on. If it is not, check the box next to shipping to turn it
on. Check the box next to UPS integration (located under the Ala Cart section) to enable the
feature. Be sure to click save at the bottom of the page.
2. Then, you will want to create a UPS Shipping Category at the Distributor level, which later on you will
assign to each product in the store. Before clicking into the store, click on the Shipping Categories
tab. Click New to create a new shipping category. Name the category UPS, or whatever you
wish. Enter in a description also. This name and description is for you, it will not show up in the store
front. Click save.

3. Now you can add the shipping methods that you wish to be available for the store. Click New, select
a shipping method you wish to offer, (it HAS to begin with UPS), enter in the min as 1 and the max as
999999, enter in 0 for price per item and base handling fee ($0 is entered because the rates will be
pulled from UPS) and click Save.
4. Repeat step 3 for each shipping method you wish to make available in the store.
5. Next, click into the Store and click on the Ship tab. Enter in the Shipping Origin Address in the text
fields. This is the return address for all packages shipped by this store. Click Save when you are
finished. Do not enter an address in the Exclusive Shipping Address unless you only want to allow that
shipping address for the store.
6. Now you will enter in the dimensions of the shipping boxes of which products are placed in. Click on
the UPS tab. Enter in the length, width, and height for the smallest, next largest, and largest box you
will use. Check the box next to Activate Box for those boxes you wish to activate. Be sure to click save
at the bottom of the page when you are finished.
7. Once you have the Shipping Categories created, you will need to assign each product with the new
Shipping Category. Click on the Products tab at the store level. Click search. Click into a product. The
edit page will display. On this page, next to Shipping Category, select the new Shipping Category that
you just created from the drop-down menu. Click save at the bottom of the page.
8. Now you will need to assign dimensions and weight to the product. Click on the Sizing/Pricing
tab. You will now see Length, Width, Height, and Weight fields. Enter in the dimensions and weight
for this product. Accuracy is important because the UPS rates that are pulled are based on what is
entered here in this section for each product as well as shipping origin and ship to zip code. Be sure to
click Save when you are finished. Repeat step 7 and 8 for all the Products in the store.
UPS WorldShip Troubleshooting Tips
If you experience problems or error messages when uploading the WorldShip file into the Company
Store Manager be sure to check the following areas:
WorldShip file is saved as a .csv comma delimited file.
Verify the file has the order number in the first column and the tracking number in the
second column.
Check for any commas or extra spaces that may have been entered in the file and remove
these.
When working in the admin be sure that you are the only one that is logged in with your
username, otherwise you may experience problems when uploading your WorldShip files.
We suggest always creating a unique username for all users accessing the company store
manager.
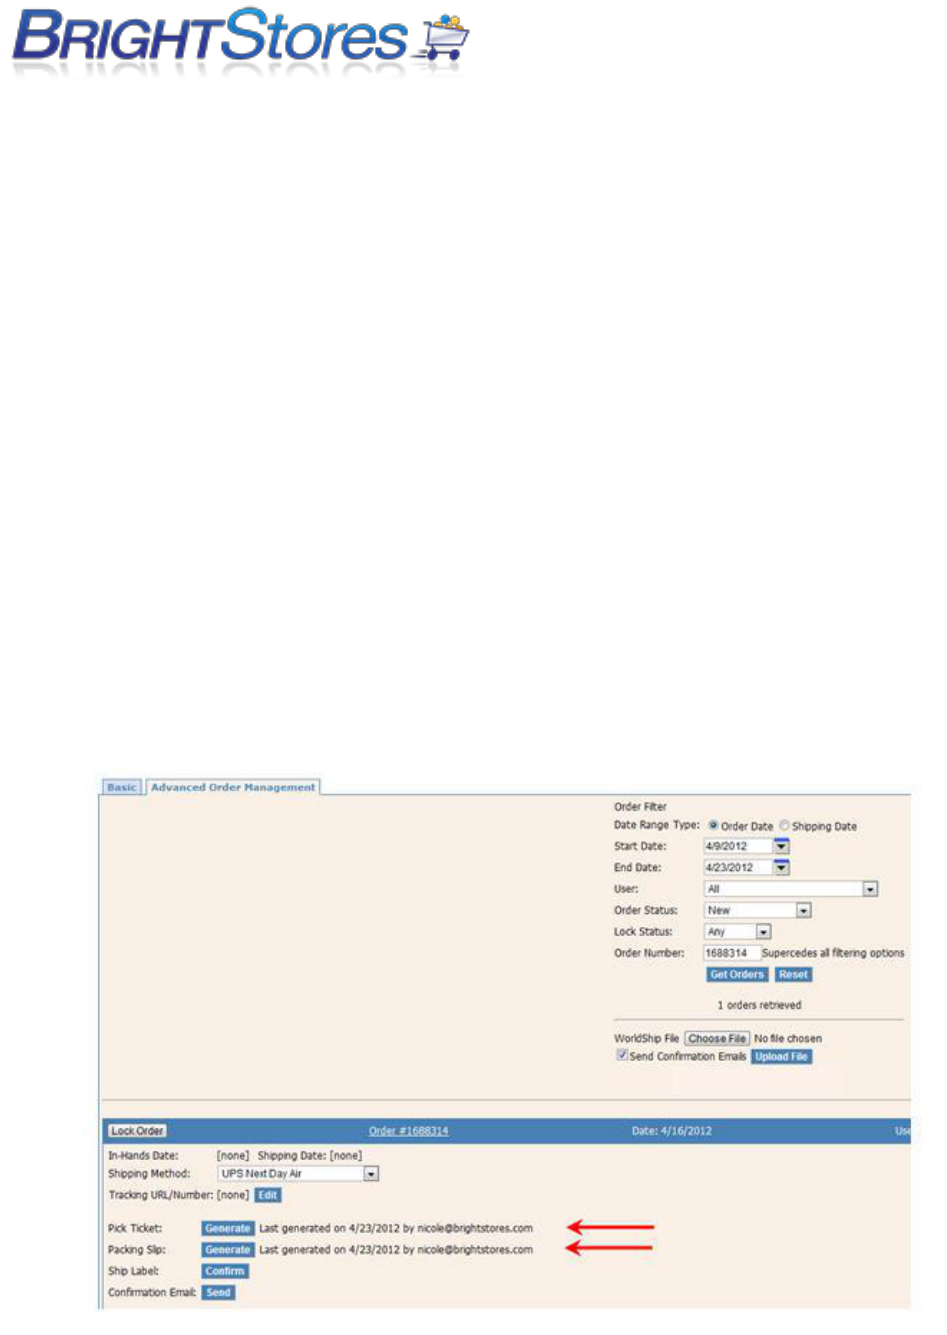
WorldShip file should only contains orders from the store you are uploading the file into.
Make sure you are logging to the admin with a username that is setup with admin access
under the specific store that you are uploading the WorldShip file to, or you may encounter
errors.
PICK TICKETS AND PACKING SLIPS
Pick Tickets and Packing Slips are available to print through the Advanced Order Management feature.
First navigate to the Order Management tab in the Company Store Manager and click on
Advanced Order Management and Search for your order by using the Order Filter.
You will now see your order appear below and where you can print pick tickets, packing slips,
and send the confirmation email to the customer.
Note: Once you generate a pick ticket or packing slip, the information will be displayed to the right of
the Generate button regarding when and who generated the last Packing Slip. If pieces of information
are missing from an order which has been edited, whether it’s a size or color or a product ID or
product, the system will not find the information it’s been directed to find for the order, and won’t be
able to print the pick ticket.
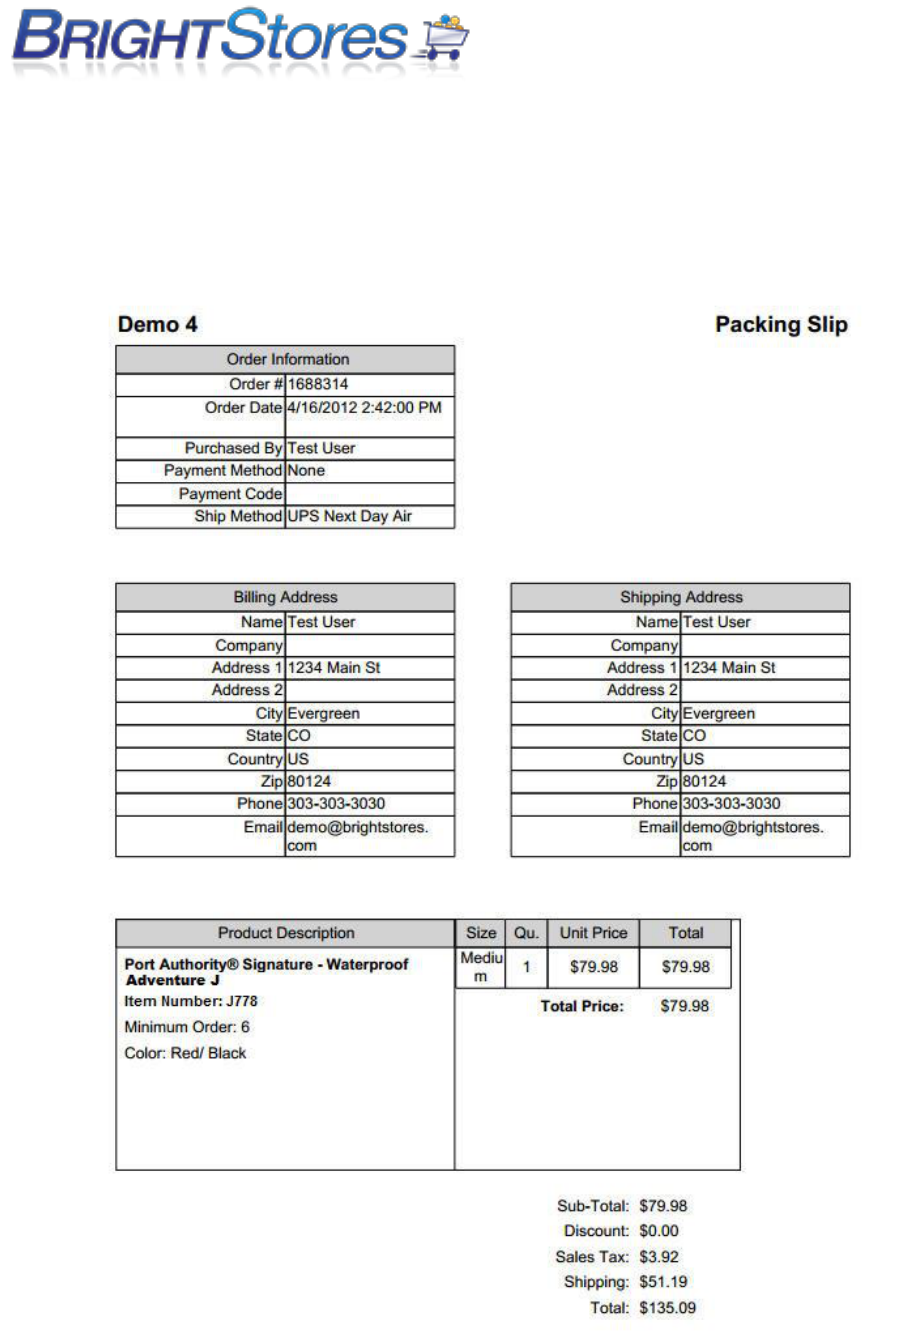
GENERATING PACKING SLIPS
Next to Packing Slip you will see the button "Generate." By pressing "Generate" a Packing Slip will
display in Adobe/Acrobat with complete order data including Billing and Shipping Addresses and the
Product Description.
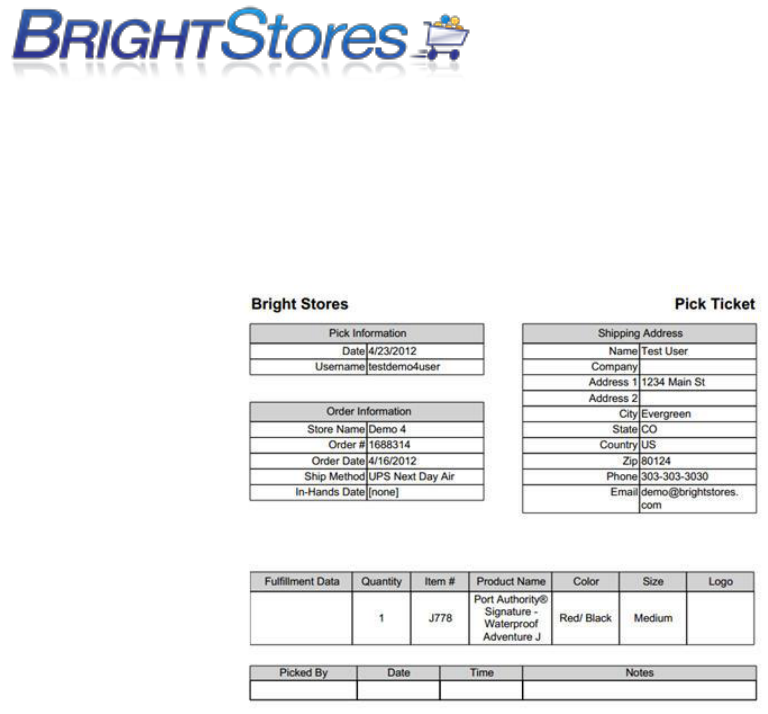
GENERATING PICK TICKETS
Next to Pick Ticket you will see the button Generate. By pressing Generate a Pick Ticket will display in
Adobe/Acrobat with complete fulfillment and order data including Shipping Address, Product
information and fulfillment data and instructions. You may print or view.
TAXES
Below will walk you through the steps to setting up your store to compute sales tax for the states the
orders are shipped to. There are two methods that computes sales tax for your store. The first
method is described below.
1. Make sure you are logged into the Company Store Manager.
2. Navigate to the Edit tab at the store level.
3. Under the features section, check the box next to Sales Tax and click Save at the bottom of the
page.
4. Click on the Tax tab at the store level.
5. Click "New." This is where you enter in the Tax Rate for the states that you wish to charge tax to.
6. Select a state, then enter in the corresponding Tax Rate in decimal form (0.065) and click Save. Your
saved Tax Rate will now be displayed.
7. To enter in another Tax Rate and state, just click New again and repeat step 6.

SALES TAX INTEGRATION - STRIKEIRON
The second method is a Sales Tax Integration.
Bright Stores offers a sales tax integration through a 3
rd
party provider (Strike Iron) who monitors and
calculates sales tax down to the county level.
Features:
ZIP or postal code lookup finds general sales and use tax rate information for 19,000 U.S. and
Canadian tax jurisdictions.
Tax rates are updated on a monthly basis to provide the most current information available.
ZIP and postal codes are updated on a monthly basis using the United States Postal Service ZIP
code database and Canada Post to ensure data accuracy.
Provides information on whether shipping and handling are taxable in a given jurisdiction.
Three levels of tax data are provided (state, county, and city), as well as a total sales tax rate
and a total use tax rate.
Partner:
StrikeIron is a leading provider of sales and use tax rate databases to companies of all sizes
from Fortune 50 companies to small ecommerce companies.
Bright Stores charges a onetime fee of $199 and an additional $49.99/month for all of your
stores. Call us at 303-800-1546 x1 or email [email protected] for more information.
Contact StrikeIron for more information on their services and to set up your account.
Phone: 1-866-562-3920 / Email: [email protected]
Website: http://www.strikeiron.com/product-list/tax-currency/sales-tax-calculation-2/
*Please note that this integration requires the Sales and Use Tax Basic 3.5.0 version.*

PAYMENT OPTIONS
In this section, you will learn how to set up payment methods including Credit Card, Purchase Order,
GL Code, and Internal Cost Center for your store. There are more payment methods available, please
see the knowledgebase, Setting up Payment Methods part II. All users must have a method of
payment, or a gift certificate or coupon to be able to check out of the store.
1. Make sure you are logged into the Control Panel
2. Navigate to the Payments tab at the store level.
3. Click on the Payments tab and the screen will automatically display payment options. You may select
one or more options to offer shoppers, to meet your company’s needs.
PURCHASE ORDER
Procedure:
1. Check the enable box to permit Purchase Order number as a payment method. This will offer a field
upon checkout where the shopper can enter their P.O. number.
2. Enter instruction or direction that you want to give the shopper in The Suggestive Text box. For
example: Please enter your Purchase Order number:
3. The validation field is for companies that require strict PO format be followed. It’s a way to make
sure the PO follows the adequate format for the company, therefore, checking its validity. This field
must be programmed. Programming is an additional charge.
4. Don’t forget to click the SAVE button at the bottom of the Purchase Order section before moving on.
GL CODE
Procedure:
1. Check the enable box to permit GL Code as a payment method.
2. Enter instruction or direction that you want to give the shopper in The Suggestive Text box.
3. The validation field is for companies that require strict GL Code format be followed. Its a way to
make sure the GL Code follows the adequate format for the company, therefore, checking its validity.
This field must be programmed. Programming is an additional charge.
4. Don’t forget to click the SAVE button at the bottom of the GL Code section before moving on.

INTERNAL COST CENTER
Procedure:
1. Check the enable box to permit Internal Cost Center as a payment method.
2. Enter instruction or direction that you want to give the shopper in The Suggestive Text box.
3. The validation field is for companies that require strict Internal Cost Center Number format be
followed. It’s a way to make sure the Internal Cost Center Number follows the adequate format for the
company, therefore, checking its validity. This field must be programmed. Programming is an
additional charge.
4. Don’t forget to click the SAVE button at the bottom of the Internal Cost Center Number section
before moving on.
CREDIT CARDS
Bright Stores uses 128-bit SSL (Secure Socket Layer) to ensure that all orders placed over the Internet
are secure. There are two ways that you can run credit cards in our system:
DATABASE or CREDIT CARD GATEWAY
DATABASE: This option is available with all store levels. Shoppers enter their credit card information
upon checkout. The information is not validated or run, but stored in a secure location that you may
access via the Company Store Manager when you’re ready. You may run it through your merchant
account interface when you’re ready. This method carries a $9.99/month/store cost.
To enable the Database credit card payment option, navigate to this store in the company store
manager and select the Payments tab. Here you will see that credit cards as a form of payment is
disabled; click the drop-down menu and select Database. A popup window will appear telling you that
you are about to add Credit Card Data Base functionality to your store. Click Ok to proceed or Cancel to
abort this action.
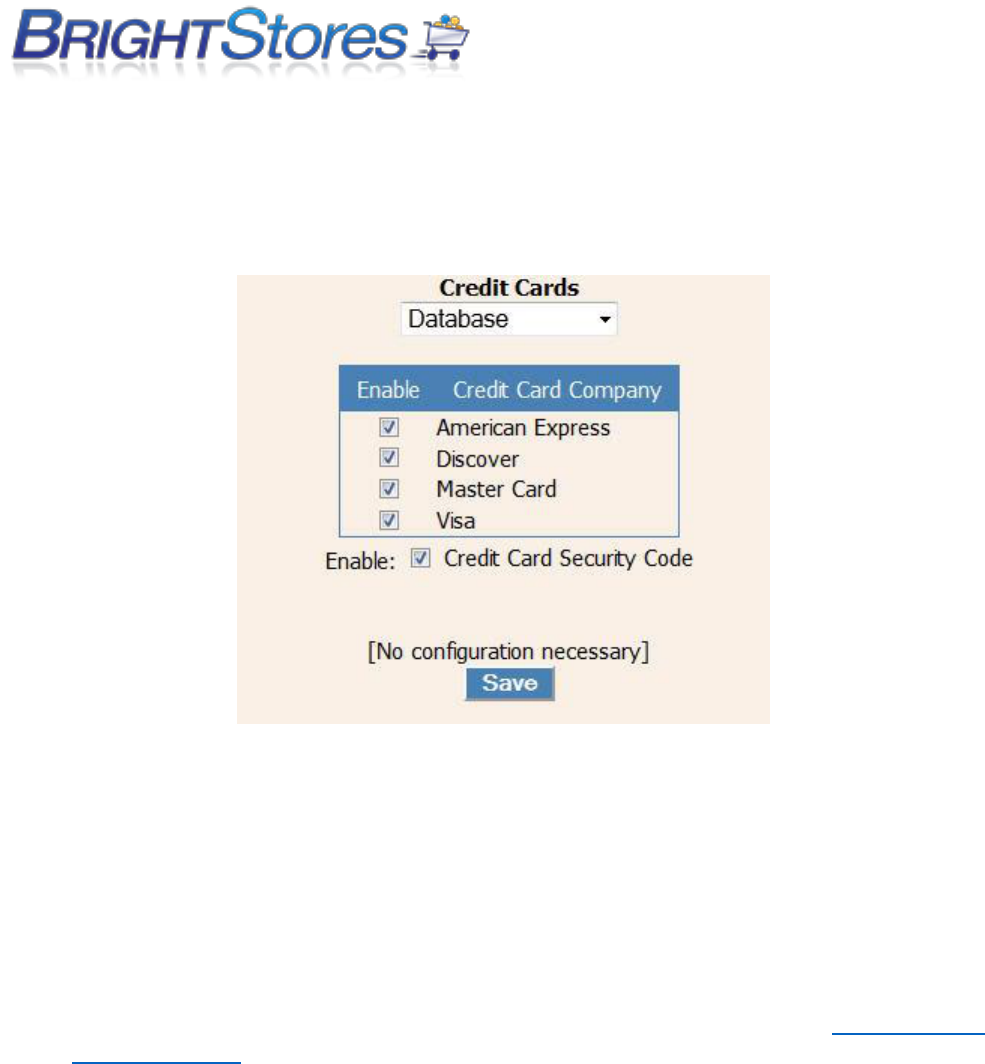
The page will refresh and then you can choose which credit card types you want to accept and if you
want the security code to be required and then you will select Save to save this payment method to
your store.
SETTING UP THE CREDIT CARD PAYMENT ACCESS PIN (ONLY IF USING DATABASE OPTION)
In order to access credit card information for stores using the Credit Card Database payment method,
you'll need to set a 4-6 digit access PIN to be used whenever you view the credit card information for
relevant orders.
To set your credit card access PIN:
1. If you have not already done so, login to the storefront administrative area at http://www.co-
store.com/admin and navigate to the store you wish to set the PIN for via the Stores tab.
2. Click on the Payments tab
3. Under the “Credit Cards” payment area, enter a 4-6 digit PIN in the Credt Card Access PIN box
and click Save.
4. You’ll be prompted twice to make sure you want to set the PIN. Accept both prompts.
5. You can now enter the PIN anywhere the PIN is required – Reports, Web services, and Order
Management.
6. Be sure to give out the PIN only to people you trust.
CREDIT CARD GATEWAYS:
You may set up your store with a Gateway Integration. A gateway connects the store to your merchant
account. To do this you need the Gateway feature (which is available in an Expert Store or may be
purchased as an a la carte item to add to a Basic or Pro store). You would also need to set up an
account with a Gateway provider. We integrate with the following 7 Gateways: Authorize.net, Sage,
Pay Flow Pro, Cyber Source, Clear Commerce, Concord EFS and Echo. Once your gateway account is set
up and you’ve set it up for your store in the Company Store Manager, when a user enters their cc data,
the card is authorized and/or run in real time.
To add on the Gateway feature to a Basic or Pro Store there is a $199.99 onetime + $9.99/month/store
cost.
To enable the Gateway option in your store login to the company store manager and click on the stores
tab and select the store you want to enable this feature for. Next click on the Payments tab and from
the credit card drop down menu select the gateway provider you would like to use.
Your page will refresh and you will see new fields for you to enter the information that your specific
gateway provider would have supplied you with and select the credit cards you want to accept and if
you want the security code to be required.
You can choose to authorize funds only; otherwise by default all credit cards would be charged
immediately upon placing an order. Be sure to select Save when done.

AUTHORIZE.NET API LOGIN AND TRANSACTION KEY
In order to setup your Authorize.net Gateway you will need to obtain your API Login ID and Transaction
key which are both provided to you once you create your Authorize.net account.
To obtain an API Login ID or Obtain a Transaction Key you will first want to login to your Authorize.net
account and then follow the steps below.
Please note that you cannot view your current transaction key for security so you will need to either
create a new one or contact Authorize.net support to find out what your current transaction key is.
Step 1: Login to your account and click the "Account" option in the top navigation.
Step 2: Under Security Settings click on API Login ID and Transaction Key.
Step 3: You will now see your API Login ID and the option to create a new transaction key.
To obtain a new transaction key:
Step 1: Enter your Secret Answer (the answer to your Secret Question configured at account setup).
Step 2: To disable the old transaction key, click the check box labeled Disable Old Transaction Key.
Note: If the Disable Old Transaction Key check box is not selected, the old transaction key will
automatically expire in 24 hours.
Step 3: Click Submit to continue or click Cancel to cancel the action. Your new transaction key is
displayed.
For additional help with locating your Login ID and Transaction key please reach out to Authorize.net
support for further assistance.

COUPONS
This section will show you how to add a coupon one at a time. Users can enter a coupon code upon
check out to apply a percentage or dollar amount discount to their purchase.
1. Make sure you are logged into the Control Panel.
2. Navigate to the Edit tab at the store level, click the Pro Features bar and then click the box next to
Coupons. If you want to allow more than one coupon to be used per order click the box next to
"Multiple Coupons" as well and hit save at the bottom of the tab.
Multiple coupons allow a shopper the ability to use up to 5 coupons to discount their order on
checkout.
3. Navigate to the Reports tab and click on the Coupons tab. Click on "Add New." The page will refresh.
4. Enter in the code or name of the coupon in the Code field.
5. Pick whether the coupon will be Order Discount, Order and Shipping Discount or Product discount
(See below for descriptions)
For Order Discount and Order and Shipping Discount, you will have to enter the dollar amount
or percentage, and the minimum order amount if applicable.
For Product Discount, you will have to select the product and whether you want one free unit
or free shipping on that unit.
6. You must enter the expiration date for all types.
7. Click save. Your coupon has been created.
8. To view the coupon, navigate to the Reports tab, click on the Coupon reports tab, enter a start and
end date (make sure the end date is after the expiration date of the coupon) and click run report.
The Order Discount is a coupon designed to deduct from an order amount (can be set up to
require a minimum) with a dollar amount or a percentage. The coupon subtracts from the sub
total amount of the order.
The Order & Shipping Discount is a coupon designed to deduct from the total order amount
including shipping (can be set up to require a minimum) with a dollar amount or a percentage.
Product Discount is a coupon designed to offer one Free Product or shipping for that product.
UPLOADING MULITPLE COUPONS
This section will show you how to upload more than one coupon at a time. This is useful if you have an
extensive list of coupons to add.
NOTE: THIS IS ONLY FOR COUPONS THAT ARE NOT MULTI-USE AND THIS TEMPLATE ONLY APPLIES
THE COUPON TOWARDS THE ORDER SUBTOTAL.
1. Make sure you are logged into the Control Panel.
2. Navigate to the Edit tab at the store level, click the Pro Features bar and then click the box next to
Coupons. If you want to allow more than one coupon to be used per order click the box next to
"Multiple Coupons" as well and hit save at the bottom of the tab. Multiple coupons allow a shopper
the ability to use up to 5 coupons to discount their order on checkout.
3. Navigate to the Reports tab in the Control Panel. Click on the Coupons tab and click on "Download
Coupon Import Template." This will download a template. Save this file in a place where you can
remember (for example your desktop).
4.You will see the following in the template:
Column A: Code- Enter the code or name of the coupon (Mandatory Field) This field is case-
sensitive. Users have to enter it in exactly when using coupon.
Column B: ValueAmount- Enter the dollar amount off. Don't enter the symbol "$" (leave blank
if entering percentage amount)
Column C: ValuePercentage- Enter the percentage off (leave blank if entering dollar amount)
Column D: MinimumOrder- Enter the minimum dollar amount they are required to order to use
this coupon. Don't enter the symbol "$" (Field not required)
Column E: ExpirationDate- Enter the date the coupon will expire (Mandatory Field) When you
run a report on the Coupons tab, remember you have to enter an ending date that is past the
expiration date of the coupon.
NOTE: Do NOT delete the top row of information; it is necessary for proper upload.
5. Once you have entered in the information, Save it. Make sure it is a .csv file.
6. Go back to the Coupon tab in the reports and click browse, search for the save file, and then click
upload.
7. If you have entered in everything correctly, the message "Coupons successfully imported" will show
up. If you receive an error, please e-mail or call Bright Stores support.
8. To view the coupons, navigate to the Reports tab, click on the Coupon reports tab, enter a start and
end date (make sure the end date is after the expiration dates) and click run report.

GIFT CERTIFICATES
This section describes how to setup, clear, and edit a Gift Certificate.
1. Begin by logging into your control panel and selecting a store.
2. On the edit tab, check the Gift Certificate box. The page will refresh and a "Display As" prompt
will appear. If you would like to change the title "Gift Certificate" to something else, you may do
so here. The Gift Certificate functionality will still work the same. Scroll to the bottom of the
page and hit save.
3. Loading Gift Certificates: Click on the Groups tab Click on the Group name for the group that
contains the user receiving the gift certificate.
4. Click on the users tab Click on the username of the user receiving the gift certificate.
5. Click on the Gift Certificate tab. Enter the gift certificate amount, any notes you would like to
show in the store front when they log in, and hit add.
6. To clear out a Gift Certificate that has been added, simply click on the Clear button for that GC
and it will clear out of the system.
7. Note: If a user places an order and pays with their Gift Certificate, and you change the status of
their order to any of the below order status options and run the Gift Certificate report, you will
not see the gift certificate value show up as a debit in the Gift Certificate Report for that users
account.
DELETING GIFT CERTIFICATES
To delete a gift certificate please do the following:
1. Begin by logging into your Company Store Manager and selecting a store.
2. Click on the "Groups" tab
3. Click on the Group name for the group that contains the user receiving the gift certificate.
4. Click on the users tab.
5. Click on the username of the user receiving the gift certificate.
6. Click on the "Gift Certificate" tab.
7. Click on the gift certificate for that user that you would like to delete.
8. Click on the Clear button for that GC and it will clear it out of the system.

CHECKOUT PAGE FEATURES
DATA ACKNOWLEDGEMENT
This tutorial will show you how to add Data Acknowledgement to the checkout page 1 of 3 to your
store. This can be used for noting a policy to your users or whatever works best for your store. It also
requires them to click a check box before they can check out.
1. Make sure you are logged into the Control Panel.
2. Navigate to the Edit tab at the store level.
3. At the bottom of the features section, check the box next to Data Acknowledgement. Below this,
you will see "Title Text", "CheckBox Text" and "Enter Content Here" with blank fields next to them.
4. Enter in your title text, for example "Shipping." Enter in your CheckBox Text, for example "I agree"
or "I have read this." Finally, enter in the content, for example, "All shipping will be billed later."
5. Make sure to click save at the bottom of the page when you are finished.
Note: If you have Data Acknowledgement enabled, you MUST enter in text in ALL fields.
CUSTOM INFORMATION FIELD
The Custom Information Field allows the store to have a customizable section on the checkout page
that can be used to gather additional information from the shopper. The fields are customizable and
may be used in conjunction with a date option. Both may be selected to be required.
Procedure:
1. Click the Custom Information Field in the store Edit page. The screen will refresh to display
additional fields.
2. In the Field Name field you may enter what you choose to name the field/section of the checkout
page.
3. In the Suggestive Text field, enter a prompt or instruction for the User.
4. If you click the Enable Date Selection, a calendar link will display on the checkout page for the User
to pick their event date.
5. By clicking the Make Fields Required box, the User will not be allowed to checkout until they
complete the required event name and date.

6. Scroll down and hit save. For example: In your store you may wish for Users to identify the event
name and date. Therefore, you would enter the following: Field Name: Name of Event Suggestive Text:
Enter the name of the event here. You would next click the Enable Date Selection box and the Make
Fields Required box.
CREATING CUSTOMIZED QUERIES
The Customize Queries feature allows a store to have a customizable section on the checkout page to
be used to gather additional information from the shopper. This is done by writing a question, or
inquiry and setting up a dropdown menu where the shopper can select the appropriate response.
1. Begin by logging into your Company Store Manager and selecting a store.
2. Navigate to the "Edit" tab and click the Customize Queries box under expert features. The
screen will refresh to display additional fields.
3. In the Field Name field you may enter what you choose to name the field/section of the
checkout page.
4. In the Primary Query text field, enter a prompt or questions for the user.
5. To the right of the Primary Query Text, there is a box with an Add button next to it. This is
where you can add the choices you would like in your drop down menu. Add them one at a
time.
6. By clicking the "Make Fields Required" box, the User will not be allowed to checkout until they
select a choice from the drop down menu.
7. By clicking the "Enable Secondary Query" box, you can turn on a second Query Text field, "Add"
box and Make Fields Required button. If you have a second query that you want to ask the
shopper, you can set the second up using the same instructions as the first.
8. Scroll to the bottom of the page and hit save. The question (query) will now show up on the
checkbox page.
ENABLING DONATIONS
This tutorial will show you how to turn on Donations in your store. This allows for donations to be
solicited to users on checkout page 1 of 3. The amount will be added to Users' order total.
1. Make sure you are logged into the Control Panel.

2. Navigate to the Edit tab and check the box next to Donations under the features section. Once the
Donations box is checked, three additional boxes will display for your selection. One, or all, boxes may
be chosen to offer Users choices.
Round total up $5
Round total up
$10
Users enter donation amount (can be any amount)
3. An empty field will be displayed when the Donations box has been checked. It is a Donation Message
field which allows you to enter a personal message or information about the donation campaign.
4. Be sure to click "Save" at the bottom of the page when you are finished.
INTEGRATIONS
QUICK BOOKS INTEGRATION
One of the major features included with our Company Store software is the ability to integrate
with QuickBooks. From the control panel you can export orders into invoices and sales receipts,
based off of the type of sale. Please read further for more information.
We recommend you upgrade and use the latest version of QuickBooks. While older versions of
QuickBooks have been tested with our software they are not supported. If you are having
problems we would ask you upgrade before contacting us as this can solve some issues.
QuickBooks is not enabled by default on any stores. Please call us at 1-303-800-1546 to have
this feature enabled for you.
Turning on Quickbooks in your store
First you will have to enable Quickbooks on the store level.
1) Login to the control panel (http://www.co-store.com/admin).
2) Click on the “Stores” tab.
3) Click on the store you’d like to edit.
4) Click on the “Edit” tab.

5) Scroll down to the “Ala Carte” section.
6) Click on the checkbox next to “QuickBooks Integration”. (If you do not see the
QuickBooks checkbox it has not been enabled for your account. Please call us at 1-303-
800-1546 to have it turned on).
7) Click on “Save” at the bottom of the screen.
8) To disable QuickBooks at any time please go back to the Edit tab of your store and under
Ala Carte uncheck the QuickBooks feature and save.
Exporting Orders to QuickBooks
Our system exports orders in the form of an IIF file, which is a file format directly utilized by
QuickBooks. Please do not attempt to modify the IIF files on your own as doing so can cause
problems during import.
Export the Orders
1) Login to the control panel (http://www.co-store.com/admin).
2) Click on the “Stores” tab.
3) Click on the store you’d like to edit.
4) Click on the “Reports” tab.
5) By default you’ll be viewing the “Orders” report.
6) Select the dates of sales you’d like exported to QuickBooks. If you want to limit by a
specific usergroup, user or order status you may do so here.
7) Click the “Run Report” button.
8) Review the orders quickly to verify they are what you want to import. Then click on
“Save to QuickBooks (IIF)”.
9) Save the file to a place where you’ll remember it, for example, your desktop.
10) Open QuickBooks and the company you want to import the invoices into.
11) Click on “File” > “Utilities” > “Import” > “IIF Files…”.
12) Navigate to the file you just saved and select it.

13) Click on “Open”.
14) Your data has now been imported.
15) Data will be imported as follows:
a. Orders using the Credit Card method will be imported as sales receipts.
b. Orders using other payment methods (PO, budget, coupon, gift certificate) will
show up as invoices.
c. Invoice numbers show up as “Store Name” : “Order Number”
d. Item numbers will either be the internal number of the product or the item
number if there is no internal number.
e. Sales tax will not show as a line item.
Internal Numbers
Internal numbers are essentially product item numbers in QuickBooks. Multiple products may
have the same internal number. For example, if you had an order with 10 different types of
shirts you wouldn’t necessarily want each item number to be different internally.
Internal numbers are also useful for matching up existing items in QuickBooks to items in your
store.
If you don’t specify an internal number the system will automatically put in the item number for
you.
Adding an internal number to a product
1) Login to the control panel (http://www.co-store.com/admin).
2) Click on the “Stores” tab.
3) Click on the store you’d like to edit.
4) Click on the “Products” tab.
5) Find the product you’d like to edit and click on its title to edit it.
6) The internal number will show up on the edit tab.
7) Input an internal number and click “Save” at the bottom of the page.
8) The internal number has now been added.

ASI PROFITMAKER INTEGRATION AND SUB-SKUS
This section is designed to give you an in-depth look at how to use ASI ProfitMaker
with BrightStores. We will walk you through the steps to add sub-skus (color and size)
as well as exporting orders to a format readable by ProfitMaker.
Enable the proper features
In order to use ProfitMaker you will need to enable two features. Follow the steps below
to enable them.
1) Login the control panel as a distributor level administrator (http://www.co-
stores.com/admin).
2) Click on the “Stores” tab.
3) Click on the store name you’d like to have ProfitMaker enabled for.
4) Click on the “Edit” tab.
5) Scroll down to the ‘Features’ section. Click on the check boxes next to “ASI
ProfitMaker Integration” and “Sub Sku”. Both check boxes MUST be enabled for
the integration to work. If you do not see either of the boxes please contact
BrightStores so we can enable them for you.
6) Click on “Save” at the bottom of the page.
7) The integration is now enabled.
Adding color and size sku’s to your products:
The next step is to create sku’s readable by profit maker. A sku is broken down into 2
parts: color (which is 3 characters long) and size (which is 2 characters long).
If no sku is entered for a product the system will automatically create one on export of the ASI
ProfitMaker file based on the first 2 letters of the size name and the first 3 letters of the
color name.

Size SKU
1) Login to the control panel as a distributor level administrator (http://www.co-
stores.com/admin).
2) Click on “Size Groups”.
3) Click on the size group you’d like to add sku’s to.
4) Click on the size you’d like to edit or click on “new” to add a new size to the
group. (Clicking on “new” will produce a form exactly like editing an existing sku,
with the omission of existing data. For the purpose of this document we will only
go over editing an existing sku, but the process of adding a sku to a new size
group is virtually the same).
5) Enter the sku and any relevant data. The sku must NOT be any more than 2
characters long if using ASI ProfitMaker.
6) Click on “Save”. That’s it!
Color SKU
1) Login to the control panel (http://www.co-store.com/admin).
2) Click on the “Stores” tab.
3) Click on the store you wish to edit color sku’s for.
4) Click on the “Products” tab.
5) Search for the product you would like to edit and click on its title.
6) Click on the “Colors” tab.
7) Choose a color to add a sku to, or simply start filling out info to add a new color.
8) Enter in the sku and any relevant information. The SKU must be 3 characters
long to work properly with ASI ProfitMaker.
9) Click on “Update” (or save if you’re adding a new color/sku combination).
10) That’s it!

Exporting orders to ASI ProfitMaker
1) Login to the control panel as an administrator (http://www.co-store.com/admin).
2) Click on the store you plan on exporting orders from.
3) Click on the “Reports” tab.
4) You’ll automatically be brought to the “Orders” tab. If you were viewing another
report, click on the “Orders” tab.
5) Select the proper order date range, the User Group if you plan on limiting by
group, User if you plan on limiting by user, and Order Status to look for orders of
a certain status (Such as ‘New’ or ‘Cancelled’).
6) Click on “Run Report”.
7) Click on “Export to ASI ProfitMaker”
8) Save the file to a location such as your desktop.
9) Import the file into ASI ProfitMaker. If you need assistance with this please
contact ASI Computer Systems (http://www.asicomp.com).
BUNDLE BUY INTEGRATION
1. Log into the Company Store Manager by going to https://www.co-store.com/admin.
2. Navigate to the edit tab of your store. Scroll down to the Ala Carte section and click to show details.
Click on the blue button to enable Bundle Buy. Be sure to hit save at the bottom of the page after
enabling the feature.
3. Once you have enabled the feature, you can go to your products and choose which product(s) you
would like to be able to add to a Bundle Buy Promotion. Navigate to your products tab. Click search
and choose a product.
4. On the edit tab of the product you will see a check box under manage features for this product only
that reads include this product in a Bundle Buy promotion. Check the box and hit save.
5. After you have clicked save on the edit tab, click on the sizing/pricing tab at the product level to add
your quantity breaks. If you do not have a min. set on the edit tab, you will want to do this first. The
quantity breaks that you set for this product will be for all users within the group buy, not for each

individual user. Please note, for apparel quantity discounts, the discount will be a percentage discount.
Items that have one size will be a flat rate discount.
6. Next, you will want to create your Bundle Buy Promotion. Navigate to the Bundle Buy Manager tab
in your store. To create a new promotion, click on the blue new promotion button.
7. Once you click on the new promotion, you will start entering in the fields for the promotion. Enter in
the name of the promotion, this will show in the store front. Enter in the start date for when you want
the promotion to run and then end date (when the item can no longer be purchased as a group buy).
Enter in the expected ship date if you choose to or leave it blank. Select your product that you would
like to add to the promotion. If you do not see the product that you would like to add, then you will
need to go to the product on the products tab and check the box to include it in a bundle buy. Enter in
the min. quantity for this promotion. Enter any notes about the promotion. Once you are finished, hit
the blue Save/Activate button.
8. Once you hit save, you will see an Email Settings tab and an Orders tab. Click on the Email Settings
Tab. Be sure to enter in emails for each field. Enter in your salutation and message for your emails.
Hit save when you are finished.
9. Once you have saved your Email Settings, you need to click back on the Edit tab of the Bundle Buy
Promotion and hit the Save/Activate button to completely activate your promotion. You will not see
the product in the store until the start date of the promotion.
10. Once orders have been placed in the store for your Bundle Buy Promotion, you can see the orders
and the order details on the orders tab for the promotion.
11. To edit a bundle buy, click on the bundle buy manager tab in the company store manager. Click on
the edit/view promotion name blue button to edit or view current promotions. You can also delete
your promotions by clicking the blue delete promotion name button.
ARIBA INTEGRATIONS
Ariba Flip - Create PO Based Invoice
PO based Invoice (PO Flip)
When you have an active relationship with a client via the Ariba Network, you will receive future
purchase orders (POs). In order to invoice a PO that has been sent to your Ariba Network account,
please follow these steps:
1. Log into your Ariba Network account.
2. From the home page, click on the Inbox tab on the top of the page.
3. Click on the Purchase Order (PO) number you want to invoice.
4. From the PO detail page, click the Create Invoice button at the top of the page and select
Standard Invoice.
5. Enter your invoice number and the invoice date (Invoice date can only be backdated 1 day from
the current date).
6. If you need to enter Shipping (or Freight) and/or Tax:
1. Shipping – click one of the Add to the Header buttons and choose Shipping. This will
open the Shipping Date and Cost fields. Only the Cost is required.
2. Tax – scroll down to the line item, click the open box to the left of the line item, click
Add to Line Item button and select Tax. This will open the fields for tax. From here you
can enter the total amount of tax (Tax Amount) or you can choose the Rate(%) and the
Taxable Amount and the Ariba Network will calculate the rate for you.
7. Ensure that the invoice price is correct and click Next.
8. From the invoice confirmation page, click the yellow Submit button to complete the process.
Troubleshooting Punch-Out Issues with Ariba, Oracle, PerfectCommerce,
etc.
If you're having issues with your punch-out integration, typically it's due to one of the issues listed
below. Keep in mind that if you do need additional help, any error messages or cXML examples you
can provide will be extremely useful.
Cannot Connect due to Invalid Username/Password
This is by and far the most common issue we get. What can happen is a user (either store
administrator or shopper) changes the password or username to the integrated user account in the
store, effectively breaking the integration. This is most common in dual login stores (where users don’t
always come through the integration to stop).
What you need to do to resolve this:
1. Get the integrated catalog username and password. BrightStores does not know the password
for the integration and we do not store it for security reasons. You should be able to get the
integrated username from your supplier account, but you may have to reset the password. As
this is specific to the provider you use (Ariba, Oracle, PerfectCommerce, etc) we recommend

you contact them for this information. (Note: With Ariba, the integrated username is typically
your, or your client’s, ANID).
2. Find the user in the Company Store Manager at http://www.co-store.com/admin. Be sure to
select the relevant store after logging into the CSM. Typically the user resides in a group titled
“Ariba” or “Integrated Users”. If you are unable to find it, we recommend using the User
Management feature to search for the user. Failing both of those, it’s possible the username
was changed. Often it’s easier to just create a new user with the information obtained in step 1.
3. Once the user information is updated the integration should work properly. If it does not, verify
the information on both sides (the procurement system and co-store.com) matches exactly –
no spaces, no extra characters, case matches, etc. Failing that, we recommend contacting our
support team, as they will be able to further look into the issue. Please note tech support for
integrations is billable, so providing us with as much useful information as possible is extremely
helpful in resolving issues quickly.
Unable to connect to Punch-Out Catalog
While this is a generic error message, there’s a few things you can do:
1. Verify the punch-out catalog URL in your procurement system is: https://www.co-
store.com/punchoutsetuprequestssl.aspx - If the URL has changed, try updating it to see if that
helps.
2. Make sure the store is online and active in the Company Store Manager. If the store is not
active, the punch-out will not work.
3. If you’re using an Oracle integration, you may get an SSL error from time to time. This is due to
how Oracle works – the only way around it is to contact Oracle support and have them update
the Cached SSL Certificate on their side (they will know what this means).
