Writer Guide
Chapter 5
Printing, Exporting, Faxing,
and E-Mailing
Copyright
This document is Copyright © 2010–2014 by the LibreOffice Documentation Team. Contributors
are listed below. You may distribute or modify it under the terms of either the GNU General Public
License (http://www.gnu.org/licenses/gpl.html), version 3 or later, or the Creative Commons
Attribution License (http://creativecommons.org/licenses/by/4.0/), version 4.0 or later.
All trademarks within this guide belong to their legitimate owners.
Contributors
John A Smith Jean Hollis Weber Ron Faile Jr.
Feedback
Please direct any comments or suggestions about this document to the Documentation Team’s
mailing list: [email protected]
Note: Everything you send to a mailing list, including your email address and any other personal
information that is written in the message, is publicly archived and cannot be deleted.
Acknowledgments
This chapter is adapted and updated from Chapter 5 of the Writer Guide for OpenOffice.org. The
contributors to that chapter are:
Jean Hollis Weber Michele Zarri Agnes Belzunce
Peter Kupfer Robert Scott Janet M. Swisher
Publication date and software version
Published 17 March 2014. Based on LibreOffice 4.2.
Note for Mac users
Some keystrokes and menu items are different on a Mac from those used in Windows and Linux.
The table below gives some common substitutions for the instructions in this chapter. For a more
detailed list, see the application Help.
Windows or Linux Mac equivalent Effect
Tools > Options
menu selection
LibreOffice > Preferences Access setup options
Right-click Control+click and/or right-click
depending on computer setup
Opens a context menu
Ctrl (Control) (Command)⌘ Used with other keys
F5 Shift+ +⌘ F5 Opens the Navigator
F11 +T⌘ Opens the Styles and Formatting window
Documentation for LibreOffice is available at http://www.libreoffice.org/get-help/documentation

Contents
Copyright..............................................................................................................................2
Contributors................................................................................................................................. 2
Feedback..................................................................................................................................... 2
Acknowledgments........................................................................................................................ 2
Publication date and software version.........................................................................................2
Note for Mac users...............................................................................................................2
Quick printing.......................................................................................................................4
Controlling printing..............................................................................................................4
Selecting general printing options for a document.......................................................................5
Printing multiple pages on a single sheet of paper.......................................................................5
Selecting what to print.................................................................................................................. 7
Printing a brochure...................................................................................................................... 7
Printing in black and white (on a color printer).............................................................................9
Previewing pages before printing.................................................................................................9
Printing envelopes.............................................................................................................10
Printing labels....................................................................................................................12
Sending a fax......................................................................................................................14
Exporting to PDF................................................................................................................14
Quick export to PDF.................................................................................................................. 14
Controlling PDF content and quality...........................................................................................14
General page of PDF Options dialog.....................................................................................15
Initial View page of PDF Options dialog................................................................................16
User Interface page of PDF Options dialog...........................................................................17
Links page of PDF Options dialog.........................................................................................18
Security page of PDF Options dialog....................................................................................18
Exporting to XHTML.................................................................................................................. 20
E-mailing Writer documents.............................................................................................20
E-mailing a document to several recipients................................................................................20
Digital signing of documents............................................................................................23
Removing personal data...................................................................................................24
Printing, Exporting, Faxing & Emailing 3
Quick printing
Click the Print File Directly icon to send the entire document to the default printer defined for
your computer.
Note
You can change the action of the Print File Directly icon to send the document to
the printer defined for the document instead of the default printer for the computer.
Go to Tools > Options > Load/Save > General and select the Load printer
settings with the document option.
Controlling printing
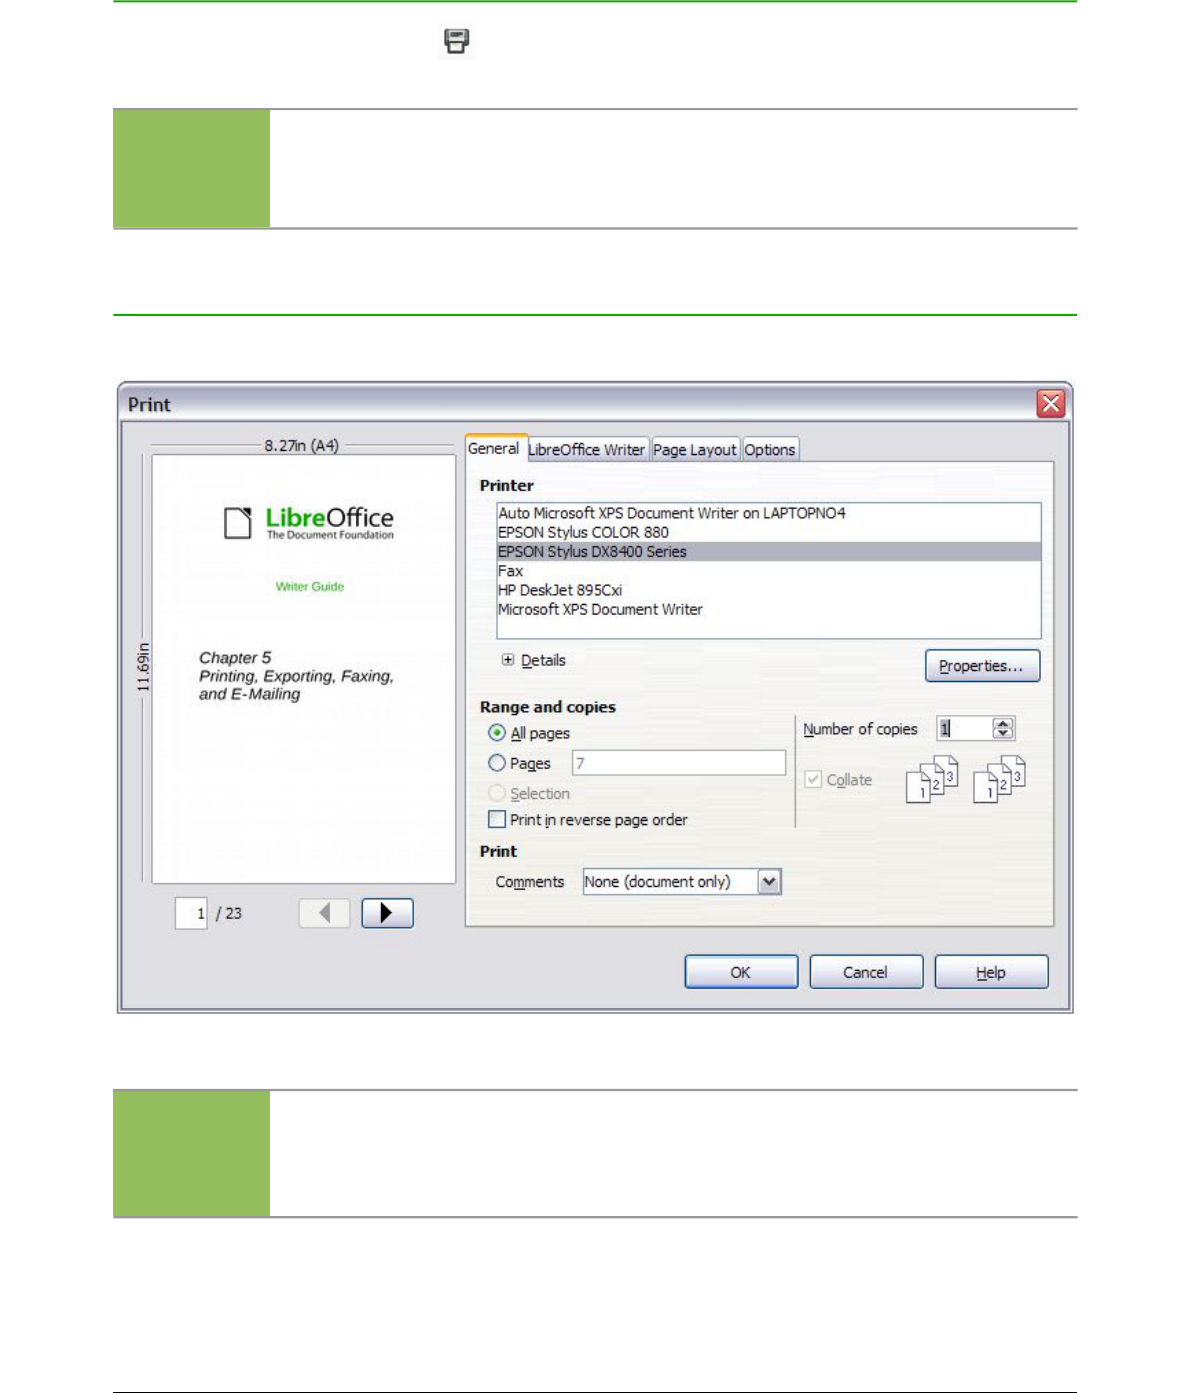
For more control over printing, use the Print dialog (File > Print or Ctrl+P).
Figure 1: The Print dialog
Note
The options selected on the Print dialog apply to this printing of this document only.
To specify default printing settings for LibreOffice, go to Tools > Options >
LibreOffice > Print and Tools > Options > LibreOffice Writer > Print. See
Chapter 2, Setting Up Writer, for more details.
The Print dialog has four tabs, from which you can choose a range of options, as described in the
following sections.
Controlling printing 4
Selecting general printing options for a document
On the General tab of the Print dialog, you can choose:
• The printer (from the printers available)
• Which pages to print (the current page number is displayed here), the number of copies to
print, and whether to collate multiple copies (Range and copies section)
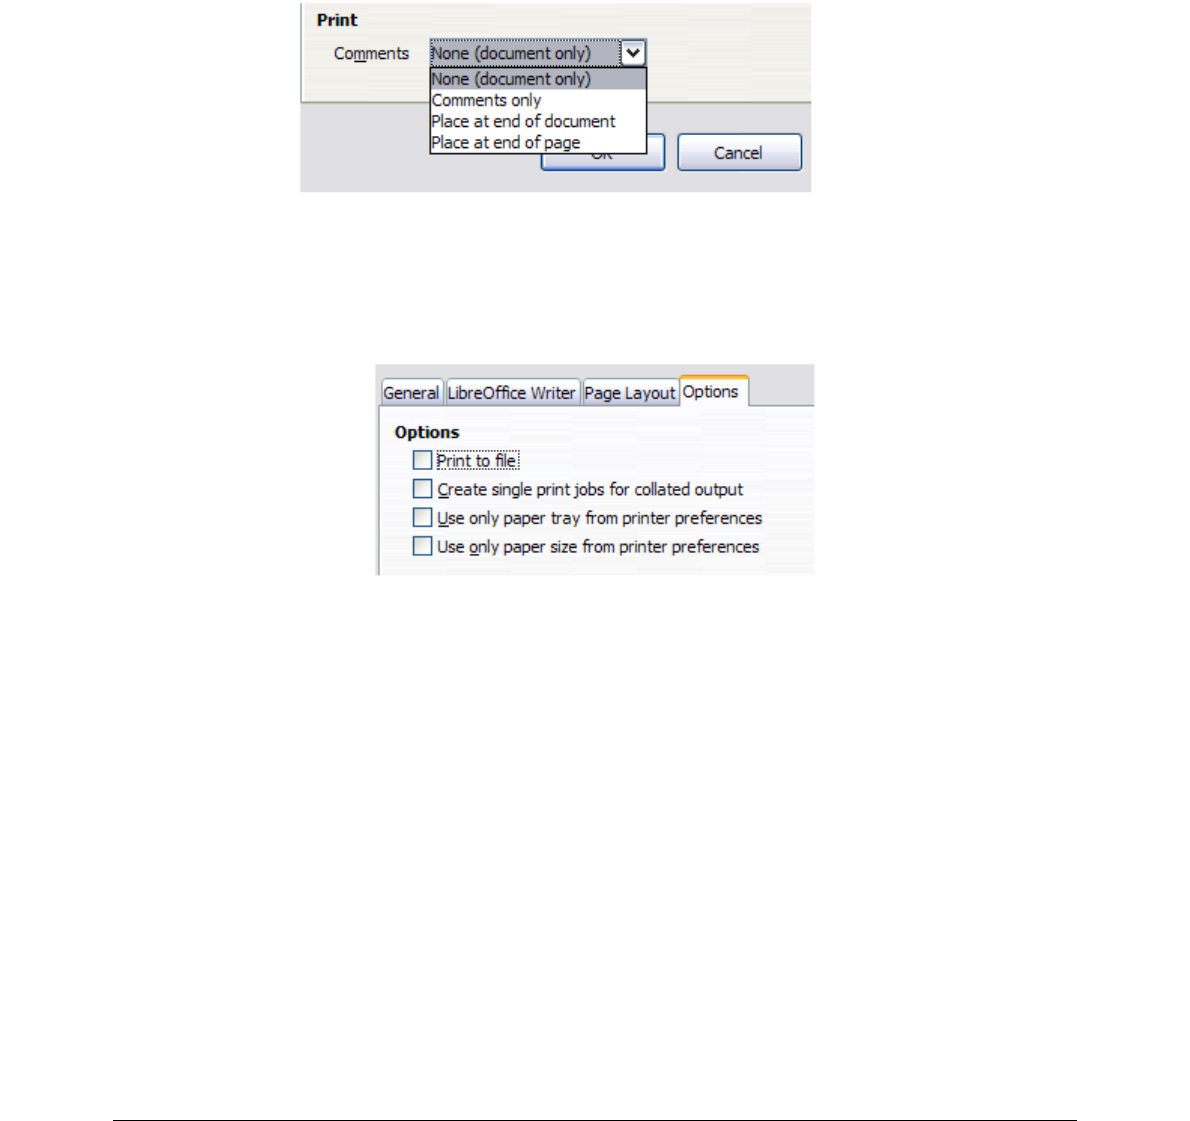
• Whether to print any comments that are in the document, and where to print the
comments.
Some selections may not be available all the time. For example, if the document contains no
comments, the Print – Comments drop-down list does not work.
Figure 2: Choosing whether and where to print comments
Click the Properties button to display a dialog where you can choose portrait or landscape
orientation, which paper tray to use, and the paper size to print on.
On the Options tab of the Print dialog, you can choose various other options for printing.
Figure 3: General print options
Printing multiple pages on a single sheet of paper
You can print multiple pages of a document on one sheet of paper. To do this:
1) In the Print dialog, select the Page Layout tab (Figure 4).
Controlling printing 5

Figure 4: Printing multiple page per sheet of paper
2) In the Layout section, select from the drop-down list the number of pages to print per sheet.
The preview panel on the left of the Print dialog shows how the printed document will look.
When printing more than 2 pages per sheet, you can choose the order in which they are
printed across and down the paper. The two pictures below show the difference.
3) In the Page sides section, select whether to print all pages or only some pages.
4) Click the OK button.
Tip
To print two pages per sheet in “facing pages” (book layout) style, print from Print
Preview instead. See page 9.
Controlling printing 6

Selecting what to print
In addition to printing a full document, you can choose to print individual pages, ranges of pages,
or a selection of a document, as described in this section.
Printing an individual page:
1) Choose File > Print from the Menu bar.
2) On the Print dialog, select the page to print.
3) In the Range and copies section of the General page, select the Pages option.
4) Enter the sequence number of the page you want to print. This may differ from the page
number if you have restarted page numbering within the document. The preview box
changes to show the selected page.
5) Click the OK button.
Printing a range of pages:
1) Choose File > Print from the Menu bar.
2) On the Print dialog, select the range of pages to print.
3) In the Ranges and copies section of the General page, select the Pages option.
4) Enter the sequence numbers of the pages to print (for example, 1–4 or 1,3,7,11).
5) Click the OK button.
Printing a selection of text:
1) In the document, select the material (text and graphics) to print.
2) Choose File > Print from the menu bar.
3) The Ranges and copies section of the Print dialog now includes a Selection option and the
preview box shows the selected material. See Figure 5.
4) Click the OK button.
Printing a brochure
In Writer, Impress, and Draw, you can print a document with two pages on each side of a sheet of
paper, arranged so that when the printed pages are folded in half, the pages are in the correct
order to form a booklet or brochure.
Tip
Plan your document so it will look good when printed half size; choose appropriate
margins, font sizes, and so on. You may need to experiment.
To print a brochure on a single-sided printer:
1) Choose File > Print.
2) On the General page of the Print dialog, click Properties.
3) Check the printer is set to the same orientation (portrait or landscape) as specified in the
page setup for your document. Usually the orientation does not matter, but it does for
brochures. Click OK to return to the Print dialog.
4) Select the Page layout tab in the Print dialog.
5) Select the Brochure option.
6) In the Page sides section, select Back sides / left pages option from the Include drop-down
list. (See Figure 6.)
7) Click the OK button.
Controlling printing 7
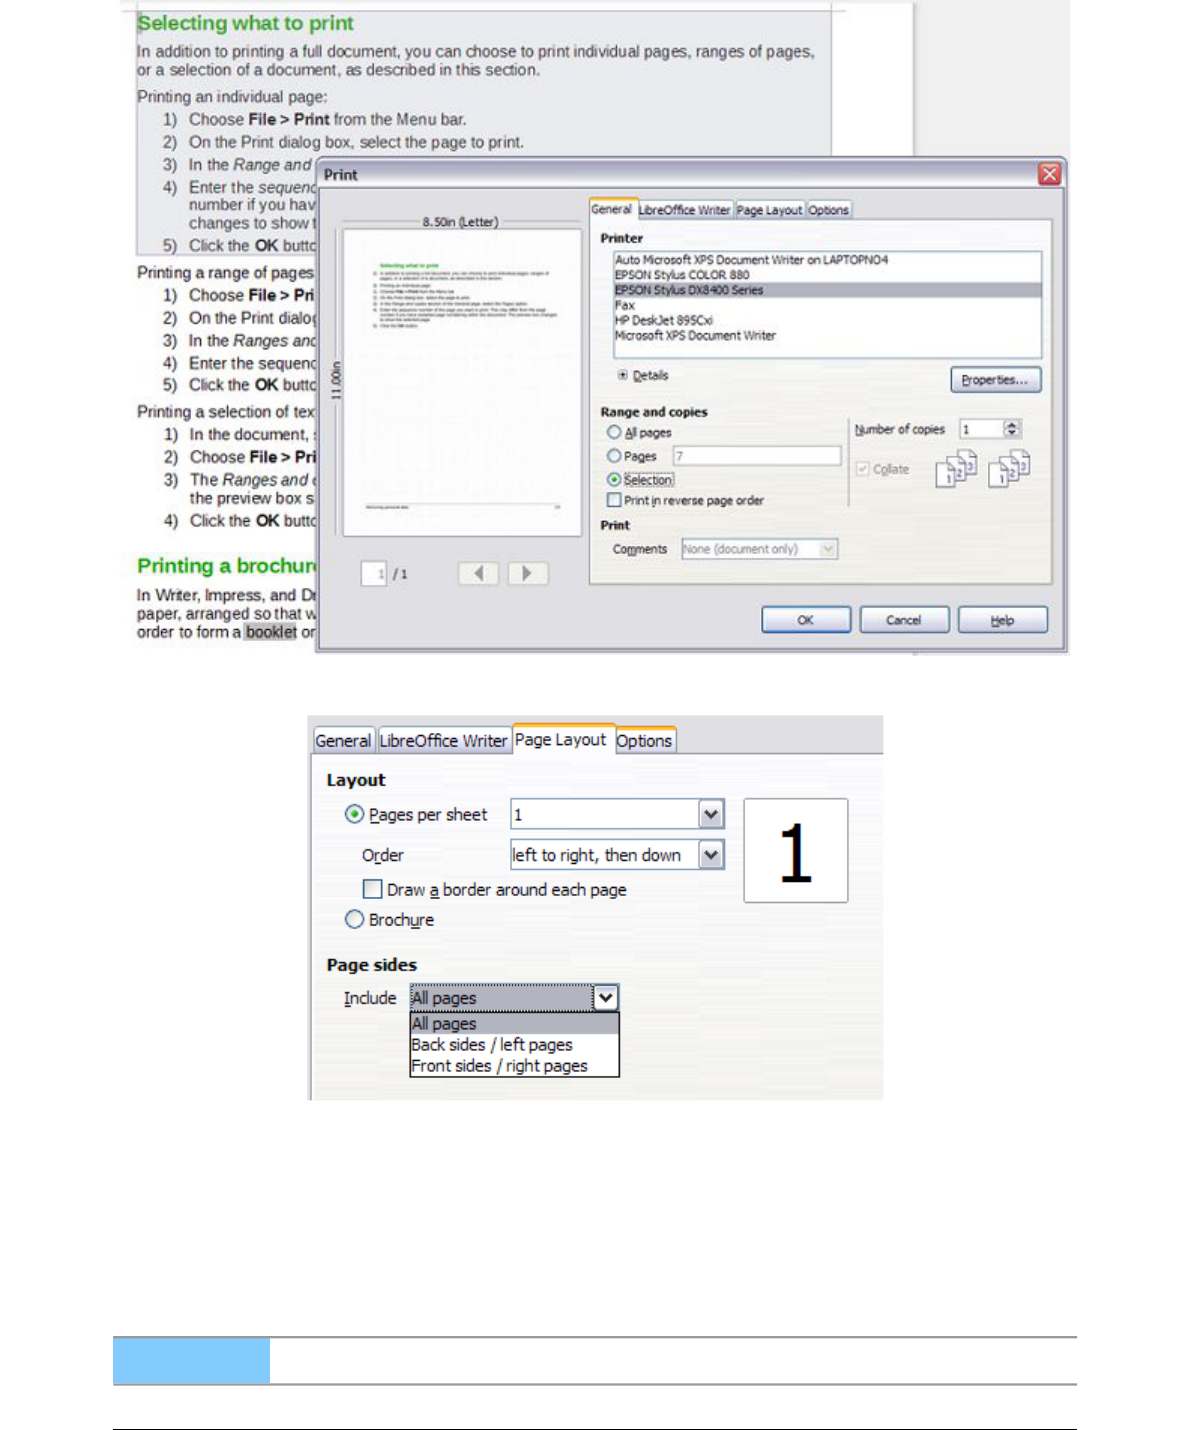
Figure 5: Printing a selection of text
Figure 6: Selecting which pages to print
8) Take the printed pages out of the printer, turn the pages over, and put them back into the
printer in the correct orientation to print on the blank side. You may need to experiment a bit
to find out what the correct arrangement is for your printer.
9) On the Print dialog, in the Page sides section, select Front sides / right pages option from
the Include drop-down box.
10) Click the OK button.
Tip
If your printer can print double-sided automatically, choose All pages.
Controlling printing 8
Printing in black and white (on a color printer)
You may wish to print documents in black and white on a color printer. Several choices are
available. Please note that some color printers may print in color regardless of the settings you
choose.
Change the printer settings to print in black and white or grayscale:
1) Choose File > Print to open the Print dialog.
2) Click Properties to open the Properties dialog for the printer. The available choices vary
from one printer to another, but you should find options for the Color settings. See your
printer’s help or user manual for more information.
3) The choices for color might include black and white or grayscale. Choose the required
setting.
4) Click OK to confirm your choice and return to the Print dialog,
5) Click the OK button to print the document.
Tip
Grayscale is best if you have any graphics in the document.
Change the LibreOffice settings to print all color text and graphics as grayscale:
1) Choose Tools > Options > LibreOffice > Print.
2) Select the Convert colors to grayscale option. Click OK to save the change.
3) Open the Print dialog (File > Print).
4) Click the OK button to print the document.
Change the LibreOffice Writer settings to print all color text as black, and all graphics as grayscale:
1) Choose Tools > Options > LibreOffice [Component] > Print.
2) Under Contents, select the Print text in black option. Click OK to save the change.
3) Open the Print dialog (File > Print).
4) Click the OK button to print the document.
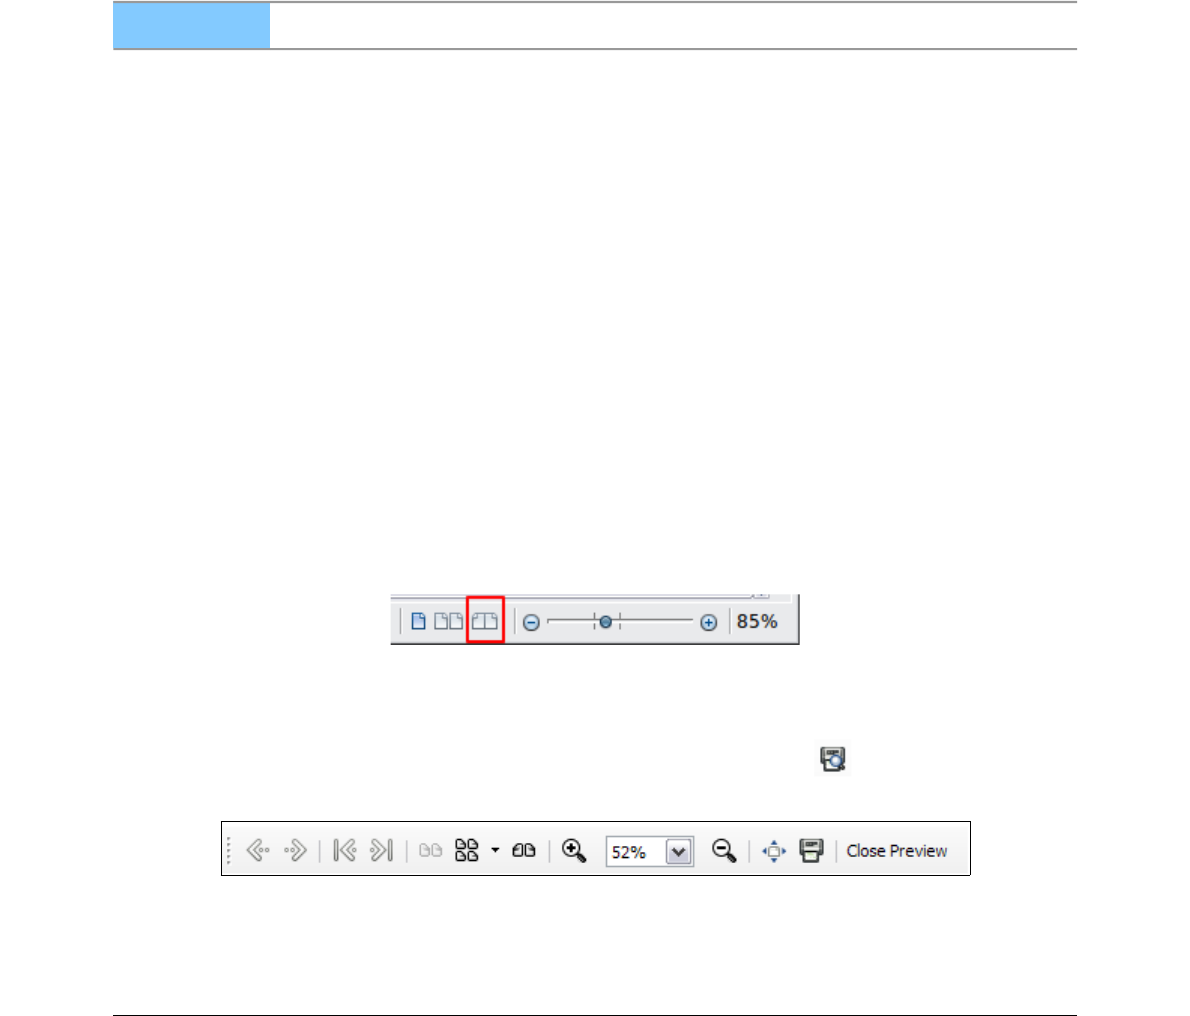
Previewing pages before printing
The normal page view in Writer shows you what each page will look like when printed and you can
edit the pages in that view. If you are designing a document to be printed double-sided, you may
want to see what facing pages look like. Writer provides two ways to do this:
• View Layout (editable view): use the Facing Pages (Book Preview) button on the status bar.
• Page Preview (read-only view).
To use Page Preview:
1) Choose File > Page Preview (or click the Page Preview button on the Standard
toolbar). Writer now displays the Page Preview toolbar instead of the Formatting toolbar.
Figure 7: Page Preview toolbar
Controlling printing 9
2) Select the required preview button: Two Pages , Multiple Pages or Book
Preview .
3) To print the document from this view, click the Print document button to open the
Print dialog.
4) Choose the print options and click the OK button.
Printing envelopes
Printing envelopes involves two steps: setup and printing.
To set up an envelope to be printed by itself or with your document:
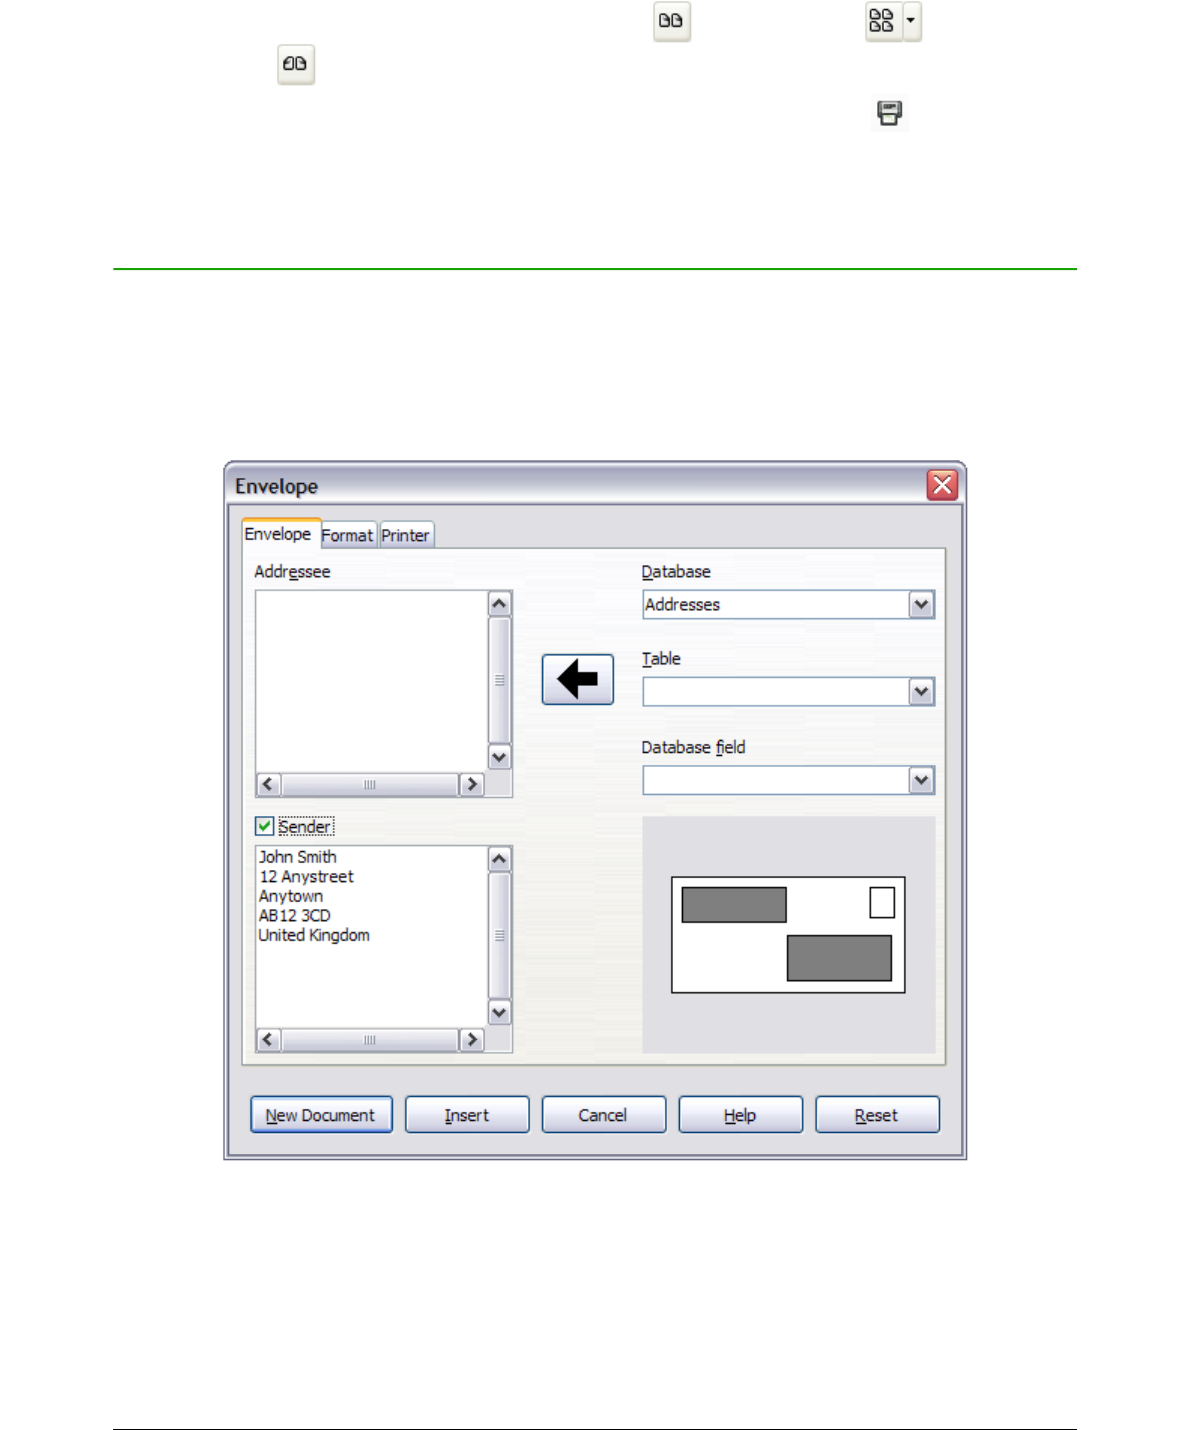
1) Click Insert > Envelope from the Menu bar.
2) In the Envelope dialog, start with the Envelope tab. Verify, add, or edit the information in the
Addressee and Sender (the “from” on the envelope) boxes.
Figure 8: Choosing addressee and sender information for an envelope
You can type information directly into the Addressee and Sender boxes, or use the right-
hand drop-down lists to select the database or table from which you can draw the envelope
information, if desired. See Chapter 11, Using Mail Merge, for details on how to print
envelopes from a database.
3) On the Format page, verify or edit the positioning of the addressee and the sender
information. The preview area on the lower right shows the effect of your positioning
choices.
Printing envelopes 10
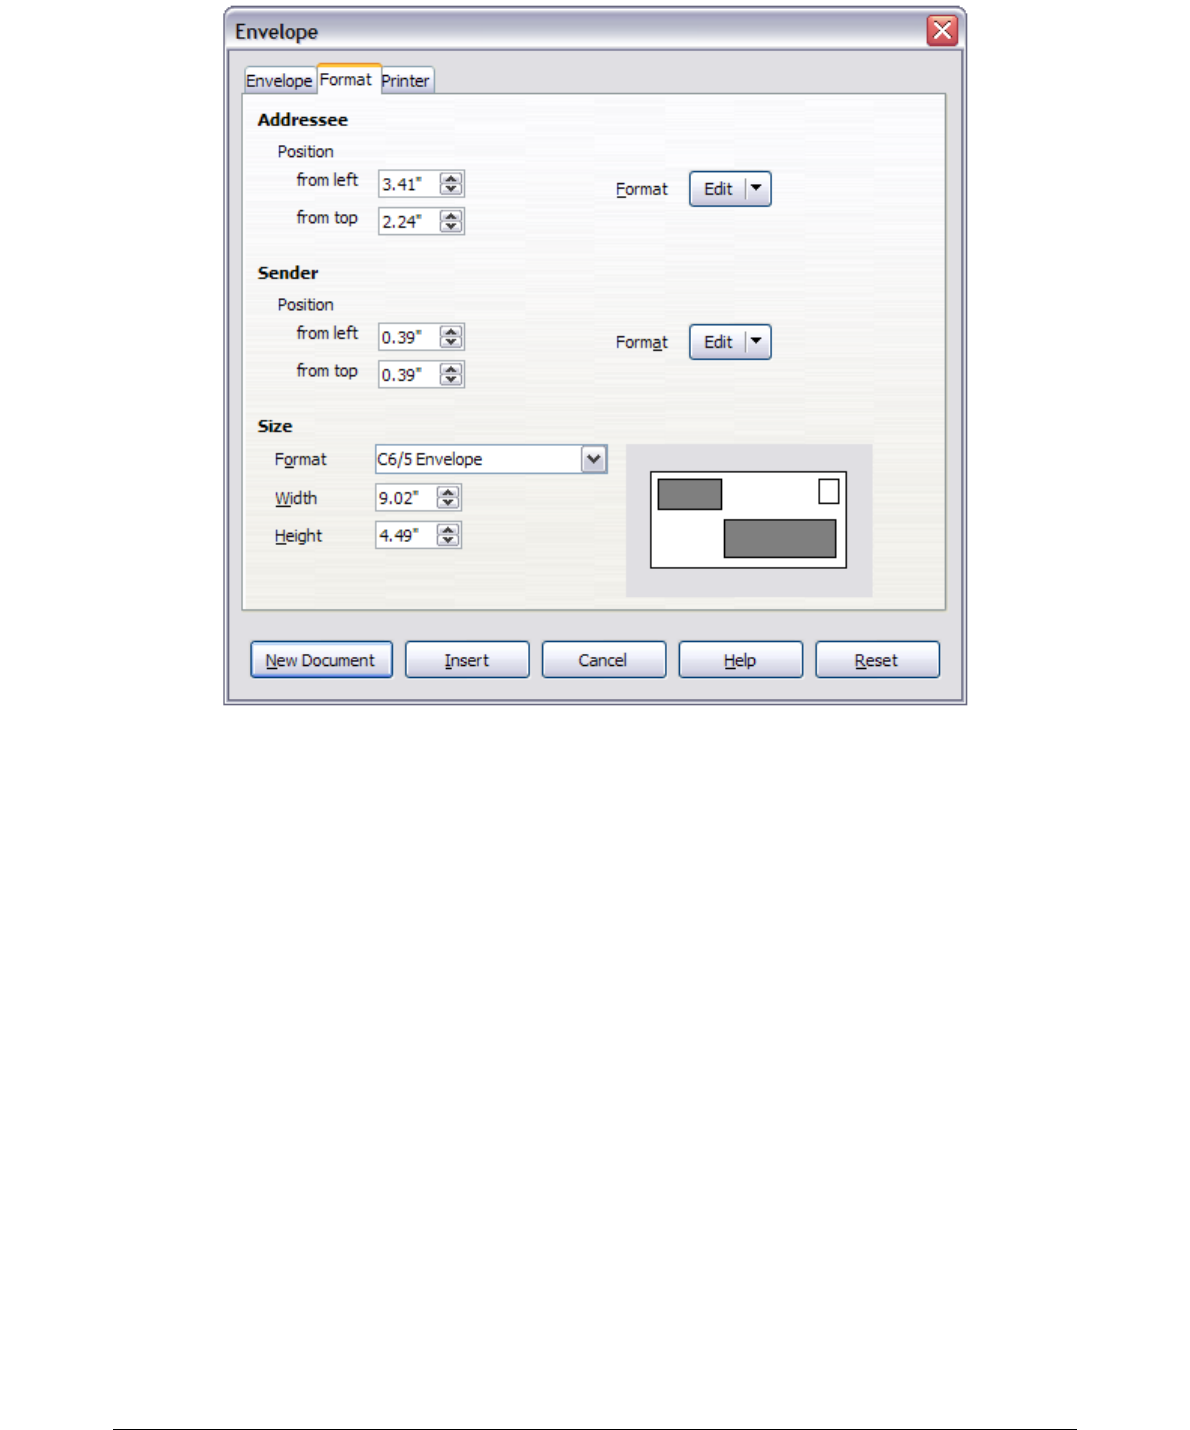
Figure 9: Choosing positioning and size of elements for an envelope
4) To format the text of these blocks, click the Edit buttons to the right. In the drop-down list
you have two choices for each button: Character and Paragraph.
• Selecting Character opens a Character dialog, similar to the standard Character dialog,
but omitting Borders, allowing you to set the formatting of the text's attributes.
• Selecting Paragraph opens a Paragraph dialog, similar to the standard Paragraph
dialog, but omitting Outline & Numbering, allowing you to set the paragraph's attributes.
5) In the lower left of this page, the Size section, choose the envelope format from the drop-
down list. The width and height of the selected envelope then show in the boxes below the
selected format. If you chose a pre-existing format, just verify these sizes. If you chose
User defined in the Format list, then you can edit the sizes.
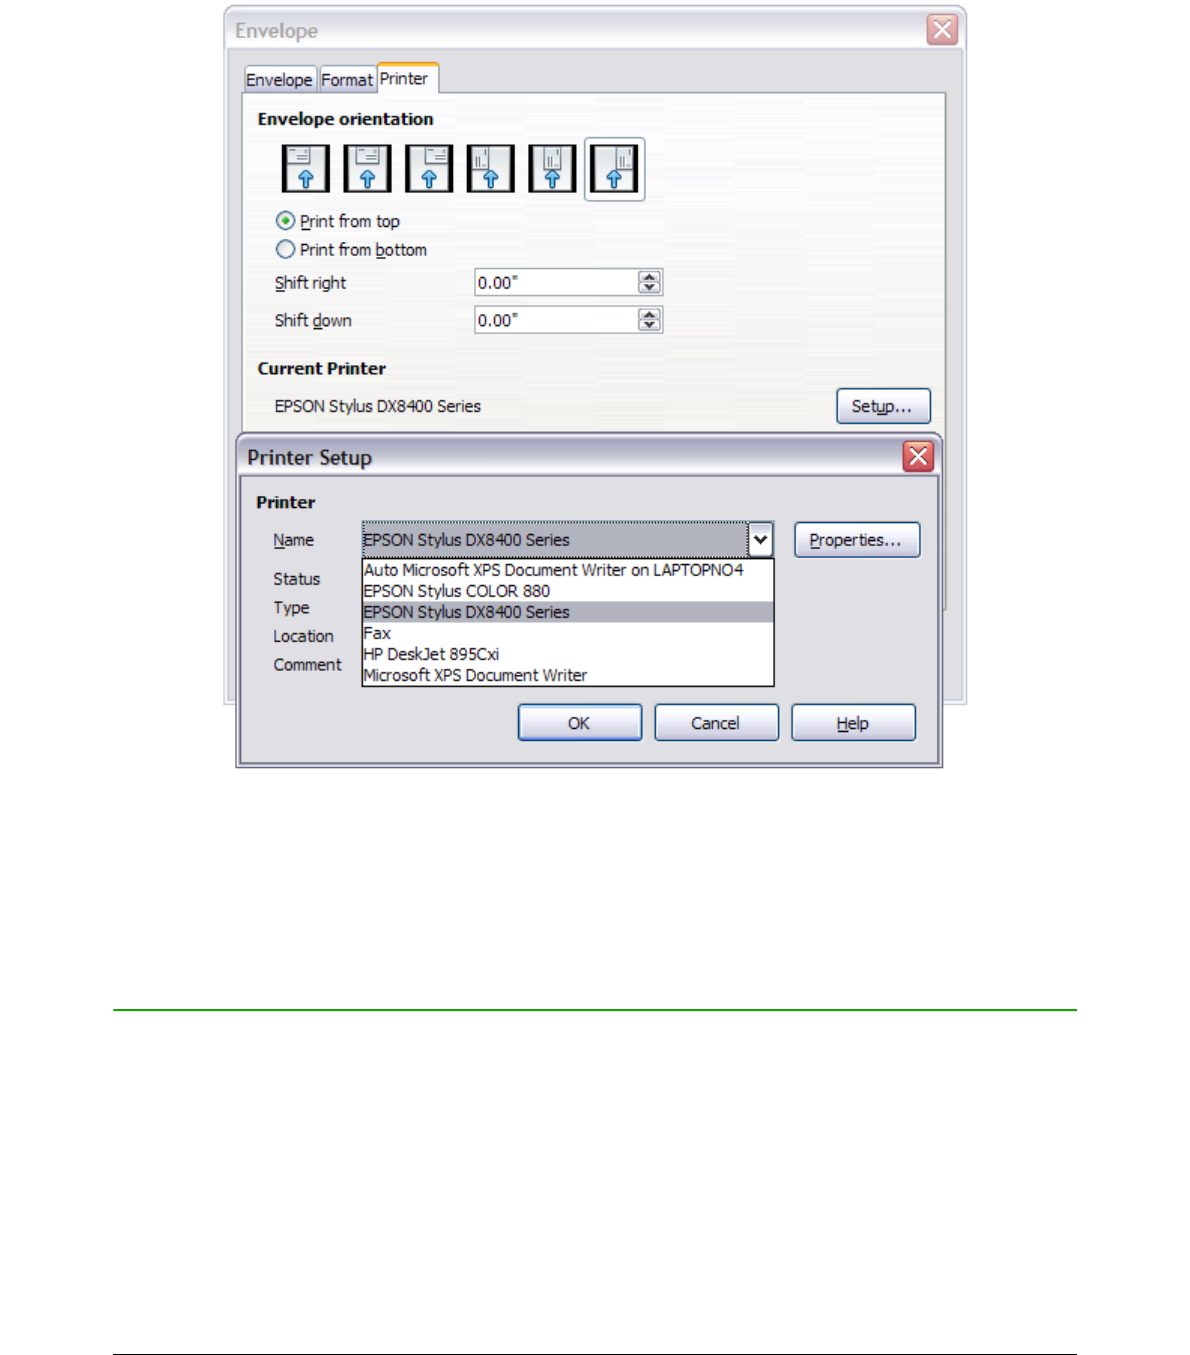
6) After formatting, go to the Printer page to choose printer options such as envelope
orientation and shifting. You may need to experiment a bit to see what works best for your
printer.
You can also choose a different printer or alter printer setup (for example, specify the tray
that holds envelopes) for this print job by clicking the Setup button and making selections
on the Printer Setup dialog.
7) When you have finished formatting and are ready to print, click either the New Document
or Insert button to finish. New Document makes only an envelope or starts a new
document with the envelope. Insert puts the envelope into your existing document as
page 1.
To avoid proceeding with this envelope, click Cancel or press the Esc key. You can also
click Reset to remove your changes and return to the original settings when the dialog
opened.
Printing envelopes 11
When the Envelope dialog closes, you are returned to your document, which now has the envelope
in the same file as the document. Save this file before you do anything else.
Figure 10: Choosing printer options for an envelope
To print the envelope:
1) Choose File > Print from the menu bar.
2) On the Print dialog, under Print range, choose Pages and type 1 in the box. Click OK to
print.
Printing labels
Labels are commonly used for printing address lists (where each label shows a different address),
but they can also be used for making multiple copies of one label only, for example return-address
stickers. To print labels:
1) Choose File > New > Labels on the Menu bar. The Labels dialog opens.
2) On the Labels page, fill in your own label text in the Inscription box, or use the Database
and Table drop-down lists to choose the required information, as described in Chapter 11,
Using Mail Merge.
Printing labels 12
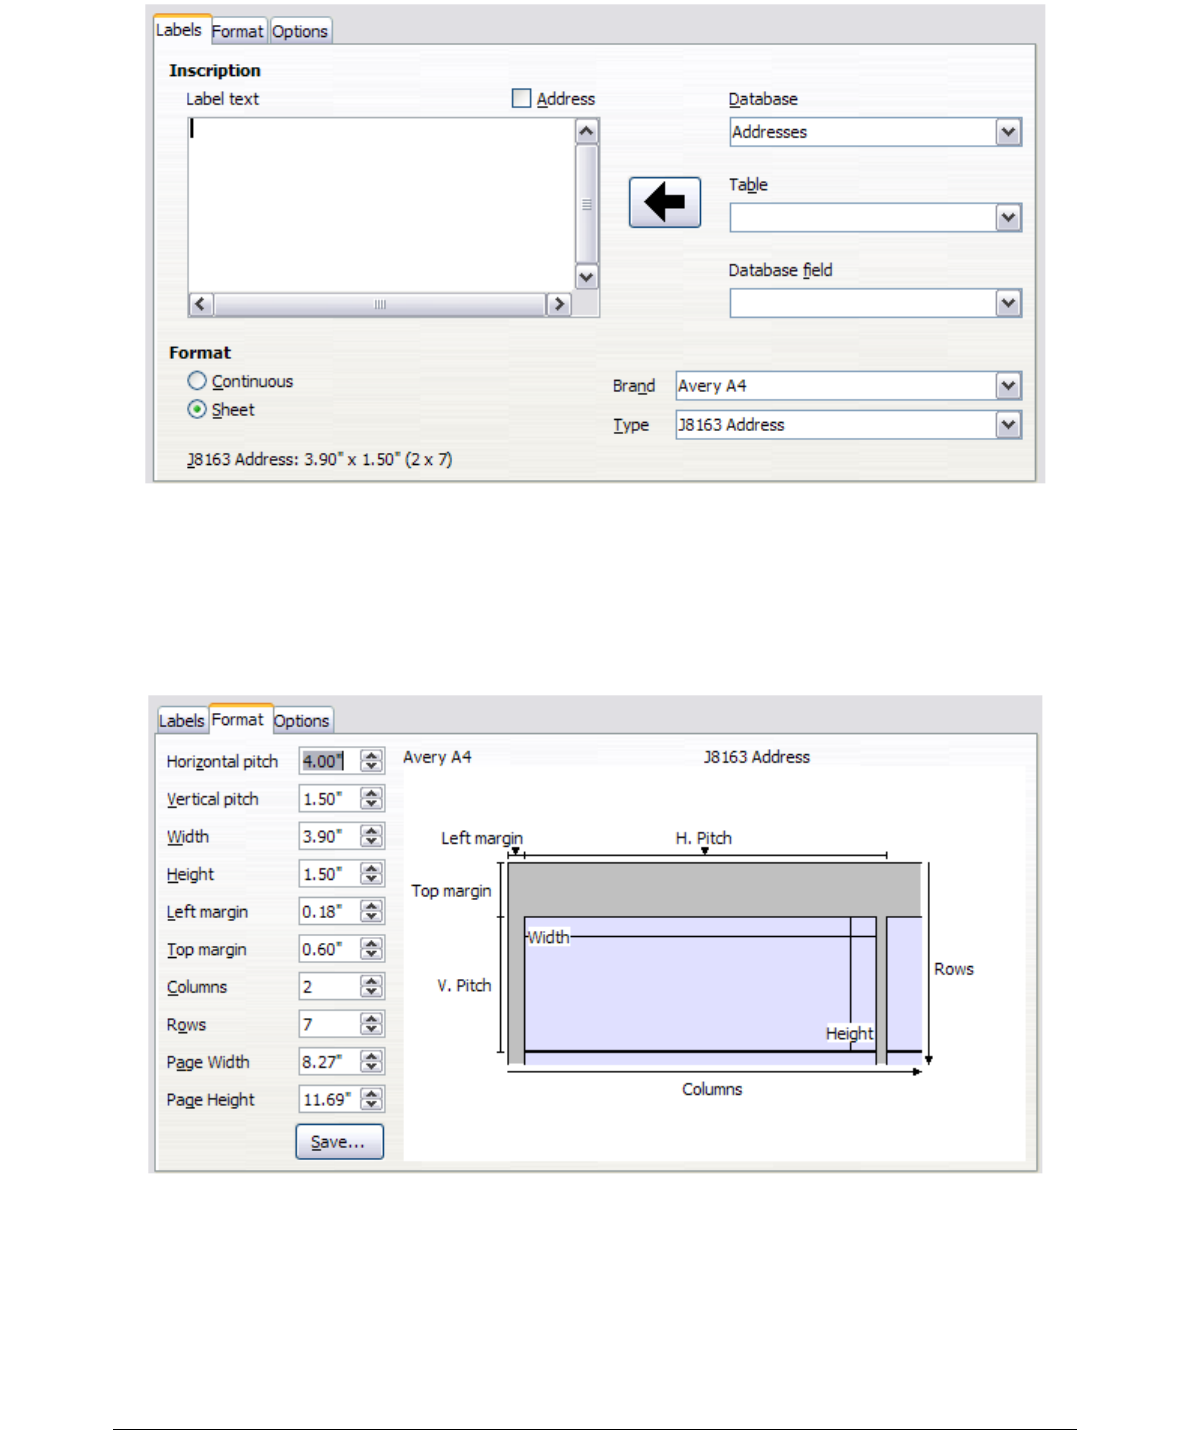
Figure 11: Labels dialog, Labels page
3) Select the label stock in the Brand drop-down list. The types for that brand then appear in
the Type drop-down list. Select the size and type of labels required. You can also select
User in the Type drop-down list and then make specific selections on the Format page.
4) On the Format page, choose the pitch, sizes, margins, columns and rows for user-defined
labels, or just verify with a brand of label stock you have loaded into the printer.
Figure 12: Labels dialog, Format page
5) Click Save to save your new format.
6) On the Options page, choose to print the entire page of labels or one single label, then
select which one by the column and row. You can also change printer setup.
Printing labels 13
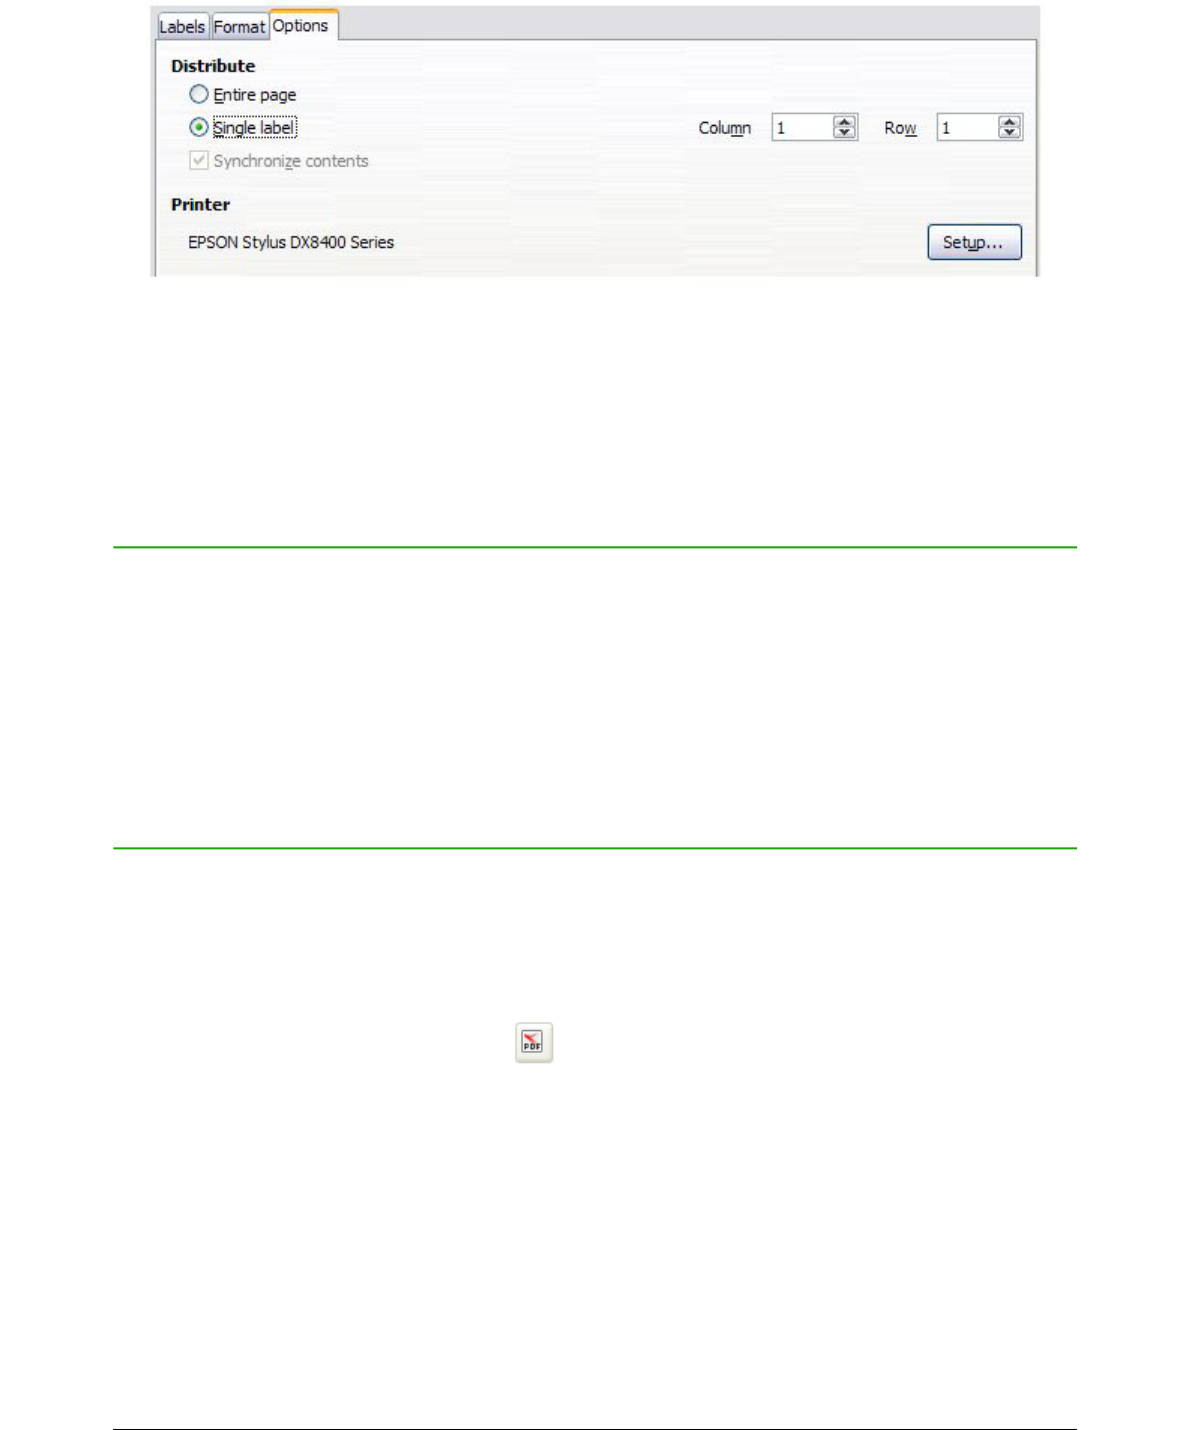
Figure 13: Labels dialog, Options page
7) When you have finished formatting, click New Document to create your sheet of labels or
click Cancel (or press the Esc key). You can also click Reset to remove your changes and
return to the original settings when the dialog opened.
8) You can print using the Print File Directly icon on the toolbar or by choosing File > Print
from the Menu bar, or you can save the file to print later.
Sending a fax
To send a fax directly from LibreOffice, you need a fax modem and a fax driver that allows
applications to communicate with the fax modem.
1) Open the Print dialog (Figure 1) by choosing File > Print and select the fax driver in the
Printer list.
2) Click OK to open the dialog for your fax driver, where you can select the fax recipient.
You can set up a toolbar button so that a single click sends the current document as a fax. To add
a button for this purpose to a toolbar, see Chapter 16, Customizing Writer.
Exporting to PDF
LibreOffice can export documents to PDF (Portable Document Format). This industry-standard file
format for file viewing is ideal for sending the file to someone else to view using Acrobat Reader or
other PDF viewer.
Quick export to PDF
Click the Export Directly as PDF button to export the entire document using the PDF settings
you most recently selected in the PDF Options dialog. You are asked to enter the file name and
location for the PDF file, but you do not get a chance to choose a page range, the image
compression, or other options.
Controlling PDF content and quality
For more control over the content and quality of the resulting PDF, use File > Export as PDF. The
PDF Options dialog opens. This dialog has five pages (General, Initial View, User Interface, Links,
and Security). Select the appropriate settings, and then click Export. On the Export dialog, enter
the location and file name of the PDF to be created, then click Export to export the file.
Exporting to PDF 14

General page of PDF Options dialog
On the General page (Figure 14), you can choose which pages to include in the PDF, the type of
compression to use for images (which affects the quality of images in the PDF), and other options.
Range section
• All: Exports the entire document.
• Pages: To export a range of pages, use the format 3-6 (pages 3 to 6). To export single
pages, use the format 7;9;11 (pages 7, 9, and 11). You can also export a combination of
page ranges and single pages, by using a format like 3-6;8;12.
• Selection: Exports whatever material is selected.
Images section
• Lossless compression: Images are stored without any loss of quality. Tends to make
large files when used with photographs. Recommended for other kinds of images or
graphics.
• JPEG compression: Allows for varying degrees of quality. A setting of 90% works well with
photographs (small file size, little perceptible loss of quality).
• Reduce image resolution: Lower-DPI (dots per inch) images have lower quality. For
viewing on a computer screen generally a resolution of 72dpi (for Windows) or 96dpi
(GNU/Linux) is sufficient, while for printing it is generally preferable to use at least 300 or
600 dpi, depending on the capability of the printer. Higher dpi settings greatly increase the
size of the exported file.
Note
EPS (Encapsulated PostScript) images with embedded previews are exported only
as previews. EPS images without embedded previews are exported as empty
placeholders.
Figure 14: General page of PDF Options dialog
Exporting to PDF 15

Watermark section
• Sign with Watermark: When this option is selected, a transparent overlay of the text you
enter into the Watermark Text box will appear on each page of the PDF.
General section
• Embed OpenDocument file: Use this setting to export the document as a PDF file
containing two file formats: PDF and ODF. In PDF viewers it behaves like a normal PDF
file, and it remains fully editable in LibreOffice.
• PDF/A-1a: PDF/A-1a is an ISO standard for long-term preservation of documents, by
embedding all the information necessary for faithful reproduction (such as fonts) while
forbidding other elements (including forms, security, and encryption). PDF tags are written.
If you select PDF/A-1a, the forbidden elements are grayed-out (not available).
• Tagged PDF: Tagged PDF contains information about the structure of the document’s
contents. This can help to display the document on devices with different screens, and
when using screen reader software. Some tags that are exported are table of contents,
hyperlinks, and controls. This option can increase file sizes significantly.
• Create PDF form – Submit format: Choose the format of submitting forms from within the
PDF file. This setting overrides the control’s URL property that you set in the document.
There is only one common setting valid for the whole PDF document: PDF (sends the
whole document), FDF (sends the control contents), HTML, and XML. Most often you will
choose the PDF format.
• Export bookmarks: Creates PDF bookmarks (a table of contents list displayed by most
PDF viewers, including Adobe Reader) for all headings in the document.
• Export comments: Exports comments as PDF notes. You may not want this!
• Export automatically inserted blank pages: If selected, automatically inserted blank
pages are exported to the PDF. This is best if you are printing the PDF double-sided. For
example, books usually have chapters set to always start on an odd-numbered (right-hand)
page. When the previous chapter ends on an odd page, LibreOffice inserts a blank page
between the two odd pages. This option controls whether to export that blank page.
Earlier versions of LibreOffice had the option:
• Embed standard fonts: Normally the 14 standard PostScript fonts were not embedded in
a PDF file, because PDF reader software already contained these fonts. However, you
could choose to embed these fonts in all PDF documents created by LibreOffice to
enhance display accuracy in PDF viewers.
The PostScript fonts are now embedded by default.
Initial View page of PDF Options dialog
On the Initial View page, you can choose how the PDF opens by default in a PDF viewer. The
selections should be self-explanatory.
If you have Complex Text Layout enabled (in Tools > Options > Language settings >
Languages), an additional selection is available under Continuous facing: First page is left
(normally, the first page is on the right when using the Continuous facing option).
Exporting to PDF 16
Figure 15: Initial View page of PDF Options dialog
User Interface page of PDF Options dialog
On the User Interface page, you can choose more settings to control how a PDF viewer displays
the file. Some of these choices are particularly useful when you are creating a PDF to be used as a
presentation or a kiosk-type display.
Window options section
• Resize window to initial page. Causes the PDF viewer window to resize to fit the first
page of the PDF.
• Center window on screen. Causes the PDF viewer window to be centered on the
computer screen.
• Open in full screen mode. Causes the PDF viewer to open full-screen instead of in a
smaller window.
• Display document title. Causes the PDF viewer to display the document’s title in the title
bar.
Figure 16: User Interface page of PDF Options dialog
Exporting to PDF 17

User interface options section
• Hide menu bar. Causes the PDF viewer to hide the menu bar.
• Hide toolbar. Causes the PDF viewer to hide the toolbar.
• Hide window controls. Causes the PDF viewer to hide other window controls.
Bookmarks
Select how many heading levels are displayed as bookmarks, if Export bookmarks is selected
on the General page.
Links page of PDF Options dialog
On the Links page, you can choose how links in documents are exported to PDF.
Figure 17: Links page of PDF Options dialog
Export bookmarks as named destinations
If you have defined Writer bookmarks, this option exports them as “named destinations” to
which Web pages and PDF documents can link.
Convert document references to PDF targets
If you have defined links to other documents with OpenDocument extensions (such as .odt,
.ods, and .odp), this option converts the files names to .pdf in the exported PDF document.
Export URLs relative to the file system
If you have defined relative links in a document, this option exports those links to the PDF.
Cross-document links
Set up the behavior of the PDF links to other files. Select one among the following alternatives:
• Default mode: The PDF links will be handled as specified in your operating system.
• Open with PDF reader application: Use the same application used to display the PDF
document to open linked PDF documents.
• Open with Internet browser: Use the default Internet browser to display linked PDF
documents.
Security page of PDF Options dialog
PDF export includes options to encrypt the PDF (so it cannot be opened without a password) and
apply some digital rights management (DRM) features.
• With an open password set, the PDF can only be opened with the password. Once opened,
there are no restrictions on what the user can do with the document (for example, print,
copy, or change it).
Exporting to PDF 18
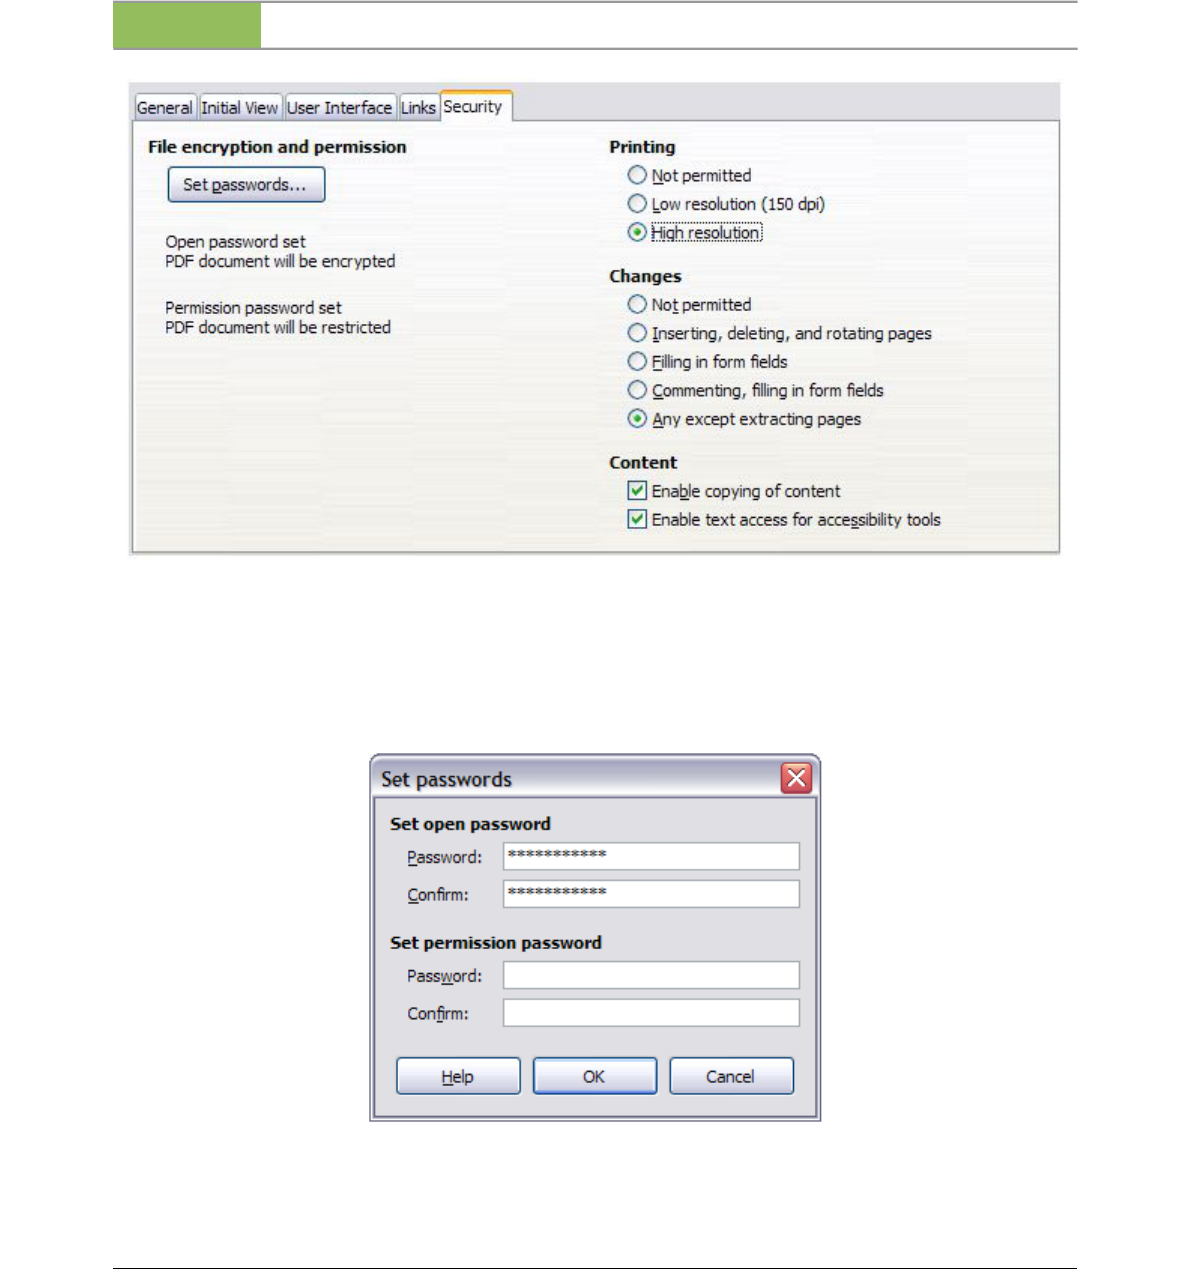
• With a permissions password set, the PDF can be opened by anyone, but its permissions
can be restricted. See Figure 18. After you set a password for permissions, the other
choices on the Security page become available.
• With both the open password and permission password set, the PDF can only be opened
with the correct password, and its permissions can be restricted.
Note
Permissions settings are effective only if the user’s PDF viewer respects the settings.
Figure 18: Security page of PDF Options dialog with passwords set
Figure 19 shows the pop-up dialog displayed when you click the Set passwords button on the
Security page of the PDF Options dialog.
Once you have set all the options you require, click on Export to open the Export dialog, where
you can set the file name and the save location.
Figure 19: Setting a password to encrypt a PDF
Exporting to PDF 19

Note
Another choice is to use File > Export. This opens the Export dialog. Select the
PDF file format, file name and location and click Export. This then opens the PDF
Options dialog, as described above. Click Export when all the selections have been
made.
Exporting to XHTML
LibreOffice uses the term “export” for some file operations involving a change of file type.
LibreOffice can export files to XHTML. Other formats may be made available through extensions.
To export to XHTML, choose File > Export. On the Export dialog, specify a file name for the
exported document, then select the XHTML in the File format list and click the Export button.
Figure 20: Export file formats
E-mailing Writer documents
LibreOffice provides several ways to send a Writer document quickly and easily as an e-mail
attachment in one of three formats: ODT (OpenDocument Text, Writer’s default format), DOC
(Microsoft Word format), or PDF.
Note
Documents can only be sent from the LibreOffice mail merge wizard if a mail profile
has been set up in Tools > Option > LibreOffice Writer > Mail Merge E-mail.
To send the current document in ODT format, choose:
1) File > Send > Document as E-mail, or File > Send > E-mail as OpenDocument Text.
Writer opens your default e-mail program. The document is attached.
2) In your e-mail program, enter the recipient, subject, and any text you want to add, then
send the e-mail.
If you choose E-mail as Microsoft Word, Writer first creates a DOC file and then opens your
e-mail program with the DOC file attached. Similarly, if you choose E-mail as PDF, Writer opens
the PDF Options dialog where you can select the settings you want, then creates a PDF and then
opens your email program with the PDF file attached.
E-mailing a document to several recipients
To e-mail a document to several recipients, you can use the features in your e-mail program or you
can use LibreOffice’s mail merge facilities to extract email addresses from an address book.
You can use LibreOffice’s mail merge to send e-mail in two ways:
• Use the Mail Merge Wizard to create the document and send it. See Chapter 11, Using Mail
Merge, for details.
E-mailing Writer documents 20
• Create the document in Writer without using the Wizard, then use the Wizard to send it.
This method is described here.
To use the Mail Merge Wizard to send a previously-created Writer document:
1) Open the document in Writer. Click Tools > Mail Merge Wizard. On the first page of the
wizard, select Use the current document and click Next.
Figure 21: Select starting document
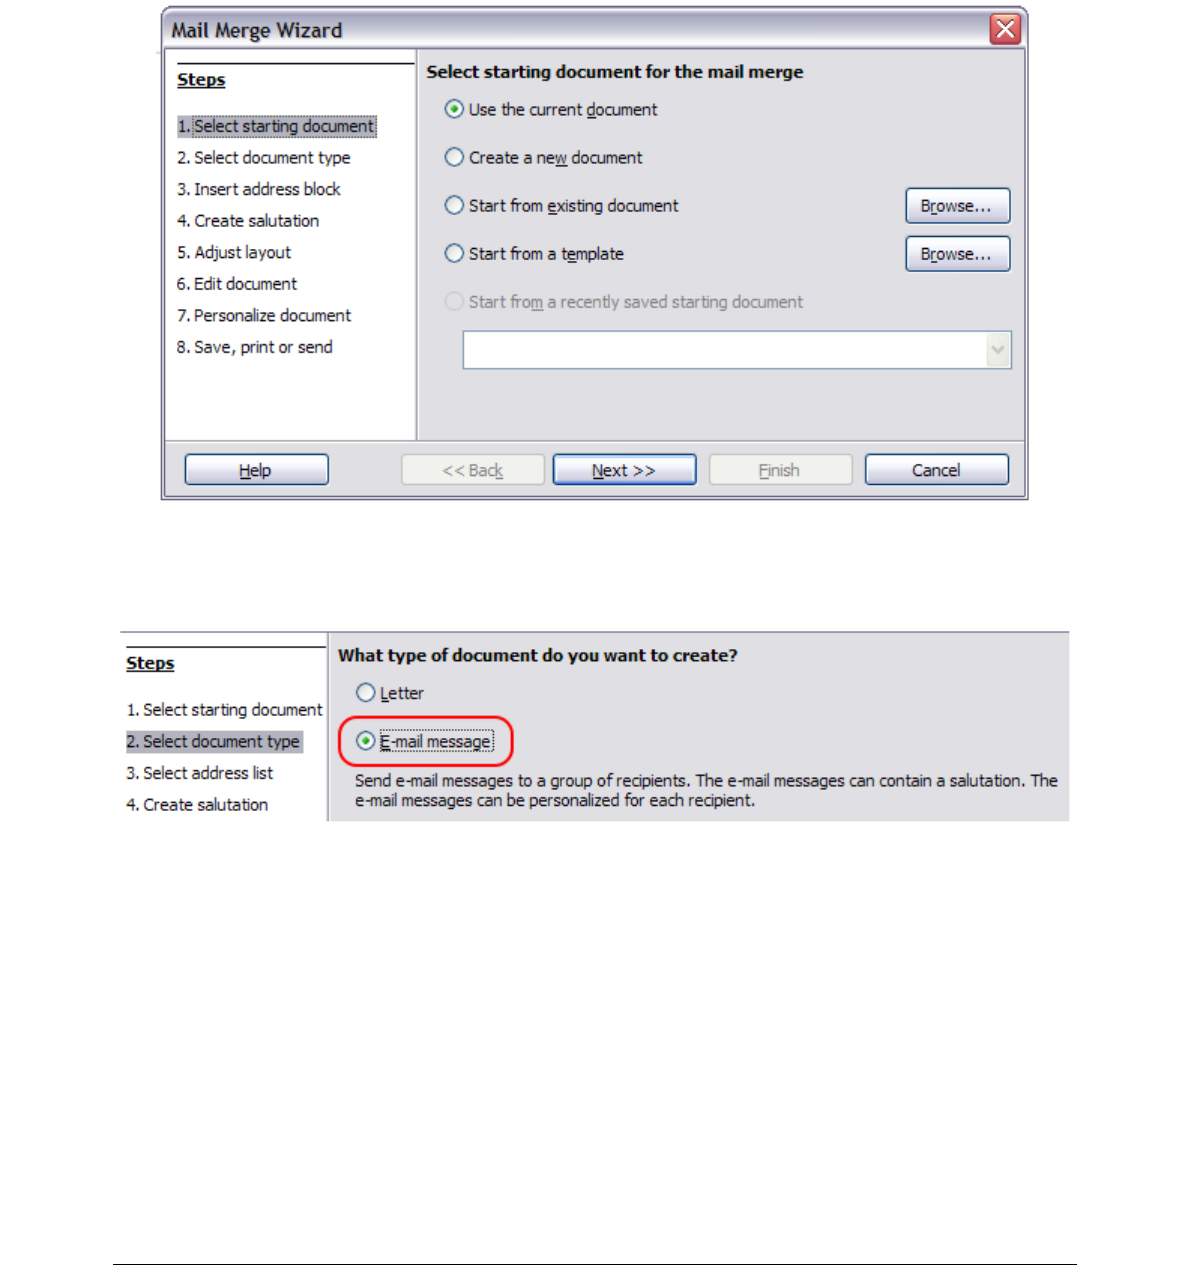
2) On the second page, select E-mail message for the type of document to create and click
Next.
Figure 22: Select document type
3) On the third page, click the Select Address List button. Select the required address list
(even if only one is shown) and then click OK. (If the address list you need is not shown
here, you can click Add to find and add it to the list.)
E-mailing Writer documents 21
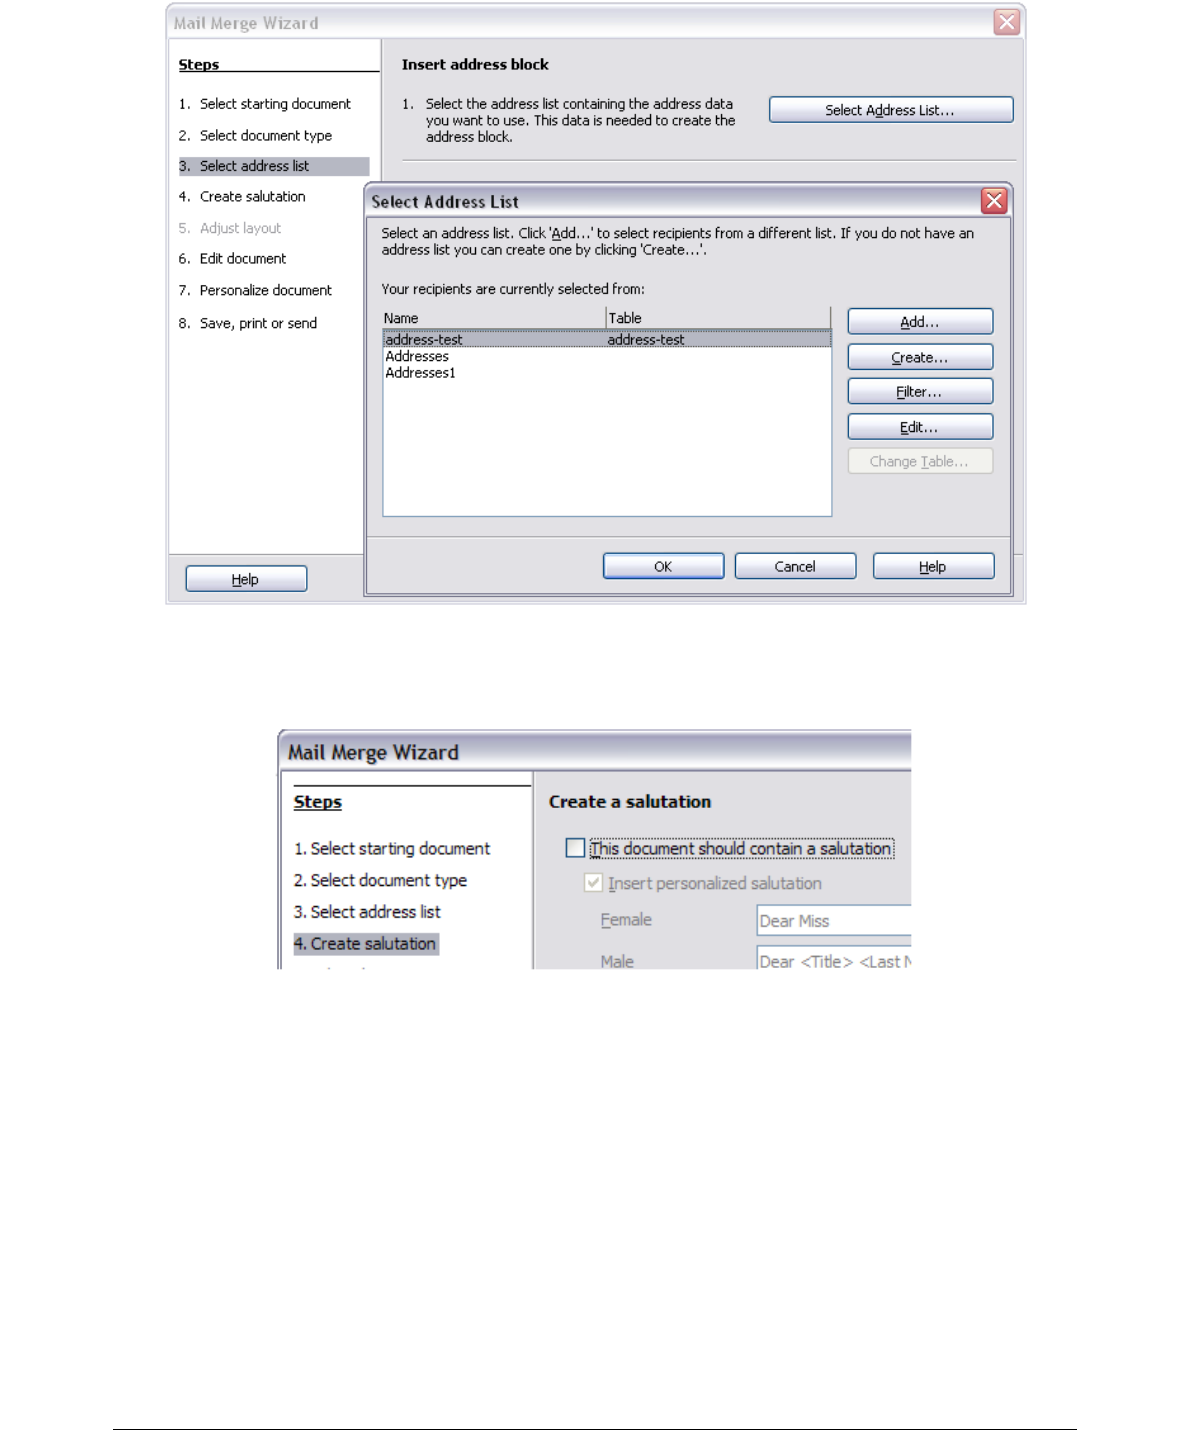
Figure 23: Selecting an address list
4) Back on the Select address list page, click Next. On the Create salutation page, deselect
the checkbox by This document should contain a salutation.
Figure 24: Deselecting a salutation
5) In the left-hand list, click Step 8. Save, print or send. LibreOffice displays a “Creating
documents” message and then displays the Save, print or send page of the Wizard.
6) Select Send merged document as E-Mail. The lower part of the page changes to show
e-mail settings choices.
7) Type a subject for your email and click Send documents. LibreOffice sends the e-mails.
E-mailing Writer documents 22
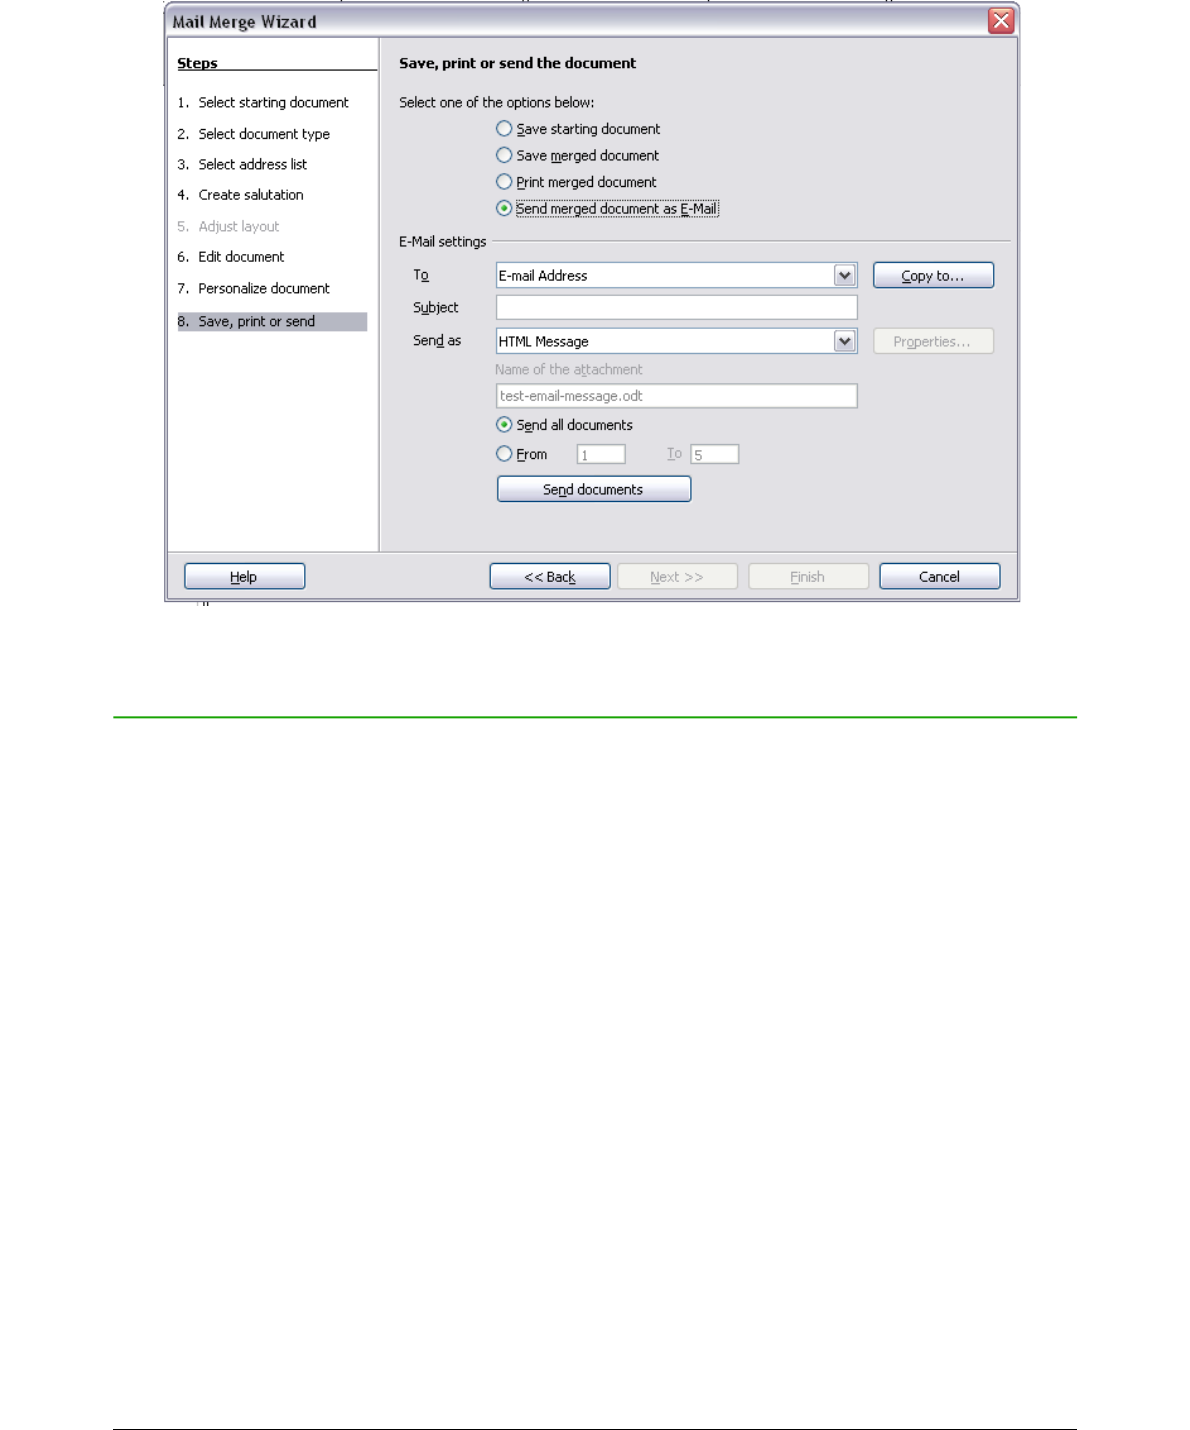
Figure 25: Sending a document as an email message
Digital signing of documents
To sign a document digitally, you need a personal key, also known as a certificate. A personal key
is stored on your computer as a combination of a private key, which must be kept secret, and a
public key, which you add to your documents when you sign them. You can get a certificate from a
certification authority, which may be a private company or a governmental institution.
When you apply a digital signature to a document, a kind of checksum is computed from the
document’s content plus your personal key. The checksum and your public key are stored together
with the document.
When someone later opens the document on any computer with a recent version of LibreOffice,
the program will compute the checksum again and compare it with the stored checksum. If both
are the same, the program will signal that you see the original, unchanged document. In addition,
the program can show you the public key information from the certificate. You can compare the
public key with the public key that is published on the web site of the certificate authority.
Whenever someone changes something in the document, this change breaks the digital signature.
On Windows operating systems, the Windows features of validating a signature are used. On
Solaris and Linux systems, files that are supplied by Thunderbird, Mozilla or Firefox are used. For
a more detailed description of how to get and manage a certificate, and signature validation, see
“Digital Signatures” in the LibreOffice Help.
To sign a document:
1) Choose File > Digital Signatures.
2) If you have not saved the document since the last change, a message box appears. Click
Yes to save the file.
3) The Digital Signatures dialog opens. Click Sign Document to add a public key to the
document.
Digital signing of documents 23
4) In the Select Certificate dialog, select your certificate and click OK to return to the Digital
Signatures dialog.
5) The certificate used is displayed in the dialog with an icon next to its name.
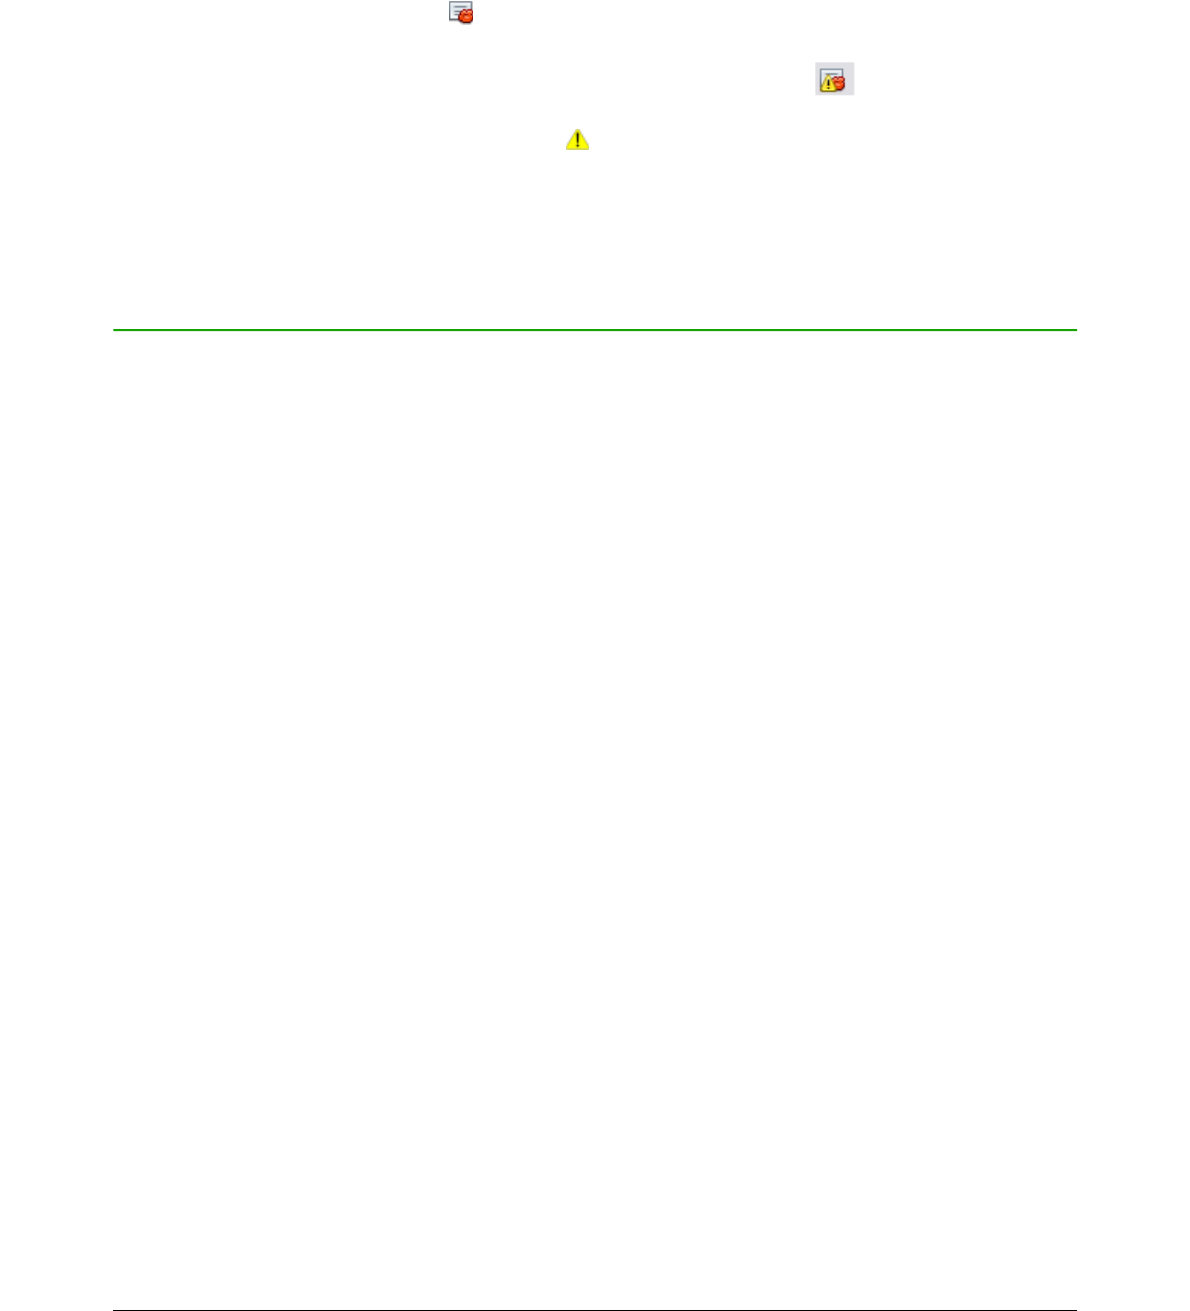
This icon indicates the status of the digital signature.
• An icon with a red seal indicates that the document was signed and the certificate
was validated.
• An icon with a yellow caution triangle overlaying the red seal indicates that the
document is signed but that the certificate could not be validated.
• An icon of a yellow caution triangle indicates an invalid digital signature.
6) Click Close to apply the digital signature.
A signed document shows an icon in the status bar. You can double-click the icon to view the
certificate. More than one signature can be added to a document.
Removing personal data
You may wish to ensure that personal data, versions, comments, hidden information, or recorded
changes are removed from files before you send them to other people or create PDFs from them.
In Tools > Options > LibreOffice > Security > Options, you can set LibreOffice to remind (warn)
you when files contain certain information and remove personal information automatically on
saving.
To remove personal and some other data from a file, go to File > Properties. On the General tab,
uncheck Apply user data and then click the Reset button. This removes any names in the created
and modified fields, deletes the modification and printing dates, and resets the editing time to zero,
the creation date to the current date and time, and the version number to 1.
To remove version information, either (a) go to File > Versions, select the versions from the list
and click Delete, or (b) use Save As and save the file with a different name.
Removing personal data 24
